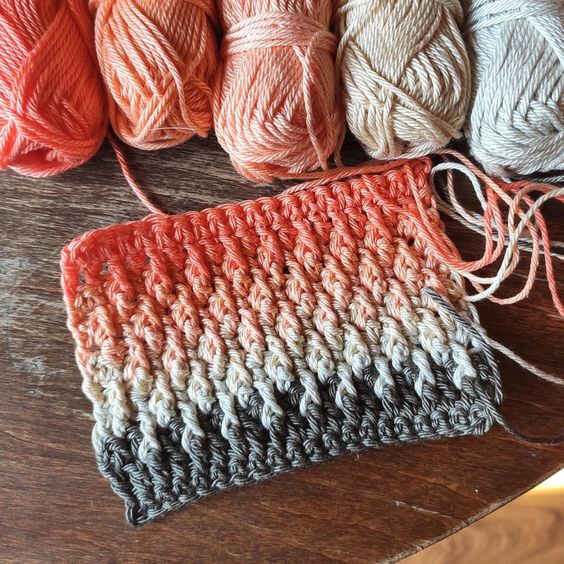
The Alpine Stitch is a beautifully textured crochet stitch that creates a stunning, almost three-dimensional pattern. It combines basic stitches like single crochet, double crochet, and front post double crochet to achieve a fabric with a rich, woven appearance. This stitch is ideal for blankets, scarves, and other cozy projects.
Materials Needed
- Yarn of your choice (medium-weight yarn works best for beginners)
- Suitable crochet hook (check the yarn label for recommendations)
- Scissors
- Tapestry needle (for weaving in ends)
Step-by-Step Instructions
Step 1: Foundation Chain
Begin by chaining an even number of stitches. The Alpine Stitch works best with a multiple of two, plus an additional stitch for the turning chain.
Step 2: Row 1 – Single Crochet Foundation
Work a single crochet (SC) into the second chain from the hook and continue placing one SC in each chain across. This forms the foundation row.
Step 3: Row 2 – Double Crochet Row
- Chain two (this counts as your first double crochet).
- Work a double crochet (DC) into each stitch across the row.
- Turn your work.
Step 4: Row 3 – Introducing Front Post Double Crochet (FPDC)
- Chain one (this does NOT count as a stitch).
- Work a single crochet into the first stitch.
- In the next stitch, work a front post double crochet (FPDC):
- Yarn over.
- Insert your hook around the post of the double crochet from the previous row (instead of into the top of the stitch).
- Complete a double crochet as usual.
- Alternate single crochet and FPDC across the row.
- Finish with a single crochet in the last stitch, then turn your work.
Step 5: Row 4 – Double Crochet Row
- Chain two (counts as the first DC).
- Work a double crochet in each stitch across the row.
- Turn your work.
Step 6: Row 5 – Alternating the FPDC Placement
- Chain one, then work a single crochet in the first stitch.
- Instead of working an FPDC over the previous row’s FPDC, place the FPDC over the next available DC stitch from two rows below (this creates the raised Alpine texture).
- Alternate SC and FPDC across the row, ending with a single crochet in the last stitch.
- Turn your work.

Repeat the Pattern
Repeat Rows 4 and 5 until your project reaches the desired length. The Alpine Stitch will develop its signature raised texture as you continue.

Finishing Touches
Once you reach the final row, finish with a row of single crochet stitches for a clean edge. Fasten off and weave in loose ends using a tapestry needle.
Tips for Success
- Maintain consistent tension to keep your stitches even.
- Use a light-colored yarn when learning, so you can easily see the stitches.
- Practice front post stitches separately if you’re new to them.
The Alpine Stitch is an excellent choice for adding depth and sophistication to your crochet projects. Enjoy experimenting with different colors and yarn weights to create unique textures!
VIDEO TUTORIAL:
Esteemed reader, I am delighted to extend to you the opportunity to access a meticulously crafted video tutorial. This instructional gem unveils the artful intricacies of the Alpine stitch—a technique that exudes both elegance and texture in crochet craftsmanship.
Designed with clarity and precision, this tutorial simplifies the learning curve, ensuring that even those unacquainted with the stitch can grasp its nuances effortlessly. Brought to you by the esteemed Bella Coco YouTube channel, this visual guide offers an immersive learning experience. You can indulge in this enlightening demonstration by watching the video below:
Would you like me to add images or video references? 😊