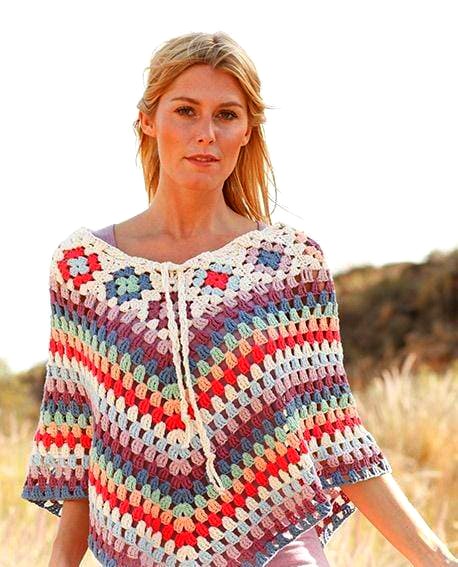
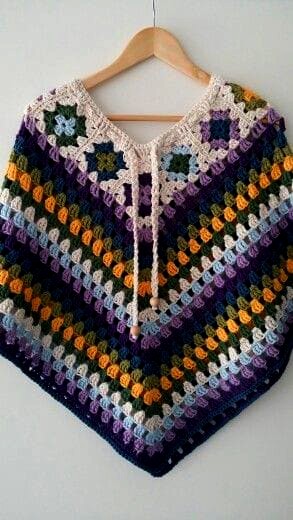
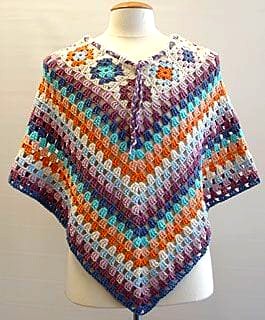
A classic granny poncho is a cozy and stylish accessory that’s perfect for chilly days. This pattern follows a simple granny stitch design and can be adjusted for different sizes, colors, and textures.
Materials Needed
Before you begin, gather the following materials:
- Yarn: Worsted weight yarn (#4) or any yarn of your choice
- Crochet Hook: 5.5mm (I-9) or the size needed for gauge
- Scissors
- Yarn Needle (for weaving in ends)
- Measuring Tape (optional, to ensure the correct size)
Abbreviations (US Terms)
- ch – Chain
- sl st – Slip stitch
- dc – Double crochet
- sp – Space
- st(s) – Stitch(es)
- rep – Repeat
Gauge
- 4” x 4” (10cm x 10cm) = 14 dc stitches x 7 rows
- Gauge is not crucial for this pattern but should be consistent.

Instructions
Step 1: Foundation Chain (Creating the Neck Opening)
- Start by making a foundation chain. Ch 80 (or any multiple of 4) to create a loose neckline that fits over your head.
- Join with a sl st to the first ch to form a ring, making sure it’s not twisted.
💡 Tip: If you want a larger or smaller neckline, adjust the number of chains accordingly, keeping it a multiple of 4.
Step 2: Establishing the Granny Stitch Pattern
-
Round 1:
- Ch 3 (counts as first dc), 2 dc in the same ch.
- Skip 3 ch, 3 dc in next ch.
- Repeat * around the ring.
- Join with a Sl St to the top of the ch 3.
-
Round 2:
- Sl st to the next sp.
- Ch 3 (counts as first dc), 2 dc in the same sp.
- 3 dc in next sp. Repeat * to the front center.
- At the center front point, (3 dc, ch 2, 3 dc) in the same sp.
- Continue 3 dc in each sp to the back center point.
- At the center back point, (3 dc, ch 2, 3 dc) in the same sp.
- Continue working 3 dc clusters around.
- Join with a Sl St to the top of ch 3.
-
Round 3 & Beyond:
- Repeat Round 2, always working (3 dc, ch 2, 3 dc) at the front and back points to maintain the poncho’s shape.
- Keep repeating rounds until you reach your desired length.
Size Adjustments & Customization
- For a longer poncho: Continue adding rounds until you reach your desired length.
- For a looser fit: Start with a larger foundation chain (e.g., 88, 92, 96, etc.), keeping it a multiple of 4.
- For a snugger fit: Reduce the foundation chain.
- For a striped effect: Change colors every few rounds for a colorful design.
Optional Edging & Finishing Touches
Scalloped Edging (Optional):
If you want a decorative edge, follow these steps:
- Attach a new color (or use the same yarn).
- Ch 1, sc in next st, skip 1 st, 5 dc in the next st, skip 1 st, sc in the next st.
- Repeat * around the poncho and fasten off.
Adding Fringe (Optional):
- Cut strands of yarn about 10” long.
- Attach fringe to every other stitch along the bottom using a lark’s head knot.
Weaving in Ends:
- Use a yarn needle to weave in any loose ends securely.
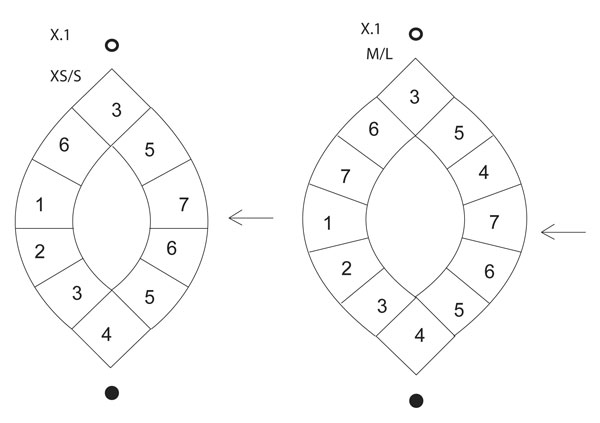
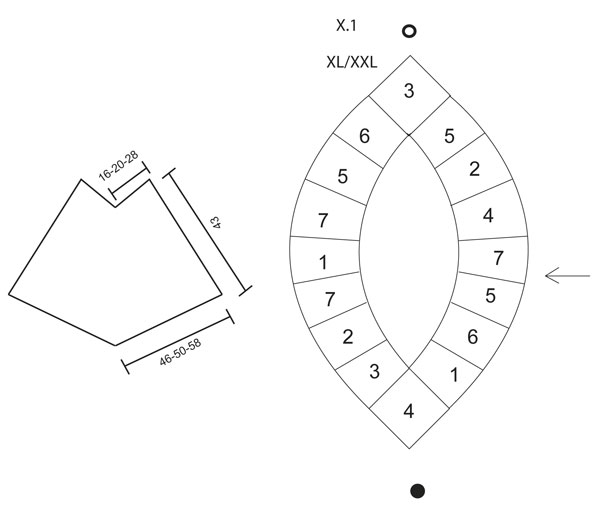
Diagram
All measurements in charts are in cm.
 |
= Start here (right shoulder) |
 |
= mid front |
 |
= mid back |
Care Instructions
- Washing: Hand wash in cold water or use a gentle cycle.
- Drying: Lay flat to dry to maintain shape.
- Storage: Fold neatly or hang on a wide hanger.
Dear reader, did you like this pattern and want it in PDF? You can access the PDF here below:
Access the PDF/ Granny Poncho Crochet Pattern
Final Notes
This granny poncho is a versatile piece that works well for casual wear or layering over dresses and tops. Customize it with different yarn colors, textures, and embellishments for a unique look.
Enjoy making your cozy poncho! Let me know if you need additional modifications. 😊