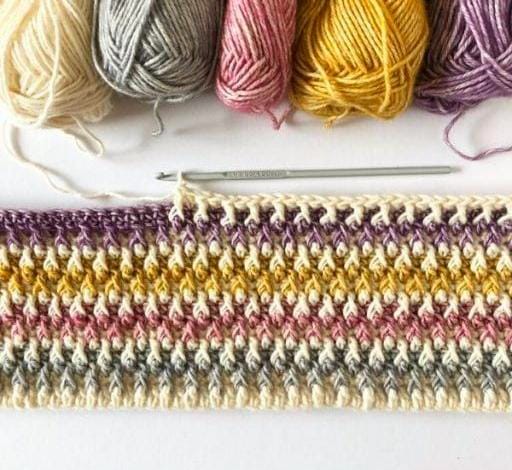
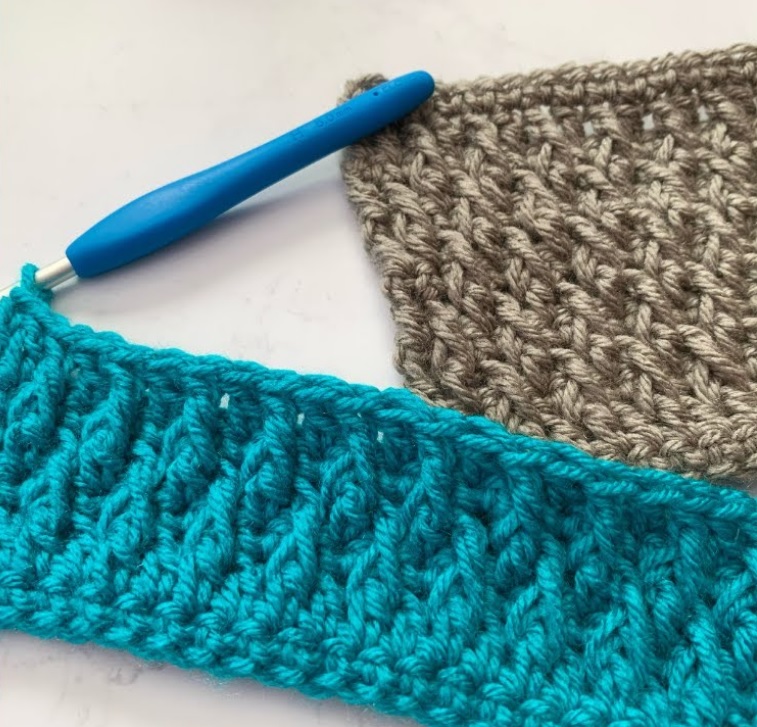
The Alpine Stitch is a stunning, textured crochet pattern that creates a raised, diamond-like effect. It’s an excellent choice for blankets, scarves, sweaters, and other cozy projects. The unique texture is achieved by alternating basic stitches with front post double crochets (fpdc), which create depth and dimension.
This stitch may look complex, but it is easy to master once you understand the pattern’s rhythm. The key to this pattern is the combination of single crochet (sc), double crochet (dc), and front post double crochet (fpdc).
Materials Needed
Before getting started, gather the following supplies:
- Yarn: Any weight yarn works, but a medium-weight (worsted) yarn is recommended for beginners.
- Hook: Use a crochet hook that suits your yarn weight (usually suggested on the yarn label).
- Scissors: For trimming excess yarn.
- Tapestry Needle: To weave in ends for a neat finish.
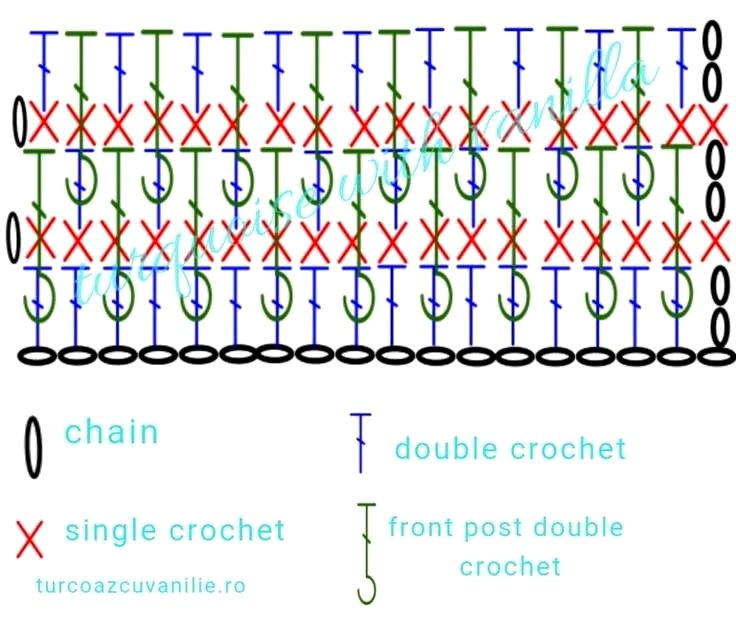
Understanding the Stitches
Basic Stitch Abbreviations (US Terms)
- ch – Chain
- sc – Single Crochet
- dc – Double Crochet
- fpdc – Front Post Double Crochet
Special Stitches
- Front Post Double Crochet (fpdc): Instead of inserting your hook into the top of a stitch, insert it around the front post of the stitch from two rows below. This creates the textured effect of the Alpine Stitch.
Step-by-Step Instructions
Step 1: Crochet the Foundation Chain
- Start by chaining an even number of stitches.
- The number of chains will determine the width of your project.
- Example: For a small sample swatch, chain 22 (or any even number).
Step 2: Row 1 – Single Crochet Across
- Start by making one single crochet (sc) in the second chain from the hook.
- Continue making single crochets in each chain across the row.
- Turn in your work when you reach the end.
(Tip: The first row of single crochets helps create a solid foundation for the Alpine Stitch pattern.)
Step 3: Row 2 – Double Crochet Row
- Ch 2 (counts as the first double crochet).
- Make one double crochet (dc) in each stitch across the row.
- Turn your work.
Step 4: Row 3 – Single Crochet Row
- Ch 1 (does NOT count as a stitch).
- Make one single crochet (sc) in each stitch across the row.
- Turn your work.
Step 5: Row 4 – Start the Alpine Texture with Front Post Stitches
- Ch 2 (counts as the first double crochet).
- Front Post Double Crochet (fpdc) around the next dc from two rows below.
- Double crochet in the next stitch (working in the normal top loops).
- Repeat (fpdc around the post of the dc from two rows below, then dc in the next stitch) across the row.
- End with a regular double crochet in the last stitch.
- Turn your work.
Step 6: Row 5 – Single Crochet Row
- Ch 1 (does NOT count as a stitch).
- Make one single crochet (sc) in each stitch across the row.
- Turn your work.
Step 7: Row 6 – Alternating Front Post Stitches
- Ch 2 (counts as the first double crochet).
- Double crochet in the first stitch.
- Front Post Double Crochet (fpdc) around the next dc from two rows below.
- Repeat (dc in next stitch, fpdc in next stitch from two rows below) across the row.
- End with a regular double crochet in the last stitch.
- Turn your work.
Step 8: Continue the Pattern Repeat
- Repeat Rows 3–6 until you reach your desired length.
- The Alpine Stitch pattern is made up of alternating fpdc and DC rows separated by single crochet rows.
Pattern Summary
- Foundation Row: Chain an even number.
- Row 1: Single crochet across. Turn.
- Row 2: Double crochet across. Turn.
- Row 3: Single crochet across. Turn.
- Row 4: Ch 2, fpdc around the dc two rows below, dc in next stitch, repeat across. Turn.
- Row 5: Single crochet across. Turn.
- Row 6: Ch 2, dc in first stitch, fpdc in next dc from two rows below, repeat across. Turn.
- Repeat Rows 3-6 until the piece reaches the desired length.
Tips for Success
- Keep your tension consistent: The fpdc stitches can tighten your work, so make sure your stitches stay even.
- Use stitch markers: If you’re making a large project, stitch markers can help you keep track of rows.
- Block your work: This stitch looks even better after blocking, as it helps define the texture.
- Experiment with colors: The Alpine Stitch looks amazing in solid colors, but it can also be worked with variegated yarn for a unique look.
Common Mistakes and How to Fix Them
1. The Alpine Stitch Looks Uneven
- This usually happens if the fpdc stitches are too tight or too loose.
- Make sure to pull up your yarn slightly when making a fpdc to match the height of your DC stitches.
2. Losing Track of Front Post Stitches
- Double-check that your fpdc stitches are wrapping around the correct stitch from the two rows below.
- If needed, count your stitches to ensure everything aligns properly.
3. Edges Look Uneven
- Make sure to always place a regular dc in the last stitch of fpdc rows.
- If your edges are still uneven, consider adding a border to neaten up the sides.
Project Ideas Using the Alpine Stitch
- Cozy blankets – The thick texture makes it perfect for warm afghans.
- Scarves & cowls – The stitch creates a beautiful, elegant look for accessories.
- Sweaters & cardigans – Great for adding dimension to wearable projects.
- Pillows & home décor – The raised texture adds depth to decorative pieces.
Video Tutorial:
1. Beginner-Friendly Tutorial: CROCHET ALPINE STITCH / BEGINNER by Claudetta Crochet “Crochet for BEGINNERS” offers a straightforward guide suitable for new crocheters.
2. In-Depth Stitch Explanation: HOW to CROCHET ALPINE STITCH – Stitchorama by Naztazia provides a comprehensive look at the stitch, ideal for those seeking a deeper understanding.
3. Step-by-Step Guide: CROCHET: ALPINE STITCH – Bella Coco offers a detailed walkthrough, perfect for visual learners who appreciate clear instructions.
Final Thoughts
The Alpine Stitch is a beautiful and beginner-friendly way to add texture to crochet projects. Once you get into the rhythm of alternating front posts and regular stitches, it becomes an easy, meditative pattern to work on.