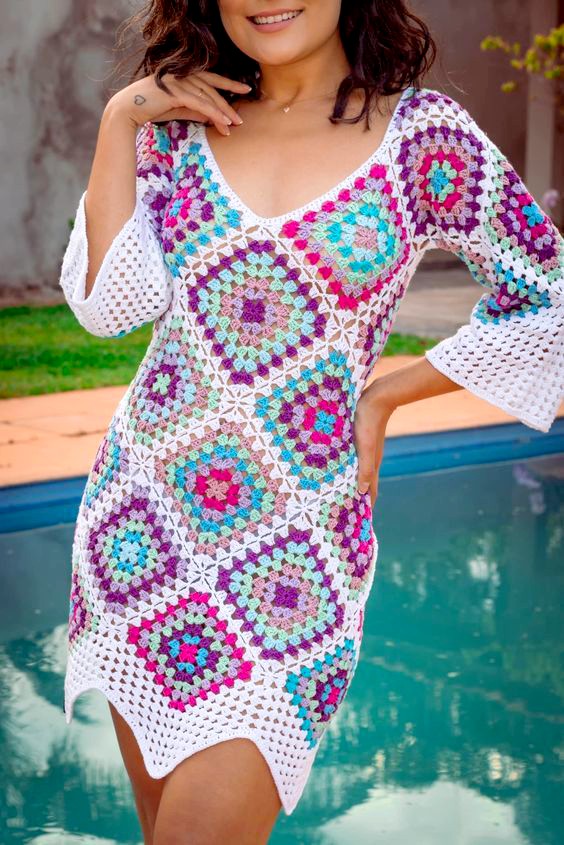
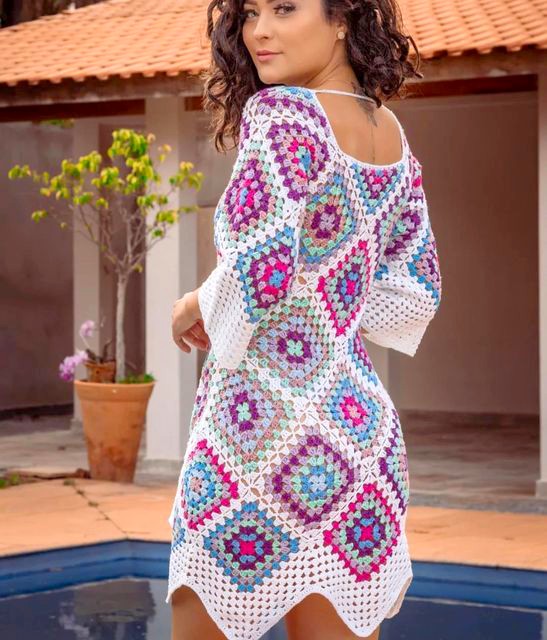
Crocheting a dress with granny squares is a wonderful way to create a unique, handmade piece that combines classic techniques with modern fashion. Granny squares are timeless motifs in crochet, known for their versatility and charm. With the right combination of colors, patterns, and techniques, you can make a stunning dress suitable for any season.
1. Choosing the Right Materials
Before you start, it’s essential to gather the right materials for your project.
Yarn Selection
The type of yarn you choose will determine the texture, weight, and overall appearance of the dress. Here are some yarn options:
-
Cotton Yarn: Ideal for summer dresses; breathable and lightweight.
-
Acrylic Yarn: Affordable and easy to work with; suitable for cooler weather.
-
Wool Yarn: Provides warmth and structure, perfect for winter.
-
Blended Yarn: A mix of fibers offering durability and flexibility.
Consider selecting lightweight (sport, DK, or worsted weight) yarn to ensure your dress isn’t too heavy or bulky.
Hook Size
The hook size depends on the yarn weight, but generally, a 4mm to 5mm hook is a good choice. Check the yarn label for recommendations.
Additional Tools
-
Scissors – For cutting yarn.
-
Tapestry Needle – For weaving in ends and sewing pieces together.
-
Measuring Tape – To ensure accurate sizing.
-
Blocking Mat & Pins – To shape granny squares evenly before assembling.
2. Designing Your Granny Square Dress
There are many ways to design a dress using granny squares. You can choose a loose, flowy design for a bohemian vibe or a fitted, structured style for a more elegant look.
Dress Length Options
-
Mini Dress: Ends above the knees, great for summer or beachwear.
-
Midi Dress: A more modest, versatile choice that reaches mid-calf.
-
Maxi Dress: Floor-length for a dramatic and stylish effect.
Sleeve Styles
-
Sleeveless / Halter Neck: Perfect for warm weather and layering.
-
Short Sleeves: Gives a casual, everyday look.
-
Long Sleeves: Ideal for cooler seasons.
Neckline Styles
-
V-Neck: Feminine and elongates the torso.
-
Round Neck: A classic, comfortable choice.
-
Off-the-Shoulder: Boho and stylish.
Color Choices
-
Monochrome: Different shades of one color for an elegant effect.
-
Bright & Colorful: Vibrant squares for a playful, eye-catching design.
-
Neutral Tones: Earthy colors for a sophisticated, wearable look.
3. Creating Granny Squares
Basic Granny Square Pattern
-
Start with a magic ring (or chain 4, slip stitch to form a ring).
-
Round 1: Chain 3 (counts as a double crochet), work 2 double crochets into the ring, chain 2, 3 double crochets, chain 2 (repeat 3 times), slip stitch to join.
-
Round 2: Slip stitch to the first chain-2 space, chain 3, 2 double crochets, chain 2, 3 double crochets (corner made), repeat for all corners.
-
Round 3+: Continue the pattern by adding clusters in corners and along edges.
You can make as many rounds as needed to achieve the desired square size.
Number of Squares Needed
The number of squares depends on your dress size and design. Create a mock layout to determine how many squares are required for the front, back, and sleeves.
4. Joining the Granny Squares
Once all your granny squares are ready, it’s time to assemble the dress.
Joining Methods
-
Slip Stitch Join: Seamless and flat.
-
Single Crochet Join: Creates a raised, decorative seam.
-
Whip Stitch (Sewing): Invisible and clean.
Assembly Steps
-
Lay Out the Pieces: Arrange the squares in the shape of your dress.
-
Join the Front and Back Panels: Sew or crochet the squares together to form two large panels.
-
Attach the Shoulders and Sides: Leave openings for the arms and neckline.
-
Add Sleeves (Optional): Connect squares to make sleeves and attach them.
5. Adding Finishing Touches
Edging & Borders
Adding a border around the dress gives it a polished look. Some popular edging stitches:
-
Picot Edge: A delicate, decorative finish.
-
Scalloped Edge: Soft and feminine.
-
Shell Stitch: Adds texture and elegance.
Shaping & Adjustments
-
If the dress is too loose, add a waist belt or elastic band to define the shape.
-
If the neckline is too wide, add extra rows or a lace-up detail.
-
Adjust sleeve length by adding or removing squares.
Blocking the Dress
Blocking helps shape the dress and smooth out stitches.
-
Dampen the fabric slightly with water.
-
Pin it to a blocking mat in the desired shape.
-
Let it dry completely before wearing.
6. Styling Your Crochet Granny Square Dress
Now that your dress is complete, here are some styling ideas:
-
Casual Look: Pair with sandals and a sunhat for a summer day out.
-
Boho Chic: Wear with ankle boots, layered jewelry, and a denim jacket.
-
Elegant Evening: Add high heels, a belt, and statement earrings.
-
Winter Styling: Layer over leggings and a turtleneck with knee-high boots.
Final Thoughts
Making a crochet dress using granny squares is a rewarding project that allows for endless creativity. Whether you want a simple summer dress or a detailed masterpiece, this technique offers versatility, beauty, and handmade charm.