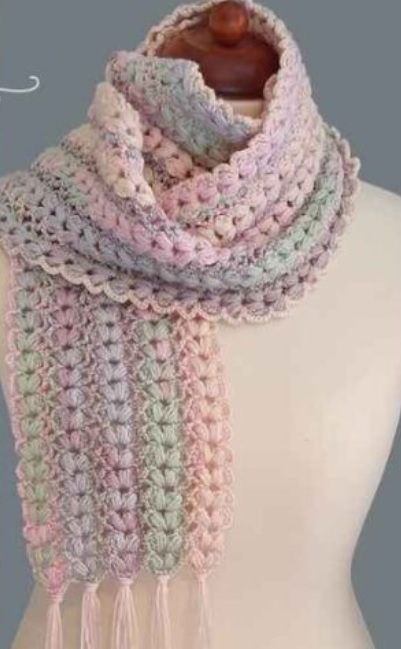
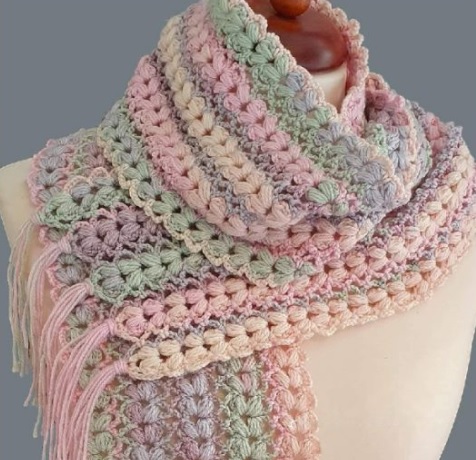
This scarf combines the texture of the puff stitch with the elegance of the mile-a-minute crochet technique, where one long strip is created and finished with edging. The result is a cozy, visually interesting scarf that works up quickly and beautifully.
🧵 Skill Level:
Beginner to Intermediate
This pattern is great for confident beginners who are familiar with basic stitches and want to learn the puff stitch. It’s also an enjoyable, relaxing project for experienced crocheters.

🧶 Materials Required:
-
Yarn: Worsted weight yarn (Category 4)
-
Approx. 300–400 yards
-
Use one solid color or a combination of 2–3 colors
-
-
Crochet hook: Size H/5.0 mm (or size needed for correct tension)
-
Scissors
-
Yarn needle (for weaving in ends)
-
Measuring tape (optional)
📏 Finished Measurements:
-
Width: Approx. 6–7 inches
-
Length: Approx. 60–70 inches
(You can easily adjust the length to suit your style)
🔤 Stitch Abbreviations (US Terms):
-
ch – chain
-
sc – single crochet
-
dc – double crochet
-
sl st – slip stitch
-
st(s) – stitch(es)
-
puff st – puff stitch (explained below)
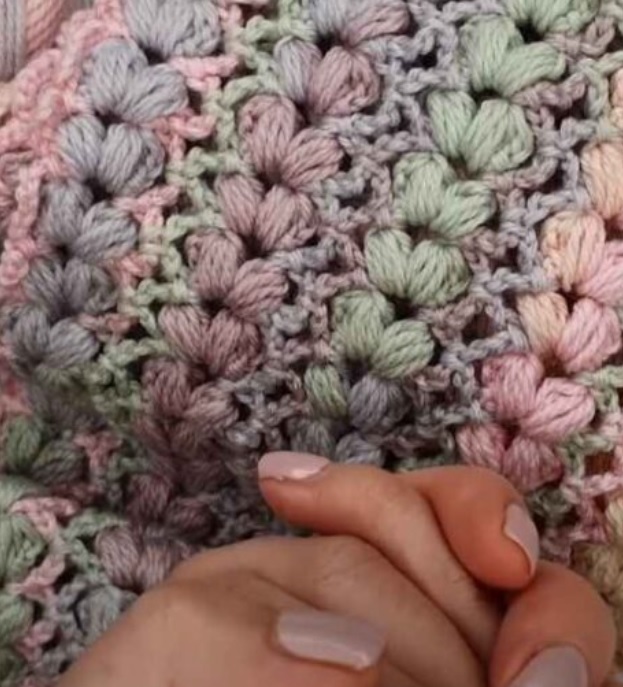
☁️ How to Crochet a Puff Stitch (puff st):
-
Yarn over (yo), insert hook into the stitch or space.
-
Yarn over again and pull up a loop – 3 loops on hook.
-
Yarn over, insert hook into the same space, yarn over and pull up another loop – 5 loops on hook.
-
Yarn over, insert hook into the same space again, yarn over and pull up a final loop – 7 loops on hook.
-
Yarn over and pull through all 7 loops on the hook.
-
Chain 1 to secure and close the puff.
✅ Tip: Keep your yarn loops loose when making puff stitches for easier pulling through all loops at once.
📘 Instructions:
🔹 1. Foundation Chain:
Start by chaining 18 stitches.
🔹 2. Base Row (Row 1):
-
Skip the first 3 chains (counts as 1 dc).
-
Make 1 double crochet (dc) in each chain across.
-
You should have 16 dc total (including the first ch-3).
-
Turn your work.
🔹 3. Puff Stitch Row (Row 2):
-
Chain 3 (counts as first dc), dc in next 2 stitches.
-
Make 1 puff stitch in the next stitch, then dc in each of the next 3 stitches.
-
Repeat the pattern between the asterisks across the row.
-
You may end with 1 puff and a few dcs to balance.
-
Turn your work.
🔁 4. Repeat Row 2:
Repeat the puff stitch row until your strip is approximately 60 to 70 inches long, or as long as you want your scarf.
💡 You can change colors every few rows for stripes or a gradient look. Simply fasten off at the end of a row and join the new color with a slip stitch at the start of the next row.
🪄 5. Optional Side Edging (Add After Strip is Complete):
🔸 First Side:
-
Join a contrasting or matching yarn to the bottom corner of one long edge.
-
Chain 1, and single crochet (sc) evenly along the entire side. Aim for 1 sc per dc row.
-
You can add a puff stitch every 4th or 5th stitch for decorative texture.
🔸 Second Side:
Repeat the same edging process on the opposite long side.
🎀 6. Optional Fringe or Tassels:
-
Cut yarn into 8–10-inch strands.
-
Attach fringe to both short ends of the scarf by folding strands in half and looping them through edge stitches.
-
Trim ends evenly.
🧹 Finishing Touches:
-
Weave in all loose ends using your yarn needle.
-
Block your scarf lightly to relax stitches, especially if your puff stitches are causing curl. For acrylic yarn, steam blocking is effective.
🧡 Customization Ideas:
-
🎨 Use self-striping yarn for an effortless color pattern.
-
✨ Add beads into your puff stitches for a sparkle effect.
-
🎁 Make several strips and join them together to create a wider wrap or shawl.
-
🧷 Add buttons and make buttonholes along the edges to transform it into a buttoned cowl or wrap.
-
🪢 Change the stitch count to create a skinny scarf or a super wide stole.
📌 Final Notes:
-
This scarf makes a great gift – quick, customizable, and stylish.
-
The mile-a-minute method is great for crocheting on the go – just one long strip at a time.
-
The puff stitch adds volume and softness without making the fabric too heavy.
Certainly! For a comprehensive, step-by-step video tutorial on creating a Crochet Puff Stitch Mile-A-Minute Scarf, I recommend the following resource:
🎥 Video Tutorial: Crochet Puff Stitch Mile A Minute Scarf
This tutorial, presented by Hooked by Robin, guides you through the entire process of crocheting a beautiful puff stitch mile-a-minute scarf.
-
Creating the foundation ring and initial puff stitches
-
Building the mile-a-minute strips with puff stitches and chain spaces
-
Adding decorative edging and joining multiple strips for a wider scarf
-
Finishing touches, including optional fringe
The pattern utilizes US crochet terminology and is suitable for beginners and intermediate crocheters alike.
You can watch the full tutorial here:
Additionally, if you prefer a written pattern to accompany the video, Hooked by Robin provides a free version on her blog:
🔗 Written Pattern by Hooked by Robin
Feel free to let me know if you need further assistance or additional resources!