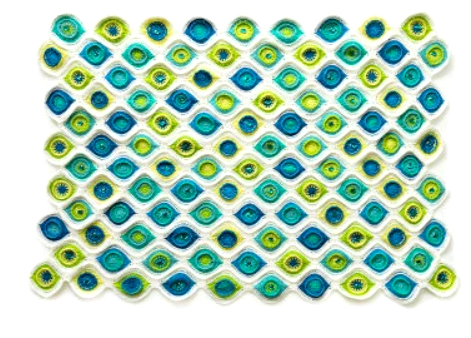
Designed to bring cozy fall vibes and modern graphics into your home.
📖 Pattern Summary
This throw blanket is worked in three vertical panels featuring bold graphic elements: striped gradients, a geometric triangle, and color block striping. The design is inspired by fall foliage and cozy autumnal color palettes, giving it a warm, earthy tone that’s both modern and timeless.
🧶 Materials
Yarn (Worsted Weight #4):
-
Color A – Burnt Orange: ~500 yds
-
Color B – Mustard Yellow: ~500 yds
-
Color C – Olive Green: ~500 yds
-
Color D – Cream/Warm Beige: ~700 yds (used as the neutral and for joining/border)
Hook:
-
Size I/9 (5.5 mm) or size needed to obtain gauge
Notions:
-
Yarn needle for weaving ends
-
Scissors
-
Optional stitch markers (for shaping or panel placement)
-
Blocking mats and pins (optional for finishing)

📏 Size
Finished Dimensions:
Approx. 50” wide x 60” long
Gauge:
13 dc and 7 rows = 4” (10 cm) square
(Gauge is not critical but helps maintain size consistency.)
🧵 Stitch Key
| Abbreviation | Stitch |
|---|---|
| ch | chain |
| dc | double crochet |
| sc | single crochet |
| sl st | slip stitch |
| RS | right side |
| WS | wrong side |
✨ Pattern Notes
-
The blanket is made in three separate panels that are sewn or crocheted together at the end.
-
Work all panels from bottom to top.
-
For neat color transitions, always change color in the final yarn-over of the last dc of the row.
-
Carry yarn along the back of your work or use bobbins to avoid tangling.
-
Block panels before joining for the most polished look.
-
Add a border and/or fringe for extra visual weight and finish.
Panel 1 – Gradient Stripes
Look: Softly fading horizontal stripes from rich orange through green to a calm neutral.
Instructions:
-
With Color A, ch 66. (Adjustable in multiples of 2.)
-
Row 1 (RS): Dc in 3rd ch from hook and across. Turn. (64 dc)
-
Rows 2–10: Ch 2 (counts as dc), dc across. Turn.
-
Switch to Color B.
-
Rows 11–20: Ch 2, dc across with Color B. Turn.
-
Switch to Color C.
-
Rows 21–30: Ch 2, dc across with Color C. Turn.
-
Switch to Color D.
-
Rows 31–40: Ch 2, dc across with Color D. Turn. Fasten off.
Optional Gradient Variation:
To soften color transitions, insert a 2-row blend with alternating colors:
-
Row 10: Alternate dc stitches between Color A and Color B.
-
Row 11: Begin solid Color B, and so on for each transition.
Panel 2 – Modern Triangle
Look: A bold geometric triangle grows outward from the center base toward both upper corners, set on a cream background.
Instructions:
-
With Color D, ch 66.
-
Rows 1–5: DC across in Color D (neutral base).
-
Row 6: Place the triangle base. Begin triangle with 2 dc in Color B, centered, dc remainder in Color D.
-
Rows 7–25: Increase triangle width by 2 sts per row (1 st on each side of the triangle section).
-
Use Color B for the triangle section.
-
Continue outer edges in Color D.
-
Your triangle should grow symmetrically and reach full width by Row 25.
-
-
Rows 26–30: Continue in Color D across the full row to frame the triangle top. Fasten off.
Triangle Shaping Tip:
Use stitch markers to track the triangle’s edges as you expand. You can also draw your triangle on graph paper if you’re a visual learner!
Panel 3 – Color Block Stripes
Look: A vertical stack of 5-row color blocks with high contrast.
Instructions:
-
With Color C, ch 50.
-
Rows 1–10: Dc in Color C.
-
Rows 11–15: Switch to Color A, dc across.
-
Rows 16–20: Switch to Color D, dc across.
-
Rows 21–25: Switch to Color B, dc across.
-
Continue alternating blocks in any order until Row 40. Fasten off.
Custom Block Style:
You can randomize color order or make each block a different height for a funkier, patchwork vibe. Just keep the overall row count consistent with other panels.
🔗 Assembling the Panels
-
Lay panels flat and arrange:
[Panel 1 – Stripes] | [Panel 2 – Triangle] | [Panel 3 – Blocks] -
With Color D and RS facing up, use one of the following methods to join:
-
Whip stitch seam: Simple, clean, and flat.
-
Single crochet join: Decorative ridge along the seam.
-
Invisible seaming for a polished finish.
-
-
Take care to match row ends precisely so panels align vertically.
🪡 Optional Border
-
Join Color D in any corner with a sl st.
-
Round 1: Ch 1, sc evenly around entire throw, placing 3 sc in each corner.
-
Round 2 (optional): Repeat in a contrasting color (e.g., Color B) or alternate each sc stitch for a two-tone border.
-
Fasten off, weave in all ends securely.
🌾 Optional Embellishments
-
Fringe or tassels: Add on short ends using all four colors.
-
Surface slip stitch: Outline triangle or block edges with contrast yarn for graphic pop.
-
Lined back: Add fleece or flannel lining for extra warmth and a quilted look.
-
Custom shape: Add a 4th panel for a wider blanket or extend each panel width.
🧼 Care Instructions
-
Machine wash cold (gentle cycle), if the yarn is machine washable
-
Tumble dry low or lay flat to dry
-
Lightly block after washing for best shape retention
🔄 Customization Ideas
-
Baby blanket: Reduce to 2 panels, shorten rows.
-
King-size throw: Add a 4th panel and increase stitch count per panel.
-
Color scheme swap: Try winter neutrals, spring pastels, or bold primaries for a different season.
📌 Final Thoughts
This throw is designed to showcase your creativity with color and layout. Whether you’re curling up on the couch or gifting it to someone special, the Graphic Fall Throw is a bold, beautiful project that adds both comfort and modern style to any space.
Video Tutorial:
While a specific video tutorial for the exact “Graphic Fall Throw” crochet pattern may not be available, there are several related tutorials that can guide you through creating similar autumn-themed throws. Here are some options:
1. Motifs: Fall Crochet Graphic Ornament Throw
This tutorial focuses on creating motifs similar to those in the Graphic Fall Throw. Motifs: Fall Crochet Graphic Ornament Throw
An easy-to-follow tutorial for a fall-themed throw that reflects the colors of autumn leaves.
3. Fall Throw Blanket | Crochet Easy Blanket Pattern
This tutorial guides you through creating an easy fall throw blanket with a one-row repeat pattern.
These resources should help you create a beautiful fall-themed throw. Happy crocheting!