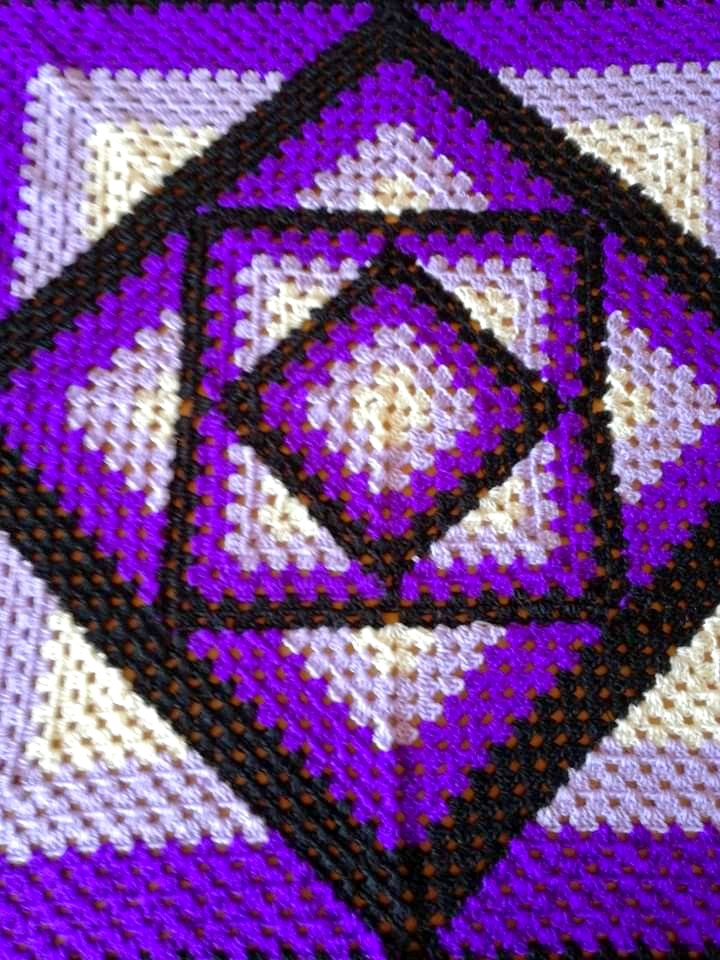
The Kaleidoscope Granny Blanket is a colorful explosion of traditional granny squares with a twist—each round of every square is worked in a different color, creating a striking, kaleidoscopic effect. This is a modular project, making it perfect for using up yarn scraps or planning a precise color story. Whether you’re going for wild and vibrant or planned and symmetrical, this blanket is a showstopper.
📏 Finished Size and Project Scope
You can customize the blanket’s size by adding or subtracting squares. Here’s a sample layout:
-
Square size: Approx. 7″ x 7″
-
Suggested layout: 7 squares wide x 9 squares long
-
Total squares: 63
-
Finished blanket size: Approx. 49″ x 63″ (before border)
🧵 Materials List
| Item | Details |
|---|---|
| Yarn | Worsted weight yarn in 6–12+ colors |
| Border/Join Color | 2–3 skeins of black or white, or another solid contrast |
| Hook Size | US H/8 (5.0 mm) or size to obtain gauge |
| Scissors | For trimming yarn ends |
| Yarn Needle | For weaving in ends |
| Blocking Supplies | (Optional) Blocking mats and pins |
🎨 Color Planning Tips
-
Use a rotating palette: e.g., red → orange → yellow → green → blue → purple → red…
-
For a gradient look, assign each row of squares its hue range (top row = red tones, bottom = purple).
-
For a random scrappy effect, draw from a bag of leftover yarn bits.
-
For a symmetrical layout, sketch your blanket using graph paper or a spreadsheet to plan color placement.
🔶 PART 1: Kaleidoscope Granny Square Pattern
Each granny square is made using different colors for every round to achieve the vibrant, spinning look.
🔁 Stitch Abbreviations (US terms):
-
ch – chain
-
dc – double crochet
-
sl st – slip stitch
-
sc – single crochet
-
st – stitch
-
sp – space
📍 Round-by-Round Granny Square Instructions:
Each round uses a new color. Fasten off and weave in ends (or crochet over them) as you go to save time later.
🟢 Round 1:
-
Start with Color A.
-
Magic ring, ch 3 (counts as first dc), work 2 dc into ring.
-
Ch 2, 3 dc into ring – repeat from * 3 more times (you’ll have 4 sets of 3 dc).
-
Ch 2, join with sl st to top of beginning ch-3.
-
Fasten off. (4 clusters, 4 ch-2 corners)
🔵 Round 2:
-
Join Color B in any ch-2 corner.
-
Ch 3 (counts as dc), 2 dc, ch 2, 3 dc in same corner.
-
In each remaining corner: (3 dc, ch 2, 3 dc).
-
Join to first ch-3 with the sl st. Fasten off. (8 clusters)
🟣 Round 3:
-
Join Color C in any ch-2 space.
-
Ch 3, 2 dc, ch 2, 3 dc in same corner.
-
(3 dc in next space between clusters, 3 dc, ch 2, 3 dc in corner) Repeat around.
-
Join, fasten off. (12 clusters: 4 corners, 8 sides)
🔴 Rounds 4–6:
Repeat the granny square pattern:
-
In corners: Always work (3 dc, ch 2, 3 dc)
-
Along sides: 3 dc in each space between clusters.
Suggested colors:
-
Round 4 – Color D
-
Round 5 – Color E
-
Round 6 – Color F
🧷 After 6 rounds, the square should measure approximately. 7”. You may adjust by working more or fewer rounds.
🧶 PART 2: Making More Squares
-
Make 63 squares for a 7×9 layout, or adjust to suit your desired dimensions.
-
Use a wide variety of color combinations. No two squares need to be identical!
-
If you’re planning a more symmetrical look, keep track of the colors used in each round.
🧵 PART 3: Joining the Squares
Joining with a neutral or contrasting color (like black or white) enhances the kaleidoscope effect by acting like the lead in stained glass.
🔗 Joining Methods (Choose One):
🔸 Option A: Flat Slip Stitch Join (Recommended for contrast)
-
Place two squares side by side, right sides up.
-
Insert hook through the back loops only of both squares.
-
Slip stitch across the edge.
-
Continue in rows, then connect columns.
🔸 Option B: Whip Stitch Join (Faster, flexible)
-
With a yarn needle and join color, whip stitch through the outer loops.
-
Secure and weave in ends.
🔸 Option C: Join-as-you-go (Advanced)
-
On the final round of each square, attach it directly to adjacent square(s) using slip stitches.
-
Saves time, but requires careful layout planning.
🎀 PART 4: Edging and Border
Once all squares are joined, it’s time to frame your masterpiece!
🧷 Border Preparation:
-
Weave in all ends before starting.
-
Block blanket if desired (especially for acrylic blends, steam blocking helps flatten joins).
🧵 Border Option 1: Simple Color-Rotating Border
-
Round 1: With a new color, sc around entire blanket, placing (sc, ch 2, sc) in each corner.
-
Rounds 2–5: Work hdc or dc around using a new color each round.
-
Always do (hdc, ch 2, hdc) in corners.
-
-
Add as many rounds as desired.
🌸 Border Option 2: Decorative Shell Border
-
Round 1: Sc around entire edge, with (sc, ch 2, sc) in each corner.
-
Round 2: (Skip 2 sts, 5 dc in next, skip 2, sc in next) – repeat.
-
Optionally repeat round in another color for a two-tone shell border.
📅 Estimated Project Time
-
Each square: 30–45 minutes
-
Total 63 squares: Approx. 30–50 hours
-
Joining and border: 8–12 hours
-
Total time: ~40–60 hours, depending on size and experience
🧺 Washing and Care Instructions
-
Use machine-washable yarns (acrylic, cotton blends).
-
Wash cold, gentle cycle.
-
Lay flat to dry or tumble dry low.
📝 Final Tips
-
Weave in ends after every few squares to avoid a huge chore later.
-
Use a yarn color chart to avoid repeating combinations.
-
Take progress photos to help plan the layout as you build.
-
Block squares before joining if they curl or aren’t uniform.
Video Tutorial
Absolutely! For a comprehensive, step-by-step guide to creating the Kaleidoscope Granny Blanket, I recommend the following video tutorial series:
This series, presented by Wow! Crochet Designs offers detailed instructions on crafting the Kaleidoscope Granny Blanket. Each part of the series focuses on different aspects of the project, ensuring a thorough understanding of the process.
Part 1
Part 2
Part 3
Part 4
The playlist includes multiple parts, allowing you to follow along at your own pace and revisit sections as needed.
If you prefer a single, concise tutorial, you might find this video helpful:
This standalone tutorial provides a focused walkthrough on creating the Kaleidoscope Granny Square, which is the foundational element of the blanket.
Feel free to choose the format that best suits your learning style. Happy crocheting!