The Bean Stitch Crochet Pattern: A Complete Guide
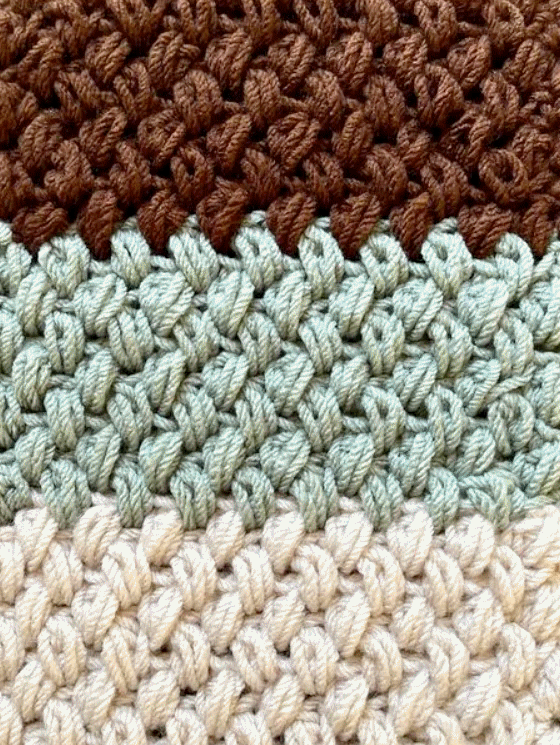
The Bean Stitch is a beautiful, textured crochet stitch that creates a soft, puffy appearance. It is a variation of the puff stitch but has a slightly different structure, giving it a unique and elegant look. The Bean Stitch is great for projects like blankets, scarves, washcloths, and even cozy sweaters because of its thick and warm texture.
This guide will cover everything you need to know about the Bean Stitch, including materials, instructions, variations, and tips for incorporating it into different projects.
What is the Bean Stitch?
The Bean Stitch is a type of cluster stitch that creates a raised, textured fabric. It is made by pulling up multiple loops in the same stitch and then closing them with a single yarn over. The result is a series of small, bean-like clusters that give a three-dimensional effect.
Unlike the puff stitch, which usually requires a chain to secure the loops, the Bean Stitch naturally holds its shape, making it an excellent choice for both beginner and advanced crocheters.
Materials Needed
Before you start crocheting the Bean Stitch, gather the following materials:
- Yarn: Any type of yarn works, but soft, medium-weight (worsted weight) yarn highlights the texture best. Bulky yarn can be used for a thicker fabric.
- Crochet Hook: Choose a hook size appropriate for your yarn (check the yarn label for recommendations). For worsted-weight yarn, a 5mm (H/8) crochet hook is ideal.
- Scissors: For cutting the yarn when finishing your work.
- Yarn Needle: Useful for weaving in loose ends.

Crochet Abbreviations (US Terms)
If you are familiar with crochet patterns, here are the abbreviations you will see in this guide:
- ch = chain
- st = stitch
- sc = single crochet
- yo = yarn over
- Bean Stitch = (insert hook, pull up a loop, yo, insert hook in the same stitch, pull up a loop, repeat for a total of 5 loops, yo, pull through all loops)
Step-by-Step Instructions for the Bean Stitch
Foundation Row:
- Start by making a slip knot and chaining any even number of stitches.
- Example: Chain 30 for a small swatch.
- Turn in your work and begin the first row.
Row 1: Creating the First Set of Bean Stitches
- Skip the first 2 chains from the hook.
- Insert the hook into the next chain, and pull up a loop (2 loops on the hook).
- Yarn over, insert the hook into the same stitch and pull up a loop (4 loops on hook).
- Repeat step 3 once more (6 loops on hook).
- Yarn over and pull through all 6 loops.
- Chain 1 to close the stitch.
- Skip the next chain and repeat the Bean Stitch in the following chain.
- Continue this pattern across the row until the last chain.
- Finish the row with a single crochet in the last stitch.
Row 2: Continuing the Pattern
- Chain 1 and turn in your work.
- Insert the hook into the first chain-1 space from the previous row and make a Bean Stitch.
- Continue making Bean Stitches in each chain-1 space across the row.
- End with a single crochet in the last stitch.
Repeating the Pattern
- Repeat Row 2 for the entire project until you reach the desired length.
- The texture will become more visible after a few rows.
Bean Stitch Variations
1. Mini Bean Stitch
- Instead of pulling up 6 loops, pull up only 4 loops before completing the stitch.
- This creates a smaller, tighter texture, ideal for lightweight fabrics like shawls and summer tops.
2. Extended Bean Stitch
- Instead of inserting the hook only once per step, repeat the process 4-5 times for an even fluffier look.
- This works well for plush projects like baby blankets or pillows.
3. Two-Tone Bean Stitch
- Use two different yarn colors and alternate every row for a striped effect.
- This creates a visually appealing pattern, great for home décor projects.
Tips for Crocheting the Bean Stitch
- Maintain consistent tension: Keeping your stitches even will help the texture remain uniform throughout the piece.
- Use soft, smooth yarn: This makes it easier to work the stitches and enhances the stitch definition.
- Add a border: A single-crochet or half-double-crochet border can give your project a neat, polished look.
- Experiment with hook sizes: A larger hook will create a looser, more open texture, while a smaller hook will make the fabric denser.
Project Ideas Using the Bean Stitch
The Bean Stitch is versatile and can be used in various crochet projects. Here are some creative ways to use it:
1. Bean Stitch Blanket
- Use bulky yarn and a larger hook for a thick, cozy blanket.
- Create a gradient effect by changing colors every few rows.
2. Textured Scarf
- A long, Bean Stitch scarf is both stylish and warm.
- Add fringe to the ends for extra charm.
3. Washcloths and Dishcloths
- The texture makes it great for exfoliating washcloths or durable dishcloths.
- Use 100% cotton yarn for better absorbency.
4. Bean Stitch Beanie
- This stitch creates a stretchy, warm fabric, making it ideal for hats and beanies.
- Work in the round to shape the beanie.
5. Crochet Bag or Tote
- A Bean Stitch bag has a unique texture and durability.
- Use a sturdy yarn like cotton to ensure the bag holds its shape.
Final Thoughts
The Bean Stitch is an excellent choice for crocheters who love textured patterns. It’s easy to learn, fun to work with and creates stunning results. Whether you’re making a blanket, scarf, or accessory, this stitch adds a beautiful touch to any project.
Would you like a specific pattern using the Bean Stitch, such as a scarf or blanket tutorial? 😊

