

 soofha
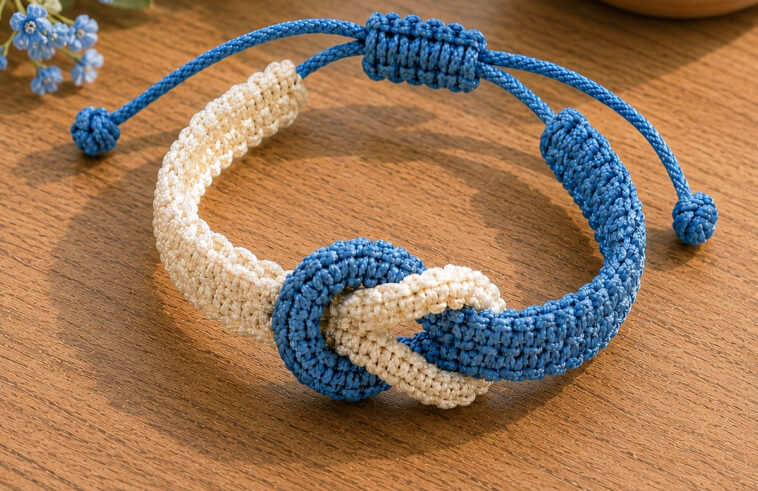
The Blue & White Celtic Knot Adjustable Bracelet is a timeless accessory that blends classic knotwork with modern minimalist style. Featuring two contrasting colors joined by a decorative Celtic-style knot, this bracelet symbolizes friendship, unity, eternity, and connection. The adjustable sliding closure makes it comfortable for almost any wrist size, making it a wonderful handmade gift for family, friends, or craft fair customers.
Whether you’re new to decorative knotting or already enjoy macramé projects, this bracelet is both relaxing and rewarding to create. The finished piece is elegant enough for everyday wear while remaining durable thanks to strong braided cord.
Why You’ll Love This Bracelet
This bracelet combines beauty with practicality.
Features include:
- Adjustable to fit most wrist sizes
- Lightweight and comfortable
- Beginner-friendly construction
- Elegant Celtic-inspired centerpiece
- Uses inexpensive materials
- Perfect for gifts and craft markets
- Highly customizable with different color combinations
The blue and white version creates a fresh nautical appearance, but the design works beautifully with virtually any color palette.
Skill Level
Easy to Intermediate
If you’re comfortable making basic knots and maintaining even tension, you’ll find this project enjoyable. The decorative center knot may require a little patience, but after a few practice attempts it becomes surprisingly simple.
Finished Measurements
- Adjustable wrist size: 6–9 inches (15–23 cm)
- Bracelet width: Approximately ½ inch (1.3 cm)
- Decorative knot: About 1 inch wide
Measurements can easily be adjusted by changing the length of the cords.
Materials Needed
- 2 mm nylon braided cord
- Blue cord (about 6 feet / 180 cm)
- White cord (about 6 feet / 180 cm)
- Sharp scissors
- Lighter or cord burner
- Measuring tape
- Clipboard or macramé board
- Pins or clips
- Optional jewelry glue
Choosing the Right Cord
Nylon braided cord is one of the best choices because it offers:
- Excellent durability
- Smooth appearance
- Strong knot retention
- Water resistance
- Easy heat sealing
Waxed polyester cord also works well and creates a slightly firmer bracelet.
Cotton cord produces a softer look but may wear faster with everyday use.
Understanding the Design
The bracelet consists of three main parts:
- The white woven band
- The blue woven band
- The decorative interlocking Celtic knot that joins both halves
An adjustable sliding knot closure finishes the bracelet.
Color Inspiration
Although blue and white create a clean coastal style, try experimenting with different combinations.
Beautiful ideas include:
- Navy and cream
- Forest green and tan
- Burgundy and gold
- Black and silver
- Purple and lavender
- Coral and turquoise
- Red and black
- Olive and beige
- Emerald and ivory
Each combination gives the bracelet a completely different personality.
Preparing Your Cords
Before tying any knots:
- Measure carefully.
- Cut cords slightly longer than needed.
- Melt the ends lightly to prevent fraying.
- Stretch the cord gently to remove twists.
Good preparation makes knotting much easier.
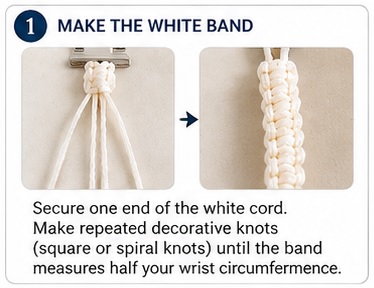
Step 1 – Create the First Bracelet Band
Using the white cord:
Secure one end.
Begin making consistent decorative knots along the length until the band measures approximately half the wrist circumference.
Keep every knot evenly tightened for a smooth appearance.
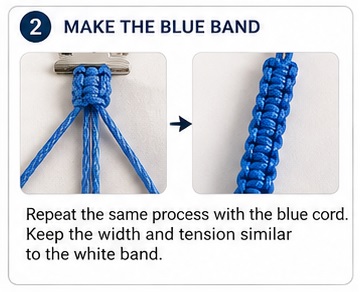
Step 2 – Make the Blue Band
Repeat the same process using the blue cord.
Try to match:
- Width
- Knot spacing
- Tension
- Thickness
Matching bands help the final bracelet look symmetrical.
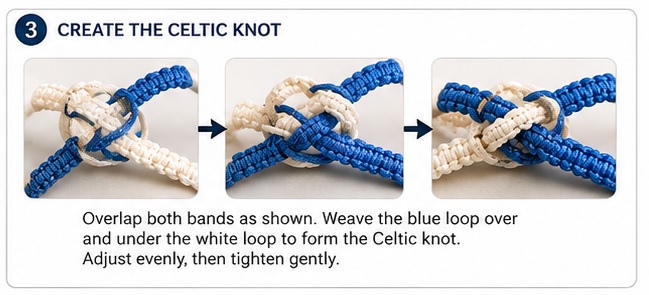
Step 3 – Form the Celtic Knot
This decorative centerpiece is the highlight of the bracelet.
Arrange both bracelet ends into overlapping loops.
Carefully weave one loop over and under the other until the knot resembles an endless Celtic design.
Avoid tightening immediately.
Adjust the loops first.
When satisfied with the appearance, slowly tighten each section evenly.
This gradual tightening preserves the elegant woven pattern.
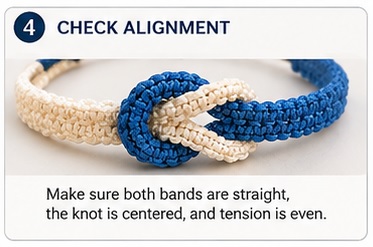
Step 4 – Check Alignment
Lay the bracelet flat.
Look for:
- Equal loop sizes
- Straight bracelet bands
- Centered knot
- Balanced tension
Small adjustments now make a big difference in the finished look.
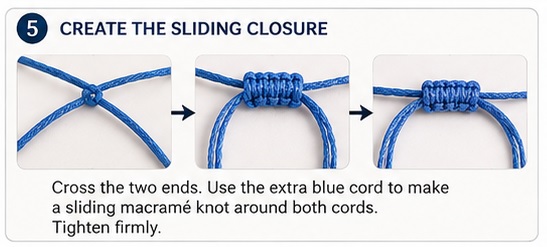
Step 5 – Create the Adjustable Closure
Cross the two bracelet ends.
Using an additional short piece of blue cord, tie a sliding macramé knot around both cords.
Make several wraps before tightening.
Trim excess cord.
Seal the ends carefully using a lighter.
Attach small decorative stopper knots to each end of the cords.
These prevent the bracelet from pulling apart while adding a finished appearance.
Helpful Knotting Tips
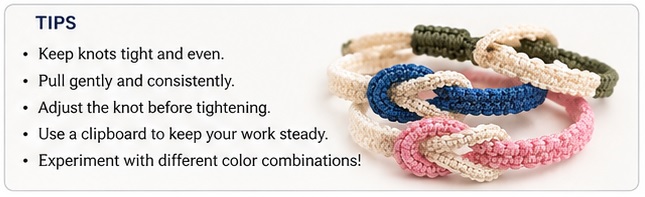
Professional-looking bracelets come from consistent tension.
Remember:
- Pull gently.
- Tighten gradually.
- Keep cords flat.
- Avoid twisting.
- Check symmetry frequently.
Patience always produces cleaner results.
Beginner Mistakes
Many first-time makers experience a few common issues.
Uneven Width
Usually caused by inconsistent knot tension.
Crooked Center Knot
Tightening one side before the other creates imbalance.
Loose Sliding Knot
Add a few more wraps before tightening.
Frayed Ends
Always melt synthetic cords immediately after trimming.
Decorating Your Bracelet
Once you’ve mastered the basic design, try adding personal touches.
Ideas include:
- Small metal beads
- Wooden beads
- Birthstone crystals
- Initial charms
- Tiny seashells
- Silver spacers
- Gemstone beads
Keep embellishments minimal so the Celtic knot remains the focal point.
Seasonal Color Ideas
Spring
- Mint and white
- Lavender and cream
- Baby blue and ivory
Summer
- Aqua and coral
- Turquoise and white
- Yellow and navy
Autumn
- Rust and cream
- Olive and tan
- Burgundy and beige
Winter
- Navy and silver
- Emerald and white
- Red and gold
Caring for Your Bracelet
To keep your bracelet looking beautiful:
- Remove before swimming in chlorinated pools.
- Avoid perfumes directly on the cord.
- Clean gently with mild soap and water.
- Allow it to air dry naturally.
- Store flat when not worn.
Proper care will help preserve the color and knot structure for years.
Gift Ideas
This bracelet makes a thoughtful handmade gift for:
- Birthdays
- Mother’s Day
- Father’s Day
- Valentine’s Day
- Christmas
- Friendship celebrations
- Graduation
- Wedding party favors
- Anniversary keepsakes
Pair it with a handwritten note explaining that the Celtic knot symbolizes eternal connection for an extra meaningful touch.
Selling Handmade Bracelets
These bracelets are excellent products for handmade markets and online shops.
Customers appreciate:
- Adjustable sizing
- Symbolic meaning
- Durable materials
- Handmade craftsmanship
- Wide range of colors
Offer matching bracelets for couples or friendship sets to increase appeal.
Frequently Asked Questions
Can beginners make this bracelet?
Yes. The basic bands are simple, and the decorative knot becomes easier with practice.
What cord works best?
Braided nylon or waxed polyester provides the best balance of strength, flexibility, and durability.
Can I use thicker cord?
Absolutely. Thicker cord creates a bolder bracelet, while thinner cord gives a more delicate appearance.
Is the bracelet waterproof?
Nylon cord is water-resistant, but drying it after prolonged exposure to water will help maintain its appearance.
Can I customize the colors?
Definitely. This design looks beautiful in virtually any two-color combination.
Final Thoughts
The Blue & White Celtic Knot Adjustable Bracelet is a beautiful blend of artistry and symbolism. Its flowing interwoven centerpiece represents unity and timeless connection, while the adjustable closure ensures a comfortable fit for nearly everyone. With just a few basic materials and some careful knotting, you can create a handcrafted accessory that’s perfect for everyday wear, heartfelt gifts, or even selling at craft fairs. Once you’ve mastered the technique, you’ll find endless opportunities to experiment with colors, textures, and embellishments, making every bracelet a unique expression of your creativity.

