

 soofha
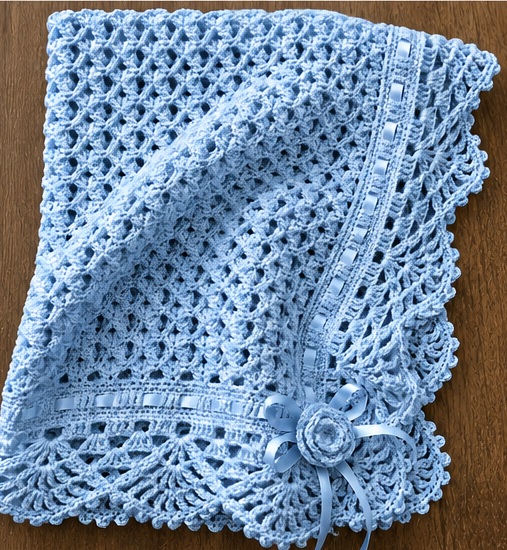
The blanket shown in the photo features an elegant open-lace stitch combined with a decorative shell border and woven satin ribbon, creating a timeless heirloom-style baby blanket. While it isn’t possible to identify the exact original designer or reproduce the pattern stitch-for-stitch from an image alone, the following pattern recreates the same overall appearance and texture.
This project is perfect for baby showers, christenings, nursery décor, or treasured family keepsakes. The airy stitch pattern makes it lightweight for spring and summer babies while still providing warmth and softness.
Pattern Information
Skill Level: Intermediate
Finished Size
Approximately 30 × 36 inches (76 × 91 cm)
The size can easily be adjusted by adding or removing pattern repeats.
Materials
- 900–1100 yards (820–1000 m) DK (#3) baby yarn
- 4.0 mm (G/6) crochet hook
- Yarn needle
- Stitch markers
- Scissors
- 2–3 yards satin ribbon (½ inch / 12 mm wide)
- Optional crochet flower
Recommended Yarn
Soft baby acrylic or cotton blends such as:
- Stylecraft Bambino
- Paintbox Baby DK
- Premier Anti-Pilling DK
- King Cole Cherished DK
- Lion Brand Baby Soft
Gauge
20 dc × 10 rows = 4 inches
Gauge is not critical for blankets.
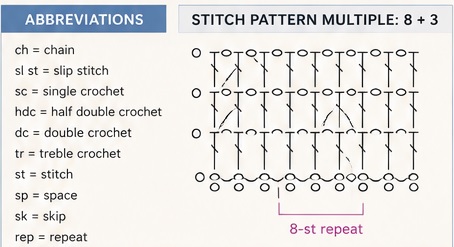
Abbreviations
- ch = chain
- sl st = slip stitch
- sc = single crochet
- hdc = half double crochet
- dc = double crochet
- tr = treble crochet
- st = stitch
- sp = space
- sk = skip
- rep = repeat
- RS = right side
- WS = wrong side
Blanket Construction
The blanket is worked flat from the bottom upward.
The decorative border is added after the blanket body is complete.
Finally, ribbon is woven through eyelet rounds and a crochet flower is sewn onto one corner.
Foundation Chain
Chain a multiple of 8 + 3
Example baby blanket:
163 chains
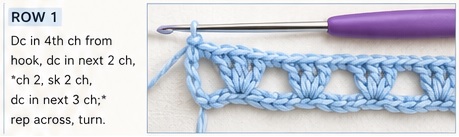
Row 1
Dc into the fourth chain from hook.
Dc in next two chains.
*Ch 2.
Skip next two chains.
Dc in next three chains.*
Repeat across.
Turn.
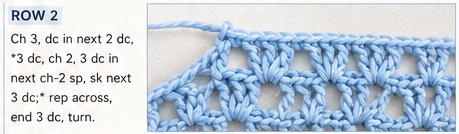
Row 2
Chain 3.
Dc in next two stitches.
*Work:
3 dc
Ch 2
3 dc
inside each chain-2 space.
Skip next dc group.
Repeat.*
End with 3 dc.
Turn.
Row 3
Chain 3.
Dc in next stitch.
*Ch 2.
Work 3 dc in next chain space.*
Repeat across.
Turn.
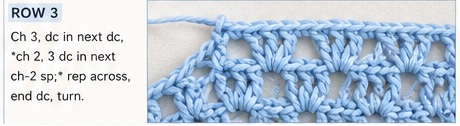
Row 4
Chain 3.
*3 dc in every chain-2 space.
Ch 2.*
Repeat.
Turn.
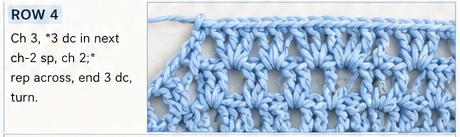
Repeat
Repeat Rows 3–4 until blanket reaches approximately 34 inches long.
The repeated shells create the beautiful lattice texture visible in the photograph.
Straightening Row
Work one row of dc across entire blanket.
Place two dc into every chain space.
This creates a clean edge before beginning the ribbon section.
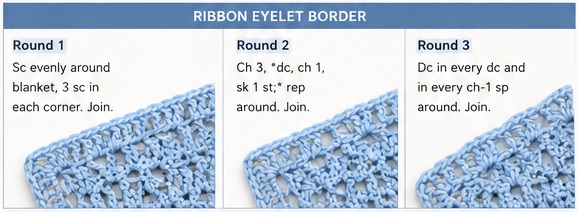
Ribbon Eyelet Border
Round 1
Join yarn.
Work sc evenly around blanket.
Place 3 sc in each corner.
Join.
Round 2
Chain 3.
*Dc.
Chain 1.
Skip one stitch.*
Repeat around.
Join.
Round 3
Dc in every dc.
Dc inside every chain space.
Join.
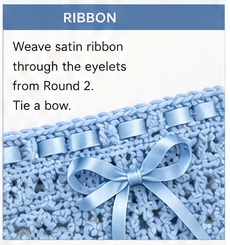
The eyelets created by Round 2 are where the satin ribbon will later be woven.
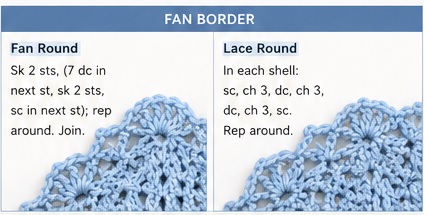
Decorative Fan Border
The fan edging is what gives the blanket its elegant appearance.
Setup Round
Sc around blanket.
Corners:
3 sc.
Join.
Fan Round
Skip 2 stitches.
Work
7 dc
into next stitch.
Skip 2 stitches.
Sc in next stitch.
Repeat around.
Join.
Lace Round
In each shell:
Sc
Ch 3
Dc
Ch 3
Dc
Ch 3
Sc
Repeat around.
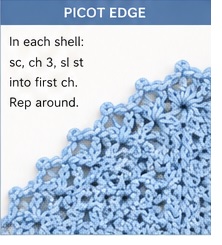
Final Picot Round
Sc.
Chain 3.
Slip stitch into first chain.
Continue around every shell.
This produces the tiny rounded edging seen in the photograph.
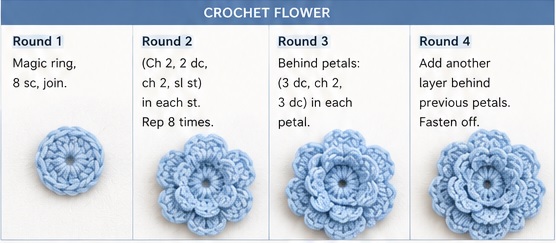
Crochet Flower
Center
Magic Ring
8 sc.
Join.
Round 2
In every stitch:
*(Ch 2
2 dc
Ch 2
Slip stitch)*
Repeat 8 times.
Round 3
Work behind petals.
*(3 dc
Ch 2
3 dc)*
Repeat around.
Round 4
Add another larger layer behind previous petals.
Repeat until flower reaches desired fullness.
Sew securely onto one blanket corner.
Ribbon
Using a tapestry needle, weave satin ribbon through the eyelet round.
Tie a decorative bow beside the crochet flower.
Trim ribbon tails diagonally.
Blocking
Wash gently.
Pin blanket to finished dimensions.
Steam lightly without touching acrylic yarn directly.
Allow to dry completely.
Blocking greatly improves the lace definition.
Size Adjustments
To make a stroller blanket:
Chain approximately 131.
To make a receiving blanket:
Chain approximately 147.
To make a toddler blanket:
Chain approximately 195.
Always maintain the foundation multiple of 8 + 3.
Colour Ideas
Classic Baby
- White
- Baby Blue
- Baby Pink
Neutral Nursery
- Cream
- Sand
- Sage
Modern
- Dusty Rose
- Mist Grey
- Lavender
- Aqua
Vintage
- Ivory
- Soft Peach
- Antique White
- Pale Mint
Helpful Tips
- Use stitch markers every 25 stitches to keep rows straight.
- Count stitches every few rows to avoid gradual widening or narrowing.
- Keep chain-2 spaces loose so the lace opens beautifully after blocking.
- Satin ribbon should be woven only after washing and blocking the blanket.
- Choose a soft, machine-washable baby yarn for everyday practicality.
- If making this blanket as a gift, consider attaching a matching crochet flower or a personalised tag for a thoughtful finishing touch.
Finished Look
The completed blanket features a delicate openwork centre, an elegant woven ribbon border, scalloped lace edging, and a charming crochet flower accent. Inspired by vintage heirloom baby blankets, this timeless design combines classic texture with graceful details, making it a beautiful keepsake for nurseries, christenings, baby showers, or cherished family gifts.
Note: This pattern is an original recreation inspired by the appearance of the blanket in the image and is not an exact copy of any specific copyrighted crochet pattern.

