

 soofha
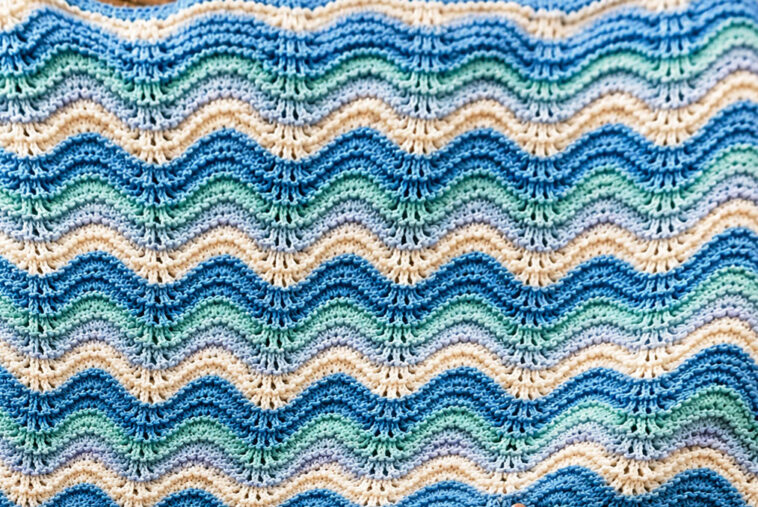
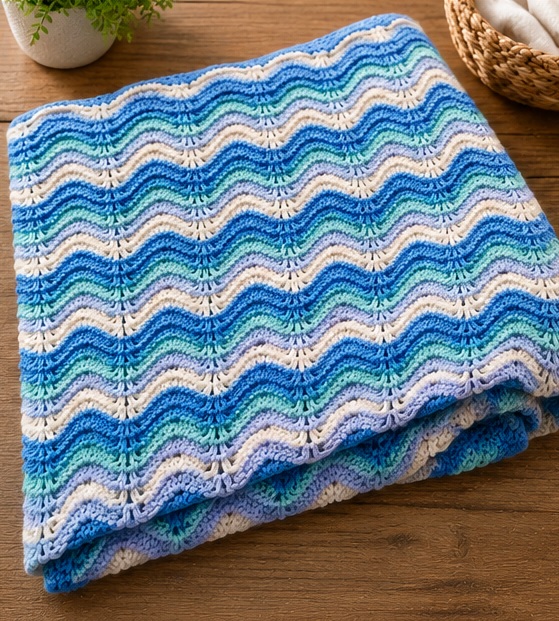
Create a soft, calming blanket inspired by the gentle movement of ocean waves with this Ocean Breeze Ripple Crochet Blanket. The design features repeating chevron waves in beautiful shades of blue, aqua, lavender, and cream. The combination creates a relaxing coastal look that works beautifully for a baby blanket, sofa throw, nursery blanket, or lightweight bedspread.
The pattern is built around a simple repeating ripple stitch. Once the first few rows are established, the rhythm becomes easy to memorize, making this a wonderful project for relaxing crochet sessions.
Ocean Breeze Ripple Blanket
Skill Level: Easy to Intermediate
Pattern Type: Ripple / Chevron
Construction: Worked flat in rows
Stitch Repeat: 14 stitches + 2
Main Stitches: Double crochet, decreases, increases
US Crochet Terminology
The finished blanket shown in the inspiration photo has a beautiful combination of narrow color stripes. You can reproduce the same effect with several coordinating yarn colors or simplify the design by using only two or three shades.
Materials
For a medium-sized throw blanket, gather:
- Worsted-weight yarn, approximately 1,800–2,400 yards total
- 5.0 mm crochet hook
- Yarn needle
- Scissors
- Measuring tape
- Stitch markers, optional
Suggested Color Palette
For an ocean-inspired version, try:
- Color A: Cream
- Color B: Soft sky blue
- Color C: Aqua or seafoam
- Color D: Light lavender
- Color E: Medium blue
- Color F: Deep ocean blue
The original look is particularly attractive because the colors are soft rather than extremely saturated. Cream separates the cool shades and gives the blanket a warm, handmade appearance.
Finished Size
A good starting size is approximately:
45 × 60 inches
However, the pattern is very easy to resize.
For a baby blanket, try approximately:
30 × 36 inches
For a lap blanket:
40 × 50 inches
For a larger sofa throw:
50 × 65 inches
You can continue adding rows until the blanket reaches the desired length.
Gauge
Gauge is not extremely critical for this project, especially if you are making a decorative throw.
For a more predictable finished size, crochet a small sample before beginning.
A suggested gauge is approximately:
13–15 double crochet stitches × 7–8 rows = 4 inches
If your sample is too wide, use a smaller hook.
If it is too narrow, try a larger hook.
Abbreviations
The pattern uses standard US crochet terminology.
| Abbreviation | Meaning |
|---|---|
| ch | Chain |
| st | Stitch |
| sts | Stitches |
| sc | Single crochet |
| dc | Double crochet |
| dc2tog | Double crochet 2 together |
| sk | Skip |
| rep | Repeat |
| sl st | Slip stitch |
| RS | Right side |
| WS | Wrong side |
Understanding the Ripple Stitch
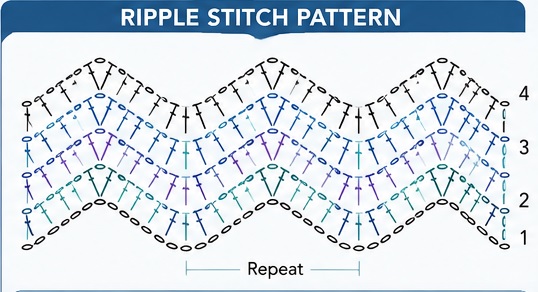
The main feature of this blanket is the repeating up-and-down wave pattern.
The increases form the peaks of the waves.
The decreases form the valleys.
Once you understand this basic movement, the entire blanket becomes very repetitive.
The most important thing is to maintain the same stitch count at the end of every row.
Foundation Chain
The ripple pattern is worked over a multiple of 14 stitches plus 2.
For example:
- 100 stitches would not work with this repeat.
- 100 ÷ 14 does not give a whole repeat.
Instead, use a starting chain based on:
14 × number of repeats + 2
Examples:
- 14 × 7 + 2 = 100 chains
- 14 × 8 + 2 = 114 chains
- 14 × 9 + 2 = 128 chains
- 14 × 10 + 2 = 142 chains
- 14 × 11 + 2 = 156 chains
For a larger blanket, simply add another 14-chain repeat.
Row 1 – Foundation Ripple
With your first color, chain the desired number of stitches.
Add 2 additional chains for the pattern.
Turn.
Work the first double crochet into the fourth chain from the hook.
Continue across using the following sequence:
2 dc in the next stitch, 1 dc in each of the next 4 stitches, dc2tog over the next 2 stitches, dc2tog over the following 2 stitches, 1 dc in each of the next 4 stitches, 2 dc in the next stitch.
Repeat the ripple sequence across the row.
End with a double crochet in the final stitch.
You should now begin to see the first gentle peaks and valleys.
Row 2 – Establish the Wave
Chain 3.
Turn.
The chain 3 counts as the first double crochet.
Work double crochet stitches across while following the same increase and decrease positions established in Row 1.
At every peak, work the required increase.
At every valley, work the required decrease.
Continue across the entire row.
Finish with a double crochet in the final stitch.
Do not worry if the ripple looks exaggerated at first. The waves become more recognizable after several rows.
Row 3 and Beyond
Repeat the established ripple pattern.
Each row should contain the same number of stitches as the previous row.
This is important because the blanket needs to remain the same width.
Continue working:
- increases over the peaks,
- decreases into the valleys,
- regular double crochet stitches along the slopes.
After several rows, the characteristic zigzag wave will become clearly visible.
Creating the Color Changes
The beautiful appearance of the inspiration blanket comes largely from its frequent color changes.
Instead of working many rows in one color, change yarn every one or two rows.
A simple sequence could be:
Rows 1–2
Cream
Rows 3–4
Sky Blue
Rows 5–6
Aqua
Rows 7–8
Lavender
Rows 9–10
Medium Blue
Rows 11–12
Cream
Rows 13–14
Aqua
Rows 15–16
Sky Blue
Rows 17–18
Deep Blue
Repeat the sequence throughout the blanket.
You do not have to follow this exact arrangement. One of the pleasures of this pattern is experimenting with color order.
How to Change Colors Neatly
For clean stripes, change colors at the end of the row.
Work the final double crochet of the row but stop before completing the final yarn-over.
Drop the old color.
Use the new color to complete the last yarn-over and pull through the remaining loops.
Then chain 3 with the new color and turn.
This technique creates a neat transition between stripes.
For an especially polished blanket, avoid carrying unused yarn along the sides when changing colors frequently. Instead, cut the yarn and weave the ends in later.
Color Combination Inspired by the Photo
If you want a look close to the pictured blanket, try this palette:
Cream + Soft Blue + Aqua + Pale Lavender + Medium Blue + Deep Turquoise
The cream creates visual breathing room between the cooler colors.
The aqua adds a fresh coastal feeling.
Lavender introduces a subtle contrast without making the blanket too bright.
The darker blue gives the waves enough definition to stand out.
A Simple Stripe Plan
Here is another easy color sequence:
Row 1: Cream
Row 2: Cream
Row 3: Light Blue
Row 4: Light Blue
Row 5: Aqua
Row 6: Aqua
Row 7: Lavender
Row 8: Lavender
Row 9: Medium Blue
Row 10: Medium Blue
Row 11: Cream
Row 12: Cream
Repeat these 12 rows.
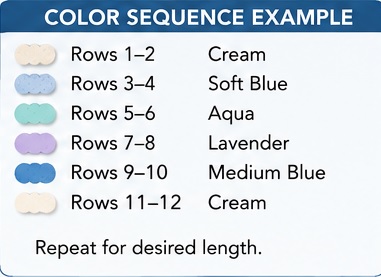
This creates wider horizontal bands while keeping the ripple pattern visible.
Making the Blanket Larger
One of the best things about this pattern is how easily it can be customized.
To make the blanket wider, add another 14 stitches to the foundation chain.
To make it longer, simply continue crocheting additional rows.
For example:
Small baby blanket: 7 repeats
Medium baby blanket: 8–9 repeats
Lap blanket: 9–10 repeats
Sofa throw: 10–12 repeats
Large bed blanket: 14+ repeats
Always remember:
14 stitches × number of repeats + 2
This keeps the ripple pattern aligned.
Keeping the Edges Straight
Ripple blankets can sometimes develop uneven edges. This usually happens when stitches are accidentally added or omitted near the peaks and valleys.
Count your stitches periodically.
Your total stitch count should remain consistent from row to row.
Pay special attention to the stitches immediately before and after the decreases.
A useful trick is to place a stitch marker at the first and final stitch of every row.
If your edge starts becoming wider, you have probably added stitches.
If it starts becoming narrower, one or more stitches have likely been skipped.
Avoiding Common Ripple Blanket Mistakes
1. Losing track of the peaks
The peaks should line up vertically.
If one peak suddenly appears in the wrong position, check your stitch count.
2. Missing a decrease
A missed decrease can create an unwanted bump.
3. Adding extra stitches
Be careful not to accidentally crochet twice into a stitch unless the pattern specifically calls for an increase.
4. Changing tension
Try to maintain consistent tension throughout the blanket.
Very tight stitches can make the waves sharper, while loose stitches create softer, more relaxed waves.
5. Forgetting the final stitch
The edge stitches are important for keeping the blanket straight.
Optional Border
The inspiration blanket has a naturally attractive ripple edge, but you can add a simple border if you want a more finished appearance.
After completing the final row, do not fasten off.
Turn your work and crochet around the entire blanket.
A simple single crochet border is an excellent choice.
Border Round 1
Chain 1.
Work single crochet evenly along the first side.
When you reach the corner, work 3 single crochet stitches into the corner space.
Continue around the blanket.
Repeat the same technique at each corner.
Join with a slip stitch.
Fasten off.
Optional Decorative Border
For a slightly more decorative finish, add a second round.
Join your contrasting cream yarn at any corner.
Chain 1.
Work single crochet around the blanket.
At each corner, work 3 sc in the center corner stitch.
Join with a slip stitch.
This simple border frames the colorful waves without competing with the main stitch pattern.
Finishing the Blanket
Once all rows and the border are complete, weave in every loose yarn end.
Use a yarn needle and work each end back and forth through several stitches on the wrong side of the blanket.
Trim only after the yarn has been secured.
Because this design contains many color changes, you may have quite a few ends to weave in. It is tempting to leave them until the very end, but weaving in a few ends every several rows can make finishing much easier.
Blocking
Blocking is optional but highly recommended for ripple blankets.
The process helps relax the stitches and makes the wave pattern look more even.
Gently dampen the finished blanket.
Lay it flat on a clean surface.
Smooth the blanket into shape, paying attention to the edges and wave peaks.
Allow it to dry completely before moving it.
Do not aggressively stretch the blanket. The goal is simply to encourage the stitches into an even shape.
Yarn Substitutions
You can use different yarn weights for this project.
DK Weight
Use a smaller crochet hook and expect a lighter, more delicate blanket.
This is particularly nice for baby blankets.
Worsted Weight
This is an excellent all-purpose option and is recommended for a cozy throw.
Bulky Weight
Use a larger hook and fewer stitches for a quick, chunky blanket.
The waves will appear larger and more dramatic.
Beautiful Color Ideas
Although blue and cream create the coastal appearance seen in the inspiration photo, the ripple pattern works with almost any color combination.
Coastal Morning
- Cream
- Powder Blue
- Aqua
- Seafoam
- Navy
Lavender Mist
- White
- Pale Lavender
- Lilac
- Dusty Blue
- Soft Gray
Sunset Waves
- Cream
- Peach
- Coral
- Dusty Rose
- Soft Orange
Forest Stream
- Cream
- Sage
- Mint
- Forest Green
- Soft Blue
Neutral Home
- Ivory
- Beige
- Taupe
- Warm Gray
- Chocolate Brown
Using Self-Striping Yarn
You can also make this blanket with self-striping or variegated yarn.
The ripple stitch looks especially beautiful with yarn that gradually changes shades.
If using variegated yarn, choose a relatively subtle color progression. Extremely short color changes can sometimes make the chevron pattern visually busy.
Solid colors and gentle gradients tend to show the waves most clearly.
How to Make a Baby Version
For a baby blanket, choose soft, washable yarn.
A finished size around 30 × 36 inches is practical and easy to handle.
Use gentle colors such as:
- Cream
- Powder blue
- Mint
- Pale lavender
- Soft gray
Keep the border simple.
For a baby blanket, I would recommend avoiding loose decorative elements such as buttons or attached appliqués.
How to Make a Large Sofa Throw
For a generous sofa blanket, start with approximately 156 chains or another foundation length that follows the stitch repeat.
Continue working the ripple rows until the blanket measures approximately 50 × 65 inches.
A larger throw looks especially attractive when the stripes are relatively narrow.
Try changing colors every two rows to create many horizontal bands.
Texture and Drape
One of the reasons this pattern works so well is the balance between texture and drape.
The double crochet construction allows the blanket to grow relatively quickly while maintaining enough flexibility to drape over a sofa or chair.
The repeated peaks and valleys give the fabric movement.
The alternating colors emphasize that movement, making each wave appear to flow into the next.
Care Instructions
Always check the yarn label for the manufacturer’s recommended washing instructions.
For most washable acrylic yarns:
- Machine wash gently
- Use cool or lukewarm water
- Avoid harsh bleach
- Dry according to the yarn label
- Avoid excessive heat
For handmade blankets, gentle washing helps preserve the stitch definition and keeps the fabric looking beautiful for years.
Pattern Summary
The Ocean Breeze Ripple Crochet Blanket is a relaxing project based on a classic chevron construction.
The basic process is:
- Choose your yarn colors.
- Make a foundation chain using a multiple of 14 plus 2.
- Establish the ripple pattern.
- Repeat the increase and decrease sequence across every row.
- Change colors every 1–2 rows for the striped effect.
- Continue until the blanket reaches your preferred length.
- Add an optional single crochet border.
- Weave in all ends.
- Block gently if desired.
- Enjoy your finished blanket.
Final Thoughts
This ripple blanket is a wonderful project if you love classic crochet patterns with a modern color palette. The combination of soft blue, aqua, lavender, and cream gives the finished piece a peaceful ocean-inspired feeling, while the repeating waves create plenty of visual interest.
The pattern is also highly customizable. You can make it tiny enough for a newborn, large enough for a sofa, or oversized for a bed. Change the colors to match your home, use leftover yarn from your stash, or create a monochromatic version using several shades of the same color.
Most importantly, don’t worry about making every stripe identical. Handmade crochet has its own charm, and the gentle variations in color and texture are part of what makes a blanket special.
Save this Ocean Breeze Ripple Crochet Blanket pattern for your next relaxing crochet project and experiment with your favorite combination of wave-inspired colors.

