

 soofha
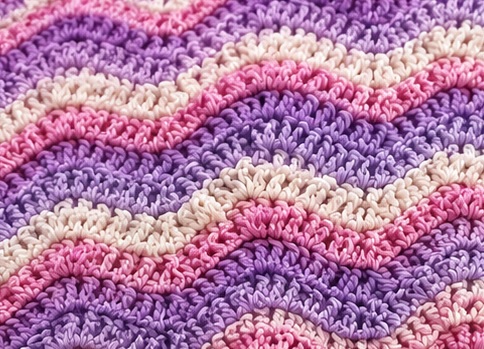
The blanket shown in the photo showcases a beautiful textured ripple design with graceful waves flowing across the fabric. Soft shades of lavender, blush pink, and creamy white create a delicate ombré effect that gives the blanket a cozy yet elegant appearance. This style is perfect for baby blankets, throws, lap blankets, bed runners, or even oversized afghans.
Although it is impossible to identify every stitch with complete certainty from a single photograph, this pattern recreates the same look using classic ripple construction with textured double crochet stitches. The result is a blanket that closely resembles the photographed design while remaining easy enough for adventurous beginners and enjoyable for experienced crocheters.
Skill Level
Easy to Intermediate
If you already know how to make:
- Chain
- Double Crochet
- Double Crochet Three Together (dc3tog)
you’ll find this project relaxing and repetitive.
Finished Measurements
This pattern is completely adjustable.
Suggested sizes include:
| Blanket Type | Size |
|---|---|
| Baby Blanket | 30 × 36 inches |
| Toddler Blanket | 36 × 45 inches |
| Lap Blanket | 40 × 50 inches |
| Throw Blanket | 50 × 60 inches |
| Twin Bed | 66 × 90 inches |
Simply begin with a longer foundation chain to increase the width and continue adding rows for additional length.
Materials
Yarn
Worsted Weight (#4)
Colors:
- Lavender
- Light Pink
- Soft Cream
or
Use one large self-striping yarn cake to achieve the gradual color transitions seen in the photo.
Estimated Yardage
Baby Blanket
900–1,100 yards
Throw Blanket
1,800–2,200 yards
Crochet Hook
5 mm (H/8)
Adjust hook size if needed to obtain the desired drape.
Additional Supplies
- Scissors
- Yarn Needle
- Stitch Markers (optional)
- Measuring Tape
Crochet Abbreviations
- ch = chain
- st = stitch
- sl st = slip stitch
- dc = double crochet
- dc3tog = double crochet three together
- rep = repeat
- sk = skip
- RS = right side
- WS = wrong side
Gauge
Approximately
15 dc × 8 rows = 4 inches
Gauge is not critical unless making a specific size.
Understanding Ripple Construction
A ripple blanket is made by repeating two simple shaping techniques:
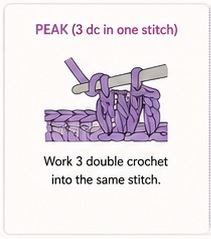
Peaks
Three double crochets worked into one stitch.
These form the high points of the waves.
Example
3 dc in one stitch
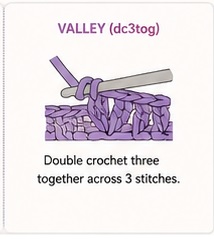
Valleys
Three stitches crocheted together.
These create the low points.
Example
dc3tog
Once these two shaping methods are repeated across each row, the fabric naturally forms beautiful waves.
Foundation Chain
Chain any multiple of
14 + 3
Examples
- 129
- 143
- 157
- 171
- 199
Longer chain = wider blanket.
Row 1
Work 1 double crochet into the fourth chain from hook.
Double crochet in each of the next four chains.
Peak
Work
3 dc
into the next chain.
Double crochet into the next six chains.
Valley
Work dc3tog across the next three chains.
Double crochet into the next six chains.
Repeat this ripple sequence across the row.
End with two double crochet in the final stitch.
Turn.

Row 2
Chain 3.
Double crochet into the first stitch.
Continue working one double crochet into every stitch until reaching a peak.
At every peak:
Work
3 dc
into the center stitch.
Continue across.
At every valley:
Work
dc3tog
over the center three stitches.
Repeat this sequence until the end of the row.
Place two double crochet into the final stitch.
Turn.

Rows 3–End
Repeat Row 2.
Continue until the blanket reaches the desired length.
The ripple pattern becomes more defined after approximately eight to ten rows.

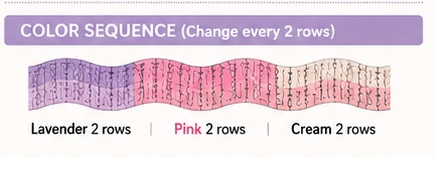
Suggested Color Pattern
To recreate the soft appearance shown in the image:
Rows 1–2
Lavender
Rows 3–4
Pink
Rows 5–6
Cream
Rows 7–8
Lavender
Rows 9–10
Pink
Rows 11–12
Cream
Repeat throughout the blanket.
Using a self-striping yarn cake eliminates the need for manual color changes while producing the same flowing color effect.
Optional Texture Variation
To mimic the raised appearance of the stitches shown in the photo, substitute every other row with front post double crochet.
Example:
Odd Rows
Standard Double Crochet
Even Rows
Alternate
Front Post Double Crochet
Back Post Double Crochet
This creates rich texture and enhances the wave pattern.
Border
Round One
With the right side facing:
Single crochet evenly around the entire blanket.
Place:
- Three single crochet in every corner.
- Two single crochet around each row end.
Join with a slip stitch.
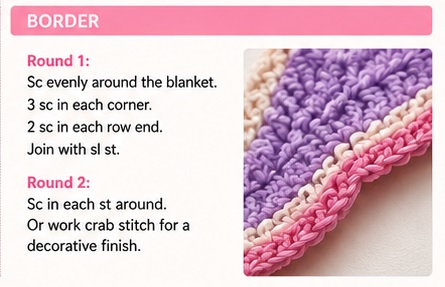
Round Two
Work one more round of single crochet.
Or
Use reverse single crochet (crab stitch) for a decorative rope border.
Optional Decorative Shell Border
Skip two stitches.
Work five double crochet into the next stitch.
Skip two stitches.
Single crochet into the next stitch.
Repeat around the blanket.
This border beautifully complements the flowing ripple design.
Blocking
Although acrylic yarn often relaxes naturally after washing, blocking improves the overall appearance of ripple blankets.
- Soak the blanket in cool water.
- Gently remove excess water.
- Lay flat on blocking mats.
- Shape each wave evenly.
- Allow to dry completely.
Blocking opens the stitches and gives the ripples a crisp, professional finish.
Customizing Your Blanket
This pattern is incredibly versatile. Try experimenting with different color palettes to create a unique project.
Baby Girl
- Blush Pink
- Lavender
- Cream
Baby Boy
- Sky Blue
- White
- Navy
Neutral
- Sage Green
- Ivory
- Taupe
Coastal
- Aqua
- White
- Sand
Autumn
- Rust
- Gold
- Brown
Winter
- Silver
- White
- Ice Blue
Rainbow
Use seven bright colors and change shades every two rows for a cheerful ripple blanket.
Helpful Tips for Success
- Count stitches at the end of every row to keep the ripples aligned.
- Place stitch markers in the peak and valley stitches if you’re new to ripple patterns.
- Keep your tension consistent for smooth, even waves.
- Weave in yarn ends as you go to save time during finishing.
- Self-striping yarn creates stunning color transitions with minimal effort.
- Wash and block the finished blanket before gifting or displaying it.
Frequently Asked Questions
Can beginners make this blanket?
Yes. If you’re comfortable with double crochet and basic decreases, this is an excellent first ripple project.
Can I use chunky yarn?
Absolutely. Use a larger hook recommended by the yarn label, keeping the stitch repeat the same.
Can I make it wider?
Yes. Increase the foundation chain using the same multiple of 14 + 3.
Can I make a scarf instead?
Certainly! Simply begin with a shorter foundation chain and continue the ripple pattern until you reach your desired length.
What yarn works best?
Soft acrylic, acrylic blends, or cotton blends all work beautifully. Self-striping cakes are especially effective for creating the elegant color transitions seen in the inspiration photo.
Final Thoughts
This Wavy Ripple Crochet Blanket combines timeless ripple shaping with soft pastel colors and rich texture to create a blanket that’s both eye-catching and comforting. Whether you’re making it as a baby shower gift, a cozy throw for your living room, or a relaxing weekend project, the repetitive rhythm of the ripple pattern makes it enjoyable from the first row to the last. The gentle waves, combined with delicate color changes, produce a stunning handmade piece that will be treasured for years to come.

