 soofha
If you love making cozy crochet blankets, this Herringbone Half Double Crochet Blanket is a lovely project to add to your list. The stitch creates a beautiful slanted texture that gives the blanket a little extra character without making the design too complicated. It’s a great choice for crocheters who want to try something different while working with a simple, repeating pattern.
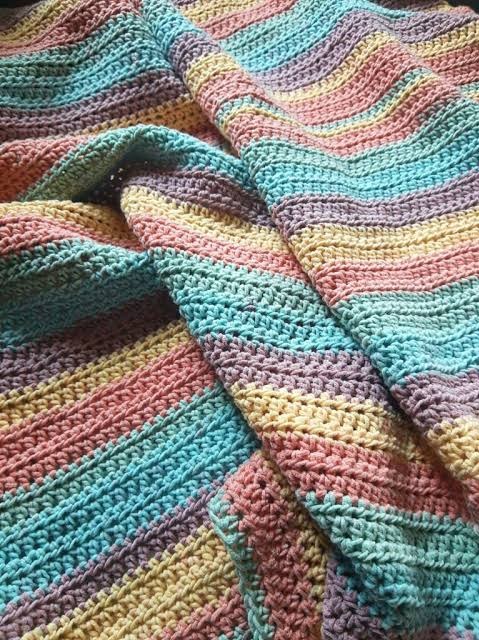
The pastel colors in the photo are especially pretty, with aqua, blush pink, pale yellow, and soft lavender creating a gentle, cheerful look. You can use the same color combination or choose shades that match your home. The written pattern starts with a soft pink yarn called Meteor, but there’s plenty of room to make the design your own.
One of my favorite things about this stitch is how the texture develops row by row. Even if you decide to make the entire blanket in one color, the slanted stitches give it a lovely finish. If you enjoy adding stripes to your projects, this pattern is also a wonderful opportunity to play around with different color combinations.
The free PDF pattern is available at the end of this post. It includes the original row instructions, stitch details, sizing information, and an optional suggestion for creating pastel stripes.
Why You’ll Love This Crochet Blanket
This blanket is a great project for anyone who enjoys simple stitches with a little extra texture. Once you get comfortable with the herringbone half double crochet, the repeating rows make it easy to settle into a relaxing rhythm.
Here are a few reasons to give it a try:
- Beautiful texture: The slanted stitches create an interesting pattern without requiring complicated techniques.
- Easy to customize: Make it in a single color or add stripes using your favorite shades.
- A cozy handmade gift: It’s a lovely choice for birthdays, holidays, or anyone who appreciates something made by hand.
- A relaxing project: The repeating stitch pattern makes it easier to pick up where you left off.
If you’re planning to use several colors, arrange your yarn before you begin. Seeing the shades together can help you decide how often to change colors and whether you want a soft, blended look or more noticeable stripes.
Materials You’ll Need
Before starting your Herringbone Half Double Crochet Blanket, gather the following supplies:
- Crochet hook: Size I (5.5 mm)
- Yarn: Worsted-weight yarn in your preferred colors
- Scissors: For cutting the yarn when needed
- Tapestry needle: For weaving in the ends
- Stitch markers: Optional, but helpful for keeping track of the first stitch in each row
The original instructions call for a soft pink shade named Meteor. However, the yarn brand, fiber content, and total yardage aren’t specified, so you’ll need to choose an appropriate amount based on your yarn and desired blanket size.
If you’re combining different colors, try to use yarns with a similar thickness and fiber content. This will help keep the finished blanket looking even.
Finished Size and Skill Level
The finished blanket measures approximately 36 × 45 inches (91.4 × 114.3 cm).
Keep in mind that your final measurements may vary depending on your yarn, crochet hook, and personal tension.
This pattern is best suited to confident beginners who are comfortable making chains, working yarn overs, turning rows, and counting stitches. If you’ve already made a few crochet projects, you should find the repeating rows fairly straightforward once you’ve practiced the main stitch.
Crochet Abbreviations
The pattern uses standard US crochet terminology.
- ch: Chain
- st: Stitch
- YO: Yarn over
- HHDC: Herringbone half double crochet
How to Crochet the Herringbone Half Double Crochet Stitch
The herringbone half double crochet stitch is what gives this blanket its distinctive texture. It looks a little different from a regular half double crochet because of the way you pull the yarn through the loops.
Here’s how to make one stitch:
- Yarn over.
- Insert your hook into the next stitch.
- Yarn over again and pull up a loop.
- Draw the newly pulled loop directly through the first loop on your hook.
- Yarn over once more and pull through the remaining two loops.
That’s your first herringbone half double crochet!
Continue working through both top loops of each stitch unless the pattern specifies otherwise. If this is your first time using the stitch, practice on a small swatch before beginning the blanket. A few practice rows will help you get comfortable with the movement and keep your stitches looking consistent.
Herringbone Half Double Crochet Blanket Instructions
Now that you’ve gathered your supplies and practiced the stitch, it’s time to get started.
Foundation Chain
Using Meteor or your chosen starting color, chain 130.
Try to keep your foundation chain relaxed and even. If you tend to crochet tightly, take a little extra care here, as a tight foundation can make the bottom edge of your blanket narrower than the rest.
Row 1
Work one herringbone half double crochet into the third chain from your hook.
Continue working one HHDC into each remaining chain across the row.
You should have 128 stitches when you finish.
Chain 1 and turn your work. The two skipped chains at the beginning do not count as a stitch.
Row 2
Work one HHDC into the first stitch and continue across the row, making one stitch in each stitch.
You should still have 128 stitches.
Chain 1 and turn.
Remember that the turning chain does not count as a stitch in this pattern.
Continue the Pattern
Repeat Row 2 until your blanket measures approximately 45 inches long, or until it reaches your preferred length.
Because the same row is repeated throughout the project, the blanket becomes easier to work on as you get into the rhythm of the stitch.
When you’ve reached your desired length, finish the last row without making the turning chain. Fasten off and weave in all your loose ends securely.
Tips for Keeping Your Blanket Edges Straight
If you’ve ever finished a crochet blanket and noticed that one side looks narrower than the other, you’re not alone! Missing or adding stitches at the edges is a common problem, especially when working the same stitch across many rows.
Here are a few simple ways to avoid it.
Use stitch markers. Place a marker in the first HHDC of each row. When you turn your work, use it to help identify the edge stitch. Move the marker as you continue working.
Count your stitches occasionally. Every row should contain 128 HHDC stitches. Checking every few rows can help you catch mistakes before they become noticeable.
Pay attention to the last stitch. Missing the final stitch can gradually narrow your blanket. Accidentally working into the turning chain can add extra stitches and make the edges wider.
Keep your tension consistent. Try to maintain the same tension throughout the project. There’s no need to pull your stitches tightly to make the edges look neat.
A little attention at the beginning can save you time and frustration later.
Optional Pastel Stripes
One of the prettiest ways to customize this blanket is by adding stripes. The aqua, blush pink, pale yellow, and lavender shades shown in the photo make a lovely pastel combination.
If you’d like to try a similar look, here’s a simple color sequence you can follow:
- Aqua
- Blush pink
- Pale yellow
- Muted lavender
Work four rows in each color, then repeat the sequence until your blanket reaches the desired length. You can also change the number of rows per color to create wider or narrower stripes.
This is simply a suggested color arrangement inspired by the photo. The exact stripe sequence used in the original image isn’t available, so feel free to experiment with your own combination.
How to Change Colors
When you’re ready to switch colors, complete the final yarn over and pull-through of the last HHDC using the new color.
Then chain 1 and turn your work.
Leave a yarn tail long enough to weave in securely when you finish. Taking care of the ends as you go can make the final finishing process much easier.
How to Customize the Blanket Size
Would you prefer a smaller lap blanket or a larger throw? You can adjust the dimensions to suit your needs.
For this pattern, the number of stitches across is determined by the foundation chain minus two. For example, chaining 102 stitches will give you 100 HHDC stitches in the first row.
For a more accurate width, it’s helpful to make a small gauge swatch before starting.
Measure how many stitches you get per inch, then multiply that number by your desired blanket width. Round the result to a whole stitch and add two chains to determine your foundation-chain length.
You can adjust the length independently by working more or fewer rows.
Keep in mind that changing your yarn, hook size, or tension may affect the finished dimensions. A small swatch is a useful way to estimate the size before committing to the full project.
Finishing Your Herringbone Crochet Blanket
Once you’ve finished crocheting, take a few minutes to tidy up your work.
Use a tapestry needle to weave in the loose ends, passing the yarn through several stitches in different directions. Avoid pulling too tightly, as this can cause the fabric to bunch up.
A border is optional and isn’t included in the original instructions. If you prefer a more finished edge, you can add one using a simple crochet stitch of your choice.
Blocking may also help even out the fabric, depending on the yarn you’ve used. Always follow the care instructions on your yarn label, and test your preferred blocking method on your swatch first.
If you’re making this blanket as a gift, consider adding a small care card with washing and drying instructions. It’s a thoughtful finishing touch that helps the recipient look after their handmade blanket.
Download the Free Herringbone Half Double Crochet Blanket Pattern
If you’re ready to start your next crochet project, this Herringbone Half Double Crochet Blanket is a lovely one to try. The repeating rows are easy to settle into once you’ve mastered the stitch, and the finished texture looks beautiful whether you choose a single color or a combination of soft pastels.
You can follow the original instructions for a simple pink blanket or experiment with your own colors to create something that feels personal to you.
Download the free printable PDF pattern below, gather your yarn and hook, and enjoy watching your blanket grow one row at a time. Happy crocheting!

