

 soofha
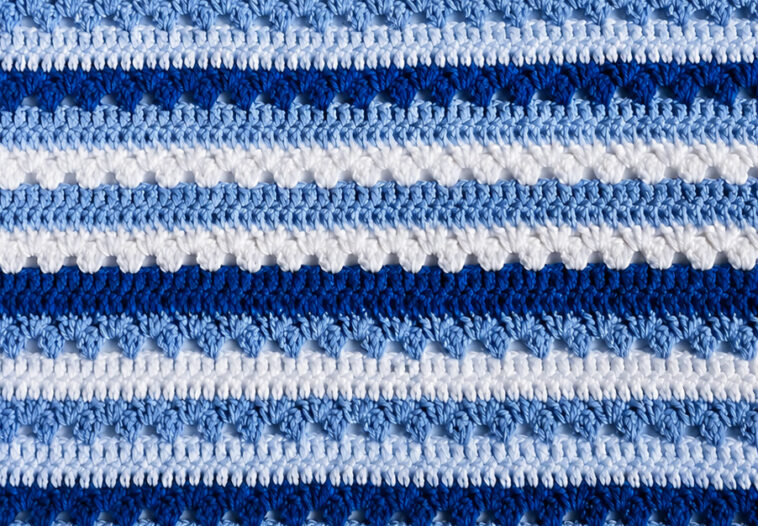
This beautiful crochet blanket combines simple textured rows, raised stitches, and alternating blue-and-white stripes to create a soft, dimensional design. The pattern is beginner-friendly once you understand the repeating textured section, and it can easily be adapted for a baby blanket, lapghan, throw, or full-size bed blanket.
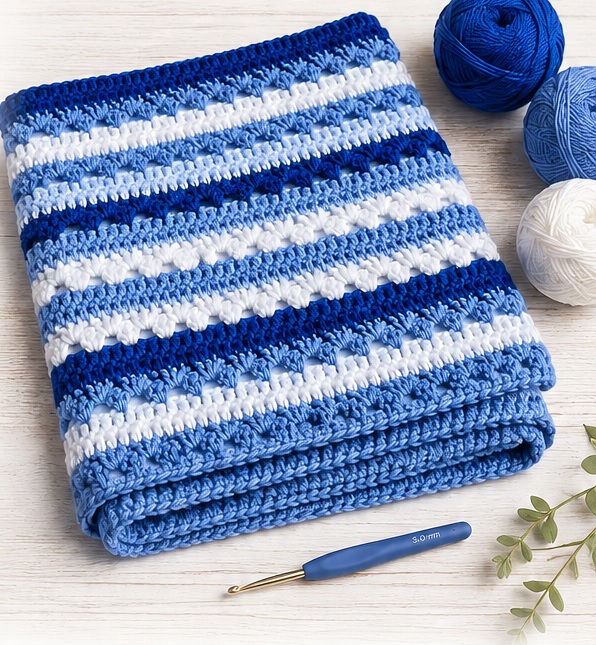
Pattern Details
Skill Level: Easy to Intermediate
Hook: 5.0 mm crochet hook
Yarn: Worsted/medium-weight yarn (#4)
Colors:
- Color A – Dark Royal Blue
- Color B – Medium Blue
- Color C – Light Blue
- Color D – White
The pictured blanket uses several shades of blue with white to emphasize the texture.
Abbreviations – US Terms
- ch – chain
- sc – single crochet
- hdc – half double crochet
- dc – double crochet
- sl st – slip stitch
- st/sts – stitch/stitches
- sk – skip
- rep – repeat
- RS – right side
- WS – wrong side
})(jQuery);
Starting Chain
Chain a multiple of 2 + 1.
For example:
101 chains will produce a blanket approximately 36–40 inches wide, depending on your yarn and tension.
For a larger blanket, use:
121, 141, 161, 181, etc.
The important thing is to maintain the same stitch multiple throughout the project.
Basic Blanket Pattern
Row 1 – Foundation
With Color A, ch your desired number.
Sc in the 2nd chain from hook and in each chain across.
Turn.
You should have the same number of sc as your starting chain minus one.
Row 2 – Single Crochet
Ch 1.
Sc in each stitch across.
Turn.
This creates a firm foundation for the textured stripes.
Row 3 – Textured Row
Change to Color B.
Ch 1.
Sc in the first stitch.
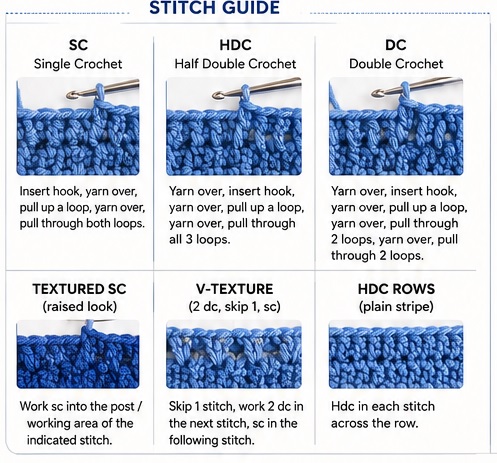
Work 2 sc around the post/working area of the next stitch, then sc in the following stitch.
Repeat across.
The slightly raised stitches begin creating the textured appearance visible in the blanket.
Turn.
Row 4 – Textured Row
Ch 1.
Sc across, working into the stitches normally.
Turn.
Keep your tension relaxed so the textured stitches do not pull the fabric inward.
Raised V-Texture Section
This is the section that gives the blanket its distinctive decorative rows.
Row 5
Change to Color C.
Ch 1.
Sc in the first stitch.
Skip the next stitch, work 2 dc into the following stitch, then sc into the next stitch.
Repeat across.
Depending on your stitch count, adjust the final stitches so the row finishes evenly.
Turn.
Row 6
Ch 1.
Sc in each stitch across.
Turn.
You should now see small raised groups forming a repeating texture.
White Stripe
Row 7
Change to Color D.
Ch 1.
Work hdc across.
Turn.
Row 8
Ch 1.
Hdc across.
Turn.
The two-row white section creates the clean horizontal stripe seen throughout the sample.
Light Blue Textured Stripe
Row 9
Change to Color C.
Ch 1.
Sc in the first stitch.
Skip 1 stitch, work 2 dc in the next stitch, sc in the following stitch.
Repeat across.
Turn.
Row 10
Ch 1.
Sc across.
Turn.
Light Blue Plain Stripe
Row 11
Continue with Color C.
Ch 1.
Hdc in every stitch across.
Turn.
Row 12
Ch 1.
Hdc across.
Turn.
Dark Blue Stripe
Change to Color A.
Row 13
Ch 1.
Sc across.
Turn.
Row 14
Ch 1.
Sc across.
Turn.
The darker blue creates strong contrast between the lighter textured sections.
Decorative Textured Row
Change to Color B.
Row 15
Ch 1.
Sc in the first stitch.
Skip the next stitch, work 2 dc into the next stitch, sc in the following stitch.
Repeat across.
Turn.
Row 16
Ch 1.
Sc across.
Turn.
White Raised Stripe
Change to Color D.
Row 17
Ch 1.
Work hdc across.
Turn.
Row 18
Ch 1.
Work hdc across.
Turn.
For an even puffier appearance, you can substitute the first row with a small bobble/puff-style stitch, but keep the second row in hdc.
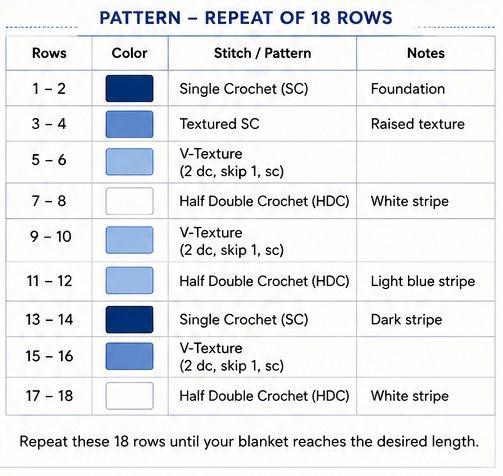
Repeat the Color Sequence
The blanket can now be built by repeating the stripe arrangement.
A simple sequence inspired by the photograph is:
Dark Blue – Medium Blue Texture – White – Light Blue – Light Blue – Dark Blue – Medium Blue Texture – White
Then repeat.
For example:
| Rows | Color | Stitch |
|---|---|---|
| 1–2 | Dark Blue | SC |
| 3–4 | Medium Blue | Textured SC |
| 5–6 | Light Blue | V-texture |
| 7–8 | White | HDC |
| 9–10 | Light Blue | V-texture |
| 11–12 | Light Blue | HDC |
| 13–14 | Dark Blue | SC |
| 15–16 | Medium Blue | V-texture |
| 17–18 | White | HDC |
Repeat this sequence until your blanket reaches the desired length.
How to Change Colors Neatly
For this design, clean color changes are particularly important because the stripes are the main visual feature.
When you’re working the final stitch of a row, stop when two loops remain on the hook.
Drop the old color and use the new color to complete the final pull-through.
Then turn your work and begin the next row with the new color.
This produces much cleaner horizontal stripes.
For an even cleaner edge, avoid carrying yarn along the side for too many rows. Instead, cut the yarn at each color change and weave in the ends later.
Border
A simple border works beautifully with this heavily textured design.
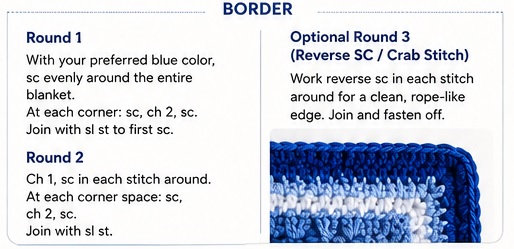
Round 1
With your preferred blue color, attach yarn in any corner.
Ch 1.
Work sc evenly around the entire blanket.
At each corner:
sc, ch 2, sc
Continue around.
Join with a sl st to the first sc.
Round 2
Ch 1.
Sc in each stitch around.
At every corner space, work:
sc, ch 2, sc
Join with a sl st.
Fasten off.
Optional Decorative Border
For a slightly more finished look, add one final round of reverse single crochet (crab stitch).
Work one reverse sc in each stitch around, maintaining the corner shape.
This creates a subtle rope-like edge that complements the raised stripes without overpowering them.
Tips for Recreating the Look
Keep your tension consistent
The textured sections naturally use more yarn than plain rows. If your tension changes significantly between sections, the blanket may become wider or narrower.
Use several shades of one color
The original look works particularly well because the colors belong to the same blue family.
Try:
- Navy
- Royal blue
- Cornflower blue
- Pale blue
- White
The contrast between dark and light shades makes the texture much easier to see.
Don’t make the textured stitches too tight
Raised stitches need room to stand out. If you crochet them very tightly, the decorative sections can become stiff and lose their three-dimensional appearance.
Block the finished blanket
After weaving in all ends, gently wash the blanket according to your yarn’s instructions and lay it flat to dry.
Light blocking will help straighten the horizontal stripes and give the blanket a more polished shape.
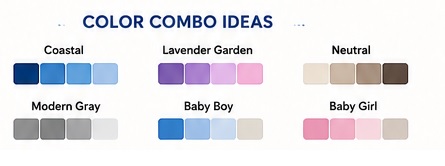
Easy Colorway Ideas
You don’t have to use blue and white.
Coastal
Navy + sky blue + white + pale aqua
Lavender Garden
Purple + lavender + white + soft pink
Neutral
Cream + beige + taupe + chocolate brown
Modern Gray
Charcoal + medium gray + light gray + white
Baby Boy
Royal blue + baby blue + white + soft gray
Baby Girl
Dusty rose + blush + cream + white
Finished Look
The combination of plain rows and raised textured rows is what gives this blanket its rich appearance. The repeating stripes make it suitable for a relaxing crochet project because you don’t have to memorize a complicated motif or continuously count intricate stitch combinations.
Pattern repeat: 18 rows
Hook: 5.0 mm
Yarn: Medium/Worsted #4
Main stitches: sc, hdc, dc and textured/V-style groups
Construction: Worked flat in horizontal rows
Best for: Baby blankets, throws, lap blankets and larger afghans

