

 soofha
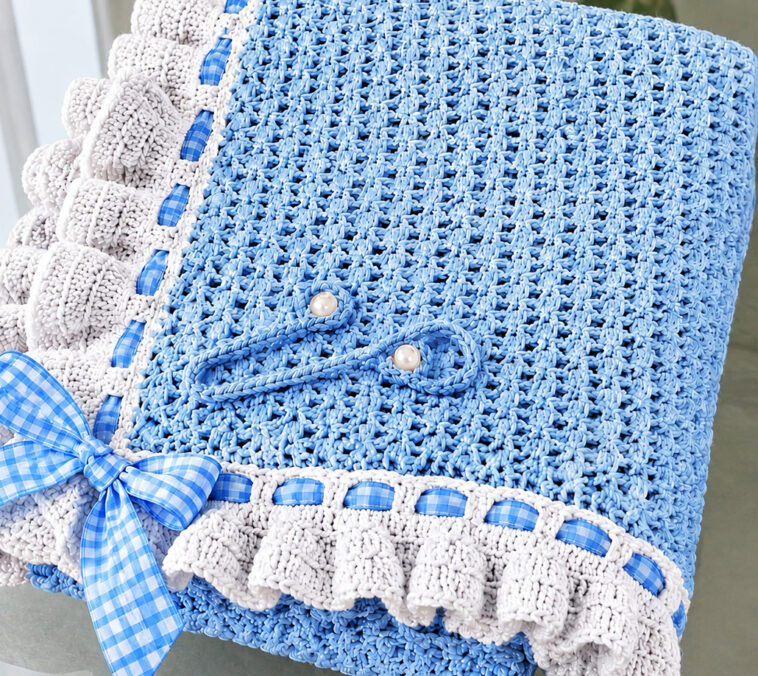
This beautiful Blue & White Crochet Ruffle Pillow Cover combines a soft textured crochet fabric with a delicate white ruffled border and blue gingham ribbon. The finished design has a charming vintage, farmhouse, and cottage-style appearance, making it perfect for a bedroom, nursery, living room, or cozy reading corner.
The main body features a tightly textured stitch that gives the pillow a wonderfully tactile surface, while the white crochet ruffle creates a pretty frame around the edges. Blue-and-white checked ribbon woven through the border adds the final decorative touch.
Pattern note: The stitch structure and construction below are designed as a close, practical crochet recreation inspired by the photographed pillow. Because the photo does not provide the original designer’s written pattern, stitch counts and measurements can be adjusted to fit your pillow insert.
Blue & White Ruffle Crochet Pillow Cover
Skill Level
Intermediate
The project uses basic crochet stitches, textured stitch repeats, simple edging, and decorative ribbon. Beginners who are comfortable working in rows and following stitch repeats can also make this project by working slowly and checking their stitch count regularly.
Finished Size
Designed for approximately:
16 × 16 inch (40 × 40 cm) pillow insert
You can easily modify the dimensions for a different pillow size.
For the best fit, measure your pillow insert and make the crochet cover approximately ½–1 inch smaller than the insert so the finished pillow looks full and plump.
Materials
- Worsted-weight yarn in light blue
- Worsted-weight yarn in white or ivory
- Crochet hook appropriate for your yarn, approximately 4.0–5.0 mm
- 16 × 16 inch pillow insert
- Blue-and-white gingham ribbon
- Tapestry needle
- Scissors
- Stitch markers
- Sewing needle and matching thread
- Optional: 2 small pearl-style buttons
- Optional: sewing machine for the pillow-cover backing
Yarn
For a 16-inch pillow, approximately:
- Light blue: 350–450 yards
- White: 150–200 yards
The exact amount will depend on your yarn weight, hook size, stitch tension, and the size of your pillow.
Finished Design
The pillow consists of several decorative elements:
- A textured blue crochet front
- A white ruffled border
- Blue gingham ribbon woven through the border
- A decorative gingham bow
- Optional pearl-style buttons
- A simple crochet or fabric backing
The combination of light blue and white gives the finished piece a soft, fresh look.
Abbreviations
US crochet terminology:
- ch – chain
- sl st – slip stitch
- sc – single crochet
- hdc – half double crochet
- dc – double crochet
- st – stitch
- sts – stitches
- sk – skip
- rep – repeat
- RS – right side
- WS – wrong side
Gauge
Gauge is less important than achieving the correct finished measurements.
Make a small swatch in the textured blue stitch.
Aim for approximately:
16–18 stitches × 12–14 rows = 4 inches
If your fabric is too loose, use a smaller crochet hook.
If it is too tight, use a larger hook.
Because a pillow cover benefits from a firm fabric, avoid making the gauge excessively loose.
Part 1: Crochet the Blue Pillow Front
The blue center is worked in rows.
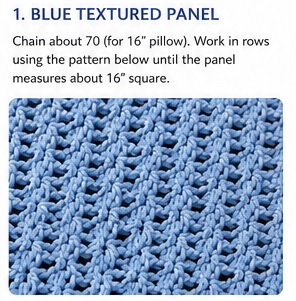
The exact texture in the photograph has a dense, raised appearance. A simple textured combination of single crochet and elongated stitches can create a very similar handmade surface.
Foundation Chain
Chain approximately 70 chains for a 16-inch pillow using your chosen yarn and hook.
Do not rely solely on the number of chains. Lay your chain flat and measure it.
Your foundation chain should be approximately:
15½–16 inches wide
For another pillow size, chain until your foundation reaches the desired width.
Row 1
Single crochet in the second chain from the hook.
Work 1 single crochet into each chain across.
Chain 1 and turn.
Row 2
Single crochet across.
Chain 1 and turn.
Row 3 – Textured Row
Single crochet in the first stitch.
Work 1 elongated single crochet around the post of the next stitch, then 1 single crochet in the following stitch.
Repeat across.
Chain 1 and turn.
What is an elongated single crochet?
Insert your hook into the indicated stitch and pull the loop slightly higher than you normally would for a single crochet. Complete the stitch normally.
The elongated stitches create little raised vertical details.
Row 4
Single crochet across.
Chain 1 and turn.
Row 5
Repeat Row 3.
Row 6
Single crochet across.
Continue the Pattern
Repeat Rows 3–6 until the piece measures approximately:
15½–16 inches long
The finished blue center should be approximately square.
Do not stretch the fabric while measuring.
Keeping the Edges Straight
Textured stitches can sometimes make the sides of a project uneven.
To avoid this:
- Count your stitches at the end of every row.
- Always work the final stitch into the correct turning-chain area.
- Use stitch markers on the first and last stitch.
- Do not pull your elongated stitches too tightly.
- Lay the work flat occasionally to check the shape.
If your sides begin to curve, correct the problem immediately rather than waiting until the end.
Part 2: Blocking the Blue Panel
Blocking is especially useful for this project because the textured stitch can naturally contract.
Lightly dampen the crochet panel.
Place it flat on a clean towel or blocking mat.
Gently stretch it into a square measuring approximately 16 × 16 inches.
Pin the edges if necessary.
Allow it to dry completely.
Do not aggressively stretch the fabric because you want the texture to remain raised.
Part 3: White Border
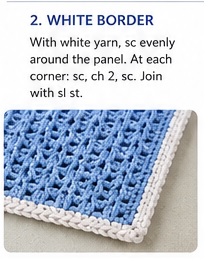
Now the blue center receives a white crochet border.
Attach the white yarn to one corner.
Work single crochet evenly around the entire square.
At each corner:
sc, ch 2, sc
This creates enough room for the border to turn neatly around the corners.
Join with a slip stitch.
Part 4: Creating the Decorative Ruffle
The ruffle is the feature that gives this pillow its distinctive vintage appearance.
For the ruffle, you want the white yarn to gather slightly.
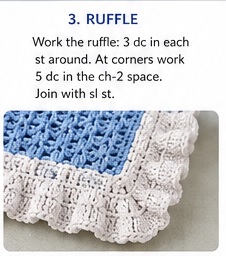
Attach white yarn along one side of the pillow.
Work approximately:
3 dc in each stitch
or, for a less dramatic ruffle:
2 dc in each stitch
The extra stitches cause the fabric to ripple.
Continue around the pillow.
At each corner, add additional stitches so that the ruffle turns smoothly.
For example:
5 dc in the corner space
Join with a slip stitch.
Fasten off and weave in the ends.
Creating a Fuller Ruffle
If you want a look closer to the photograph, use a fuller ruffle.
Work:
3–4 dc in each stitch
The more stitches you place into each base stitch, the more dramatically the border will gather.
For a softer, elegant ruffle, use 2 dc.
For a fuller vintage ruffle, use 3 dc.
For a very dramatic ruffle, use 4 dc.
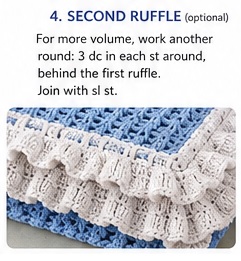
Part 5: Second White Ruffle Layer
For additional dimension, work another round of white stitches behind the first ruffle.
Attach the yarn to the base of the first ruffle.
Work:
3 dc in each stitch around
The second ruffle should sit slightly behind the first.
This creates a layered effect similar to a fabric frill.
If you prefer a simpler pillow, this second layer can be omitted.
Part 6: Adding the Blue Ribbon
The blue gingham ribbon is what gives this pillow its particularly charming country-cottage appearance.
Choose approximately:
½–¾ inch wide blue-and-white gingham ribbon
Cut enough ribbon to travel around the pillow border, leaving additional length for tying the bow.
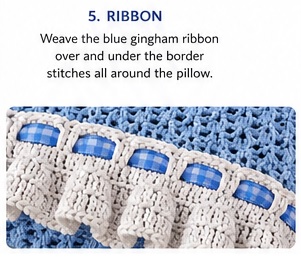
Weaving the Ribbon
Look for spaces between the white crochet stitches.
Starting near one corner, weave the ribbon:
over one section → under the next → over → under
Continue around the entire pillow.
Do not pull the ribbon too tightly.
It should gently follow the shape of the ruffle.
Ribbon at the Corners
When reaching a corner, carefully bend the ribbon around the crochet border.
Avoid forcing it into a sharp angle.
Instead, allow a small amount of slack so the ribbon follows the rounded crochet corner naturally.
Making the Decorative Bow
The bow shown in the photograph is an important part of the design.
Cut a piece of gingham ribbon approximately:
24–30 inches long
Fold the ribbon into two loops.
Cross the center.
Tie the middle firmly using a small piece of matching thread.
Adjust the loops until they are even.
Trim the ribbon ends at an angle or into a V-shaped notch.
Attaching the Bow
Place the bow near one corner of the pillow.
Using a tapestry needle and matching thread, sew the center of the bow securely to the crochet border.
Make several small stitches through the back of the bow.
Avoid stitching through only the ribbon because the bow may eventually loosen.
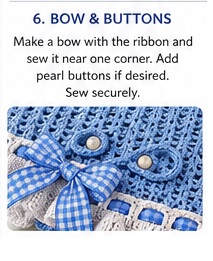
Optional Pearl Button Decoration
The photographed design includes small pearl-like decorative details.
You can add:
- 2 pearl buttons
- White wooden buttons
- Small crocheted flowers
- Tiny fabric-covered buttons
Sew the buttons securely to the front of the pillow.
For a children’s pillow, make sure all decorative pieces are firmly attached and appropriate for the intended age.
Part 7: Pillow Cover Backing
There are several ways to finish the back.
The easiest method is an envelope-style crochet backing.
You will need two overlapping panels.
Back Panel A
Chain until the foundation measures approximately:
16 inches wide
Work in single crochet rows until the panel measures approximately:
11 inches long
Fasten off.
Back Panel B
Repeat the same process.
Make another rectangle approximately:
16 × 11 inches
These panels will overlap in the center.
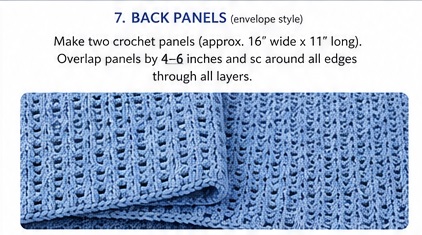
Joining the Pillow
Place the decorative front face-up.
Position Back Panel A over it.
Then place Back Panel B over the other side.
The two back panels should overlap by approximately:
4–6 inches
The overlap prevents the pillow insert from slipping out.
Single crochet around the entire outside edge, working through all layers.
At each corner:
sc, ch 2, sc
Join with a slip stitch.
Fasten off.
Weave in all ends.
Alternative: Fabric Backing
If you prefer a more polished pillow cover, you can sew a fabric backing.
Choose:
- White cotton
- Pale blue cotton
- Blue gingham
- Cream linen
- Small floral cotton
Cut two fabric pieces according to your pillow dimensions.
Create an envelope opening or insert a zipper.
Then sew the fabric backing to the crochet front.
This option is especially useful if you want the pillow to be washable and durable.
Finishing the Crochet Edges
Once the cover is assembled, examine the entire border.
Look for:
- Loose ends
- Uneven ruffles
- Loose ribbon
- Missed stitches
- Uneven corners
Use a tapestry needle to hide all yarn tails securely.
Do not simply cut yarn ends close to the surface.
Weave them through several stitches first.
Washing and Care
Because this pillow includes ribbon and decorative elements, gentle care is recommended.
Hand Washing
Use cool or lukewarm water and a mild detergent.
Gently squeeze the pillow cover.
Do not twist or wring the crochet fabric.
Rinse thoroughly.
Press between clean towels to remove excess water.
Lay flat to dry.
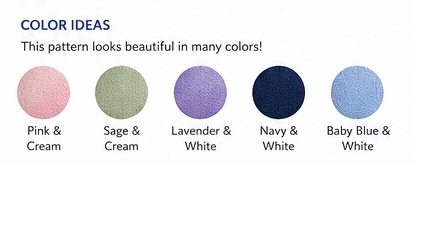
Color Variations
Although the original inspiration uses a beautiful light blue and white combination, this design works wonderfully in many palettes.
Baby Blue & White
- Powder blue
- White
- Blue gingham
Perfect for nurseries and children’s rooms.
Pink & Cream
- Blush pink
- Ivory
- Pink gingham
A lovely romantic cottage style.
Sage Green & Cream
- Soft sage
- Cream
- Green gingham
Ideal for farmhouse and botanical interiors.
Lavender & White
- Pale lavender
- White
- Lavender gingham
Soft and feminine without being overly bright.
Navy & White
- Navy blue
- White
- Navy gingham
This version gives the pattern a classic nautical feel.
How to Customize the Pillow Size
The easiest way to customize this pattern is to work according to measurements rather than fixed stitch counts.
Measure your pillow insert.
For example:
12 × 12 inch pillow
Make the blue center approximately:
11½ × 11½ inches
16 × 16 inch pillow
Make the blue center approximately:
15½ × 15½ inches
18 × 18 inch pillow
Make the blue center approximately:
17½ × 17½ inches
The white ruffle will add approximately 1–2 inches around the outside.
Tips for a Professional Finish
1. Keep your tension consistent
The textured center looks best when the stitches are evenly formed.
2. Don’t make the ruffle too tight
A tightly pulled ruffle can cause the pillow to curl.
3. Block before adding ribbon
Blocking makes it much easier to position the ribbon evenly.
4. Use quality ribbon
A good-quality gingham ribbon holds its shape and creates a much more polished bow.
5. Hide your yarn tails carefully
A neat back makes the finished project look professionally made.
6. Choose a firm pillow insert
A plump insert helps emphasize the raised crochet texture.
Design Ideas
This pillow would look beautiful placed on:
- A white armchair
- A wooden farmhouse bench
- A bedroom bed
- A nursery rocking chair
- A cottage-style sofa
- A reading chair
- A guest bedroom
- A porch seating area
Pair it with a knitted throw, lace curtains, woven baskets, or other blue-and-white accessories for a coordinated look.
Why You’ll Love This Pattern
The Blue & White Crochet Ruffle Pillow Cover is a wonderful project if you enjoy combining crochet with fabric-style embellishments.
The textured blue stitch creates visual depth without requiring an extremely complicated stitch pattern. The white ruffle gives the project a soft decorative edge, while the gingham ribbon brings everything together with a nostalgic handmade feel.
It is also highly customizable. You can change the yarn colors, ribbon, pillow size, ruffle fullness, or even the backing method to create a completely different look.
The project makes a lovely handmade gift for:
- Baby showers
- Housewarming gifts
- Mother’s Day
- Birthdays
- Christmas
- Cottage-style home décor
- Handmade craft markets
Quick Pattern Summary
Project: Blue & White Crochet Ruffle Pillow Cover
Skill Level: Intermediate
Finished Size: Approximately 16 × 16 inches
Main Color: Light blue
Accent Color: White
Trim: Blue-and-white gingham ribbon
Hook: Approximately 4.0–5.0 mm
Main Stitch: Textured single-crochet/elongated-stitch combination
Border: White crochet ruffle
Closure: Envelope-style crochet backing
Embellishments: Gingham bow and optional pearl buttons
Final Thoughts
This blue-and-white crochet pillow is a lovely example of how a simple crochet base can become something truly special with the right finishing details. The textured blue fabric provides the foundation, while the white ruffled trim creates movement around the edges. The gingham ribbon adds a sweet vintage accent, and the oversized bow gives the finished pillow its signature handmade character.
If you’re making this design for your own home, don’t be afraid to experiment with different yarn colors, ribbon widths, ruffle sizes, and pillow dimensions. The basic construction is simple enough to adapt, while the decorative details allow you to make the finished piece uniquely yours.
Save this pattern for your next crochet home décor project and enjoy creating a beautiful blue-and-white accent pillow with a charming vintage feel!

