

 soofha
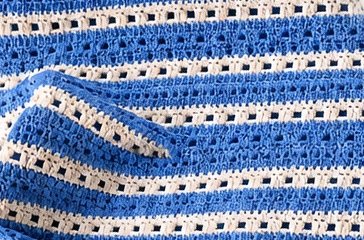
Create a cozy, textured blanket with a beautiful combination of denim blue and soft cream yarn. This design features horizontal bands of dense crochet texture separated by delicate cream accent rows, creating a modern farmhouse look with plenty of visual interest.
The blanket in the photo has a wonderfully tactile appearance. The blue sections provide the main body of the design, while the cream stripes add definition and make the texture stand out. It is a great project for a throw blanket, baby blanket, lapghan, or larger bed blanket.
Pattern note: The exact original stitch pattern cannot be determined from a photograph alone. The instructions below are a carefully designed photo-inspired crochet pattern that recreates the overall appearance, stripe arrangement, texture, and color effect shown in the image.
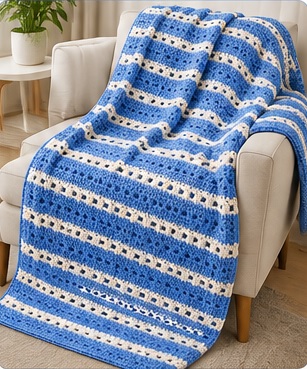
Blue and Cream Textured Stripe Blanket
Skill Level
Easy to Intermediate
This blanket uses basic crochet stitches combined with a simple textured stitch pattern. Once you establish the first few rows, the repeating section becomes very easy to memorize.
Finished Size
The sample can be customized to almost any size.
For a comfortable throw blanket, aim for approximately:
48 × 60 inches (122 × 152 cm)
For a baby blanket:
30 × 36 inches (76 × 91 cm)
For a lap blanket:
36 × 48 inches (91 × 122 cm)
Your finished measurements will depend on your yarn, hook size, and personal tension.
Materials
- Worsted-weight or aran yarn
- Blue yarn – approximately 1,200–1,500 yards
- Cream yarn – approximately 250–400 yards
- Crochet hook suitable for your yarn, approximately 5.0 mm (H/8)
- Scissors
- Yarn needle
- Measuring tape
For a chunky version, you can use bulky yarn and a larger hook.
Suggested Color Combination
The photographed blanket uses a calm, coastal-inspired palette.
Color A – Blue: Main color
Color B – Cream: Accent color
For a similar appearance, choose a medium denim, cornflower, or dusty blue together with an ivory or warm cream.
Abbreviations
US crochet terminology:
- ch – chain
- sc – single crochet
- hdc – half double crochet
- dc – double crochet
- sl st – slip stitch
- st/sts – stitch/stitches
- rep – repeat
- sk – skip
- yo – yarn over
- BLO – back loop only
The Basic Idea Behind the Pattern
The blanket is worked flat in rows.
The design is built from:
- A foundation row
- Dense textured blue rows
- Narrow cream accent rows
- A small openwork detail in some cream stripes
- Repeating blue sections
- A simple contrasting border
The most important feature is the stripe rhythm. Rather than using equal-sized stripes throughout, the blanket combines several blue rows with occasional narrow cream rows.
This gives the finished blanket the layered appearance seen in the photograph.
Starting Chain
For a throw approximately 48 inches wide, make a foundation chain that measures around 48 inches.
If you prefer to work with a stitch multiple, use:
Chain a multiple of 2 + 1
For example:
Ch 161
This produces a good starting width for a standard throw, although you should always measure your chain rather than relying only on the number of chains.
For a smaller blanket, simply reduce the starting chain.
Row 1 – Foundation
Using Color A (blue):
Ch 161.
Sc in the second chain from the hook.
Sc in each chain across.
Turn.
Stitch count: 160 sc
This foundation creates a firm base and gives the blanket a neat lower edge.
Row 2 – Textured Blue Row
Ch 1.
Sc in the first stitch.
Work hdc in the next stitch, sc in the next stitch.
Repeat across the row.
End with a sc.
Turn.
This alternating stitch combination creates a subtle raised texture.
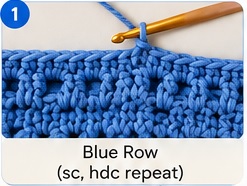
Row 3
Ch 1.
Sc across.
Turn.
Keep your stitches relaxed. A very tight tension can make the blanket stiff and reduce the softness of the texture.
Row 4 – Textured Row
Ch 1.
Sc in the first stitch.
Work:
hdc, sc
across the row.
Repeat until the end.
Turn.
Row 5
Ch 1.
Sc across.
Turn.
You should now have a compact blue textured section.
Creating the First Cream Stripe
Change to Color B – cream.
Do not cut the blue yarn if you are comfortable carrying it neatly along the edge. Otherwise, fasten off and weave in the end later.
Row 6 – Cream Accent
Ch 1.
Sc across.
Turn.
The cream row creates the first strong horizontal accent.
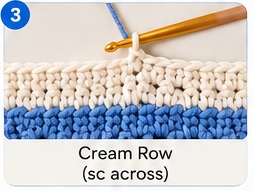
Row 7 – Cream Textured Detail
Ch 1.
Sc in the first stitch.
Skip the next stitch.
Work 3 hdc into the following stitch.
Skip the next stitch.
Repeat this small sequence across the row.
Finish with sc as necessary to keep the edge straight.
Turn.
This creates the little raised/open appearance that helps the cream stripe stand out from the blue background.
If you prefer a simpler version, work hdc across instead.
Row 8 – Cream Finishing Row
Ch 1.
Sc across.
Turn.
You now have a narrow cream decorative band.
Blue Section
Return to Color A.
Work the following sequence:
Row 9
Sc across.
Row 10
Sc, hdc, sc across.
Row 11
Sc across.
Row 12
Sc, hdc, sc across.
Row 13
Sc across.
Row 14
Sc, hdc, sc across.
Row 15
Sc across.
These rows create a wide textured blue section between the cream stripes.
Repeat the Stripe Sequence
The blanket becomes much easier after the first stripe has been established.
Repeat the following:
5–7 blue textured rows
followed by
2–3 cream accent rows
followed by another
5–7 blue rows.
You do not have to make every blue section exactly the same width.
In fact, slightly varying the width of the blue sections can give your blanket the relaxed handmade appearance shown in the photograph.
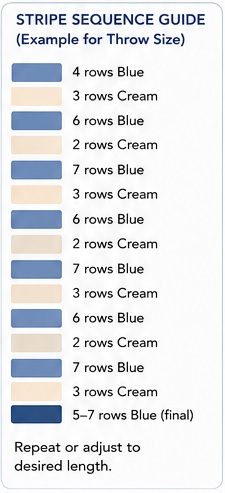
Recommended Stripe Layout
For a blanket approximately 60 inches long, you can use the following general layout:
| Section | Color | Rows |
|---|---|---|
| Foundation | Blue | 1 |
| Textured section | Blue | 4 |
| Accent stripe | Cream | 3 |
| Main section | Blue | 6 |
| Accent stripe | Cream | 2 |
| Main section | Blue | 7 |
| Accent stripe | Cream | 3 |
| Main section | Blue | 6 |
| Accent stripe | Cream | 2 |
| Main section | Blue | 7 |
| Accent stripe | Cream | 3 |
| Main section | Blue | 6 |
| Accent stripe | Cream | 2 |
| Main section | Blue | 7 |
| Accent stripe | Cream | 3 |
| Final section | Blue | 5–7 |
Continue repeating until your blanket reaches your desired length.
How to Change Colors Neatly
The color changes are one of the most important details in this blanket.
When working the final stitch of a blue row, stop before completing the final yarn over.
Instead:
- Insert hook into the final stitch.
- Yarn over with blue.
- Pull up a loop.
- Drop blue.
- Pick up cream.
- Complete the final yarn over with cream.
- Pull through the remaining loops.
Your next row will begin cleanly in cream.
When changing back to blue, use the same technique.
This creates a much cleaner transition than cutting and joining the new yarn at the beginning of every row.
Keeping the Blanket Straight
Textured crochet can sometimes cause the edges to become uneven.
To avoid this, count your stitches at the end of every few rows.
If your foundation contains 160 stitches, try to maintain 160 stitches throughout.
Pay particular attention to the first and final stitch of each row. These are the stitches most commonly missed.
A simple stitch marker placed in the first stitch can also help.
Creating the Soft Raised Texture
The texture in this design comes primarily from alternating compact stitches with taller stitches.
For a more pronounced texture, you can replace some of the hdc stitches with front-post stitches.
For example:
sc, FPdc, sc, FPdc
repeated across the row creates a stronger ribbed effect.
However, if you want a softer blanket with a flatter surface, keep the basic sc/hdc combination.
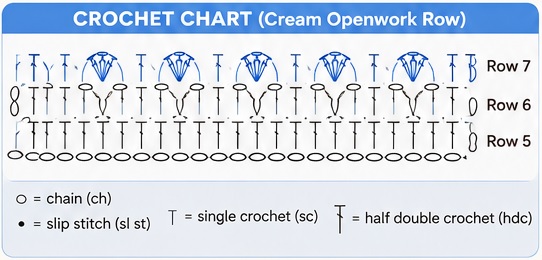
Optional Openwork Cream Stripe
For a more lace-like cream stripe, use this variation.
Cream Openwork Row
Ch 1.
Sc in the first stitch.
Ch 1, skip 1 stitch, sc in the next stitch.
Repeat from * across.
Turn.
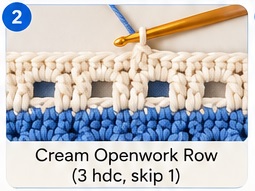
Following Row
Ch 1.
Sc in every sc and work 1 sc into every chain-1 space.
Turn.
This creates tiny openings in the cream stripe and gives the blanket a delicate decorative line.
Finishing the Main Blanket
Continue repeating your blue and cream stripe pattern until the blanket reaches your preferred length.
For the pictured style, finishing with several rows of blue creates a strong visual frame around the design.
After your final blue row, do not cut the yarn immediately if you plan to begin the border with the same color.
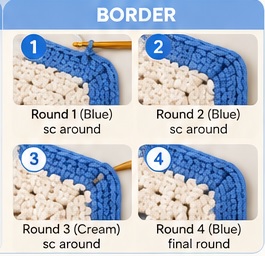
Crochet Border
A simple border works beautifully with this textured blanket.
Round 1
Using blue:
Ch 1.
Sc evenly around the entire blanket.
At each corner, work:
sc, ch 2, sc
This keeps the corners flat and prevents them from pulling inward.
Join with a sl st.
Round 2
Ch 1.
Sc in each stitch around.
At each corner space, work:
sc, ch 2, sc
Join with a slip stitch.
Round 3 – Cream Accent Border
Change to cream.
Ch 1.
Sc around the blanket.
Work sc, ch 2, sc in each corner.
Join.
This narrow cream border echoes the horizontal cream stripes inside the blanket.
Round 4 – Final Blue Border
Change back to blue.
Ch 1.
Sc around the entire blanket.
At every corner:
sc, ch 2, sc
Join with a slip stitch.
Fasten off.
Optional Decorative Edge
If you want a more decorative finish, try a simple scalloped edge.
After completing the border, work:
Skip 2 stitches, 5 dc in the next stitch, skip 2 stitches, sl st in the next stitch.
Repeat around the blanket.
This gives the blanket a soft, feminine edge.
For a more modern appearance, however, I recommend keeping the border simple.
Blocking the Blanket
Blocking is optional, but it can make a significant difference to the finished piece.
Because this design uses multiple textured rows, blocking helps straighten the edges and even out the stripe sections.
Wet Blocking
- Soak the finished blanket in cool or lukewarm water.
- Gently squeeze out excess water.
- Do not twist or wring.
- Lay the blanket flat on clean towels or blocking mats.
- Gently stretch it into the desired rectangular shape.
- Pin the corners and edges if necessary.
- Allow it to dry completely.
Always check the care instructions for your yarn before wet blocking.
Yarn Substitution
This design is very flexible.
You can make it with:
- Cotton
- Acrylic
- Cotton/acrylic blend
- Merino blend
- Superwash wool
- Bamboo blend
For a washable everyday blanket, acrylic or cotton/acrylic yarn is particularly practical.
For a baby blanket, choose a soft yarn that is comfortable against delicate skin and easy to wash.
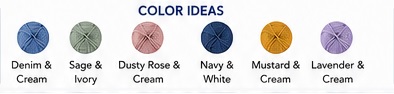
Color Ideas
Although blue and cream create a beautiful coastal look, this pattern would work with many combinations.
Soft Pink & Cream
Perfect for a baby girl blanket or romantic bedroom throw.
Sage Green & Ivory
A natural, modern farmhouse combination.
Terracotta & Cream
Warm and earthy for autumn-inspired home décor.
Mustard & Cream
Cheerful and vintage-inspired.
Navy & White
A crisp nautical look.
Lavender & Cream
Soft, calm, and delicate.
Gray & White
Perfect for a minimalist modern home.
How to Make the Blanket Larger
One of the best things about this pattern is that it does not require a fixed finished size.
To make a wider blanket, simply add more foundation chains.
Remember to maintain your chosen stitch multiple.
To make it longer, simply continue repeating the stripe sequence.
For a king-size blanket, you can continue until the project reaches the desired length.
Always make a small swatch first because yarn weight and tension can dramatically change the finished dimensions.
How to Make a Baby Blanket
For a baby version, start with approximately 100–120 chains, depending on your yarn and desired width.
Use fewer stripe repeats and finish around 30–36 inches long.
A lovely baby color combination would be:
- Soft blue
- Ivory
- Pale gray
Keep the border relatively simple to maintain the clean appearance of the original design.
How to Make a Chunky Version
For an extra cozy blanket, substitute bulky or super bulky yarn.
Use a larger crochet hook appropriate for the yarn.
Because chunky yarn creates larger stitches, you will need fewer foundation chains.
The same stripe concept can then be followed with:
wide blue textured bands + narrow cream accent stripes.
This version works especially well as a winter sofa throw.
Tips for a Professional Finish
1. Make a Gauge Swatch
Before beginning the blanket, crochet a small sample.
Measure both its width and height.
This allows you to estimate how many stitches and rows you need.
2. Avoid Tight Tension
The textured stitch pattern looks better when the stitches have room to move.
A loose, relaxed tension also makes the finished blanket softer.
3. Keep Your Color Changes Consistent
Always change colors at the same point in the row.
This creates clean horizontal stripes.
4. Count Your Stitches
Especially during the first few rows, count regularly.
5. Weave in Ends as You Go
If you cut the yarn after every stripe, you can end up with many loose ends.
Weaving them in periodically makes finishing much less overwhelming.
6. Wash Before Gifting
If the blanket is intended as a gift, wash and dry it according to the yarn manufacturer’s instructions before wrapping it.
This also lets you see how the finished texture behaves after washing.
Pattern Variations
One-Row Cream Stripes
For a subtler design, make every cream stripe only one row wide.
This creates a sophisticated striped effect.
Wide Cream Stripes
For a bolder appearance, work 3–4 cream rows between the blue sections.
Even Stripes
For a more geometric blanket, make every blue section exactly the same number of rows.
Random Stripes
For a more relaxed handmade appearance, vary the blue section widths while keeping the cream stripes consistent.
Two Blue Shades
Use two shades of blue instead of one.
For example:
- Light blue
- Medium denim
- Cream
This creates additional depth without making the pattern complicated.
Care Instructions
Care will depend on the yarn used.
For washable acrylic yarn, machine washing on a gentle cycle is generally convenient, but always follow the yarn manufacturer’s instructions.
Avoid high heat if possible, especially for acrylic and delicate fibers.
Lay the blanket flat to dry when practical to help preserve its shape.
Final Thoughts
This Blue and Cream Textured Stripe Crochet Blanket is a wonderful project when you want something that feels both handmade and polished. The combination of rich blue and warm cream gives it a timeless appearance, while the textured rows keep the surface from looking flat or repetitive.
The pattern is also highly adaptable. You can make a small baby blanket, a cozy lapghan, a sofa throw, or a large bedspread simply by changing the starting chain and number of stripe repeats.
The key to achieving the look is the contrast between the dense blue textured sections and narrow cream decorative stripes. Keep the color transitions clean, maintain an even stitch count, and allow the finished blanket to relax before blocking.
Whether you are crocheting it for your own home or making it as a thoughtful handmade gift, this pattern is an excellent way to create a cozy piece with a classic, modern feel.
Save this pattern for later, choose your favorite two-color combination, and start crocheting your own beautiful textured striped blanket!

