

 soofha
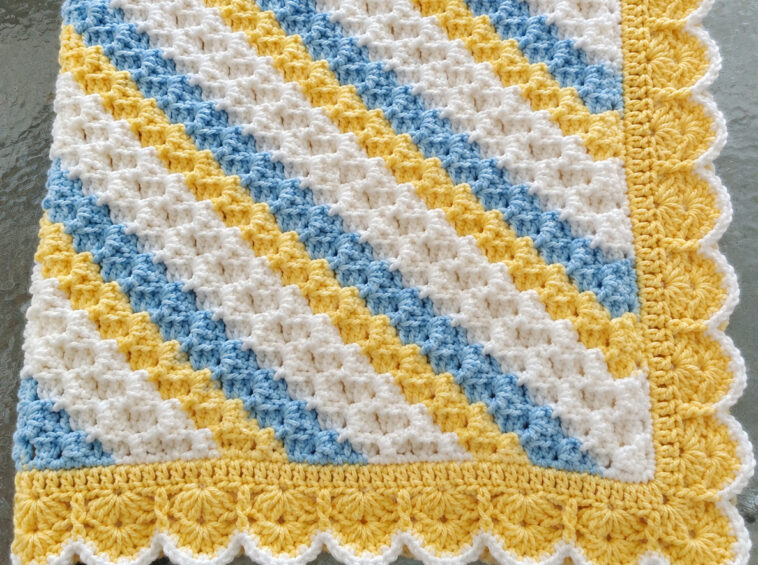
Bring a little sunshine into your crochet with this cheerful Sunny Skies Diagonal Stripe Blanket. Inspired by the beautiful blanket shown above, this design combines soft white, light blue, and warm yellow into a relaxed diagonal stripe pattern.
The textured stitch gives the blanket plenty of visual interest without making the project overly complicated. The diagonal color arrangement creates movement across the fabric, while the golden border and scalloped white edging give the finished blanket a sweet, classic finish.
This is a lovely project for a baby blanket, lapghan, nursery throw, summer blanket, or cozy handmade gift. The pattern can also easily be enlarged into a full-size bedspread simply by adding more repeats.
About the Pattern
The beauty of this blanket is the combination of simple textured crochet rows and strategic color changes.
Rather than using complicated motifs or joining dozens of squares, the blanket is worked as one continuous piece. The diagonal appearance comes from arranging the color sections so that the stripes visually travel from one corner toward the opposite side.
The main body uses three cheerful shades:
- White – clean and soft
- Light blue – fresh and calming
- Sunny yellow – warm and playful
A yellow border frames the entire blanket, followed by a delicate white scalloped edging.
The result is a blanket that feels both modern and traditional.
Finished Blanket
The sample shown is approximately suitable for a small throw or baby blanket.
You can customize the dimensions easily.
Suggested sizes
| Blanket Type | Approximate Size |
|---|---|
| Lovey | 18 × 18 in |
| Baby Blanket | 30 × 36 in |
| Small Throw | 36 × 48 in |
| Lapghan | 40 × 50 in |
| Standard Throw | 50 × 60 in |
| Larger Blanket | 60 × 72 in |
Your final size will depend on your yarn weight, hook size, and personal tension.
Materials
Yarn
Use a soft worsted-weight or aran-weight yarn.
You will need approximately:
- White: 400–500 g
- Light blue: 250–350 g
- Sunny yellow: 300–400 g
For a larger blanket, increase the quantities proportionally.
A washable acrylic yarn is particularly practical for blankets because it is soft, durable, affordable, and easy to care for.
Cotton or a cotton-acrylic blend can also be used if you prefer a slightly firmer fabric.
Crochet Hook
Use approximately:
5.0 mm crochet hook
Adjust your hook size according to your yarn and tension.
Other Supplies
- Yarn needle
- Scissors
- Measuring tape
- Stitch markers, optional
- Blocking mat and pins, optional
Crochet Abbreviations
US crochet terminology is used throughout this pattern.
- ch – chain
- sc – single crochet
- hdc – half double crochet
- dc – double crochet
- sl st – slip stitch
- st – stitch
- sts – stitches
- sk – skip
- rep – repeat
- RS – right side
- WS – wrong side
Gauge
Work a small swatch before beginning.
Approximately:
15–16 stitches × 10–12 rows = 4 inches
Gauge is not extremely important for a decorative blanket, but matching the gauge will help you achieve a finished size similar to the sample.
If your swatch is too large, use a smaller hook.
If your swatch is too small, use a larger hook.
Choosing Your Colors
The original color combination is particularly pretty because the colors are bright without being overwhelming.
Classic Sunny Skies Palette
Color A – White
Use white as the main neutral shade.
Color B – Light Blue
A soft sky blue works beautifully between the white sections.
Color C – Yellow
Choose a warm golden or lemon yellow.
The color balance is important. White should remain the dominant neutral, while blue and yellow create the diagonal movement.
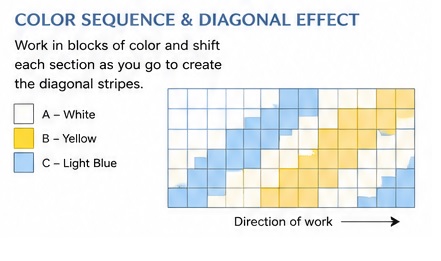
How the Diagonal Effect Is Created
The blanket looks more complicated than it actually is.
The diagonal stripes are created by changing colors at carefully planned intervals rather than crocheting conventional horizontal stripes.
Imagine the blanket divided into diagonal bands:
White → Yellow → Blue → White → Yellow → Blue
As the rows progress, the color blocks shift gradually. This causes the stripes to appear to travel diagonally across the blanket.
The textured stitch helps disguise the color transitions and gives the finished fabric a lovely dimensional surface.
Main Stitch Pattern
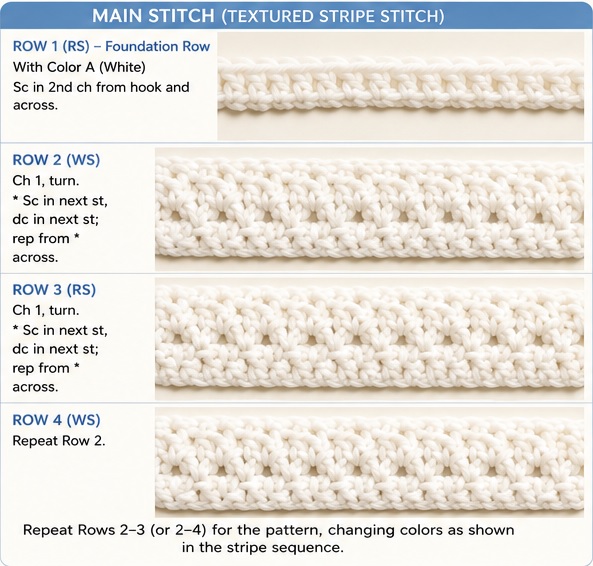
For this design, use a simple textured stitch based on alternating single crochet and double crochet.
This creates small raised areas across the blanket.
Textured Stripe Stitch
Foundation: Work an even number of chains.
Row 1:
Sc in the 2nd ch from hook and across. Ch 1, turn.
Row 2:
Sc in first st, dc in next st. Repeat sc, dc across. Ch 1, turn.
Row 3:
Sc in first st, dc in next st. Repeat across. Ch 1, turn.
Row 4:
Repeat Row 2.
Continue repeating the textured rows throughout the body of the blanket.
The alternating stitches create the soft, pebbled appearance visible in the sample.
Beginning the Blanket
Choose the width you want for your finished blanket.
For a baby blanket, begin with approximately:
121 chains
This creates a blanket around 30–32 inches wide depending on yarn and tension.
For a larger blanket, simply add chains in an even-numbered sequence.
Foundation Chain
With White, chain 121.
Turn your chain carefully so that the foundation is not twisted.
Row 1 – White
Single crochet into the second chain from the hook.
Single crochet across the entire foundation chain.
You should have approximately 120 stitches.
Chain 1 and turn.
Row 2 – Textured White
Work:
sc in first stitch, dc in next stitch
Repeat across.
Make sure you finish the row with the correct stitch so that your stitch count remains consistent.
Chain 1 and turn.
Row 3
Repeat the same textured stitch:
sc, dc across
Chain 1 and turn.
Continue working the textured stitch for several rows.
The fabric will begin to develop a soft, slightly raised texture.
Creating the Diagonal Color Sections
Now begin introducing the blue and yellow.
Rather than making every row the same color, use blocks of color and gradually shift their position.
A useful color sequence is:
Section 1
White
Section 2
Yellow
Section 3
Light Blue
Section 4
White
Section 5
Yellow
Section 6
Light Blue
Repeat the sequence while shifting each color section slightly from one group of rows to the next.
This creates the diagonal movement.
Simple Color-Change Method
When changing colors, work the final stitch of the old color until you have two loops remaining on the hook.
Drop the old yarn.
Place the new color over the hook.
Pull the new color through the remaining loops.
Then continue the row using the new yarn.
This produces a much cleaner color transition than fastening off after every stripe.
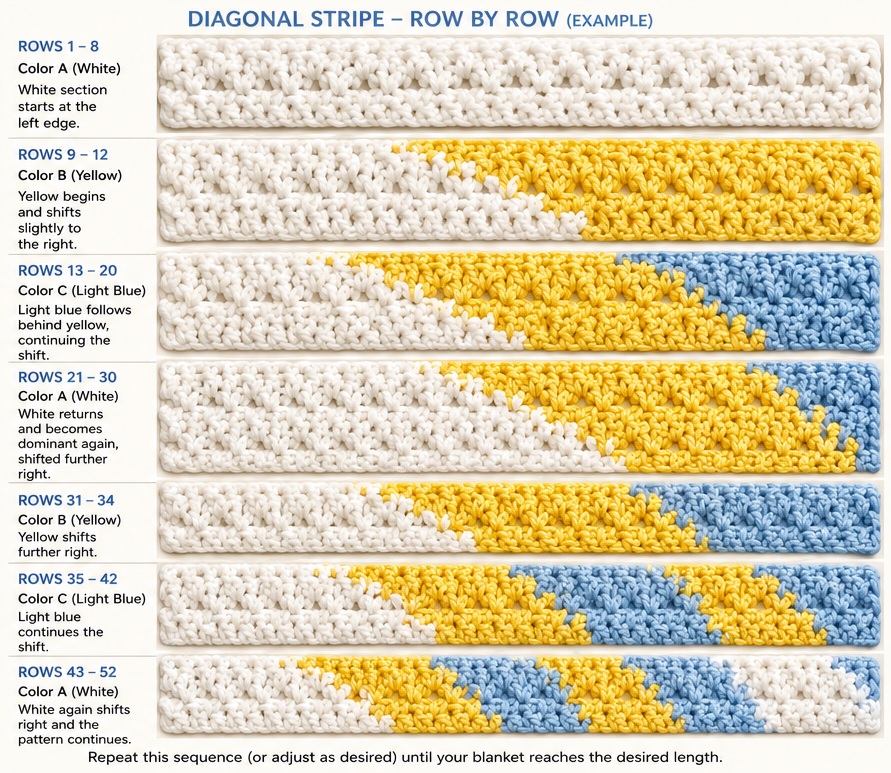
Suggested Stripe Arrangement
For a blanket similar to the pictured design, try the following approximate sequence:
Rows 1–8
White
Rows 9–12
Yellow
Rows 13–20
Light Blue
Rows 21–30
White
Rows 31–34
Yellow
Rows 35–42
Light Blue
Rows 43–52
White
Continue this general rhythm while shifting the stripe placement slightly from one section to the next.
The exact number of rows does not have to be identical to the sample.
The important part is maintaining the visual relationship between the three colors.
Creating the Diagonal Look
Here is an easy way to think about the construction.
Instead of:
White
White
Yellow
Yellow
Blue
Blue
across the entire blanket, gradually move the color sections.
For example:
Section A
White dominates the left side.
Section B
Yellow enters slightly farther across.
Section C
Blue follows behind the yellow.
Section D
White returns as the dominant section.
When these transitions are repeated, the eye connects the color sections and sees diagonal stripes.
This technique is especially useful if you want to recreate the overall appearance without having to work complicated diagonal increases and decreases.
Main Body
Continue working the textured stitch until the blanket reaches approximately:
34–36 inches long
for a baby-sized version.
If you want a square blanket, simply make the length approximately equal to the width.
For a rectangular throw, continue until you reach your preferred dimensions.
Keep the edges as straight as possible.
Count your stitches periodically because textured stitches can sometimes make it difficult to see the first and last stitch.
Keeping the Edges Straight
One of the most important tips for this pattern is to identify the first and final stitch of every row.
A stitch marker can help enormously.
Place a marker into the first stitch of each row if necessary.
At the end of the row, count your stitches.
You should maintain the same number throughout the blanket.
If your stitch count starts decreasing, your blanket will become narrower.
If your stitch count increases, the edges will begin to flare.
Finishing the Main Body
Once the blanket reaches your desired length, work one additional row in yellow.
This creates a transition between the colorful textured center and the decorative border.
Fasten off and weave in the end.
Do not cut all your ends too short until you are certain you will not need to adjust any color transitions.
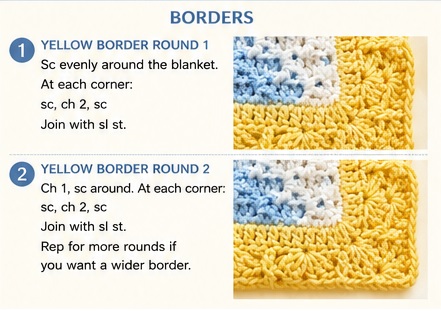
The Yellow Border
The sample has a beautiful wide golden border surrounding the center.
Attach yellow yarn at any corner.
Border Round 1
Ch 1.
Work single crochet evenly around the entire blanket.
At each corner, work:
sc, ch 2, sc
This creates a neat corner.
Continue around all four sides.
Join with a slip stitch to the first single crochet.
Border Round 2
Chain 1.
Work single crochet around the first side.
At each corner, work:
sc, ch 2, sc
Continue around the blanket.
Join with a slip stitch.
Repeat for additional rounds if you want a wider border.
Textured Yellow Border
For a more decorative finish, use a textured stitch on the final yellow border.
Try:
sc in first stitch, dc in next stitch
Repeat around each side.
At each corner, work enough stitches to keep the border flat.
If the corners begin curling, add an extra stitch.
If the border begins becoming wavy, reduce the number of corner stitches slightly.
Scalloped White Edging
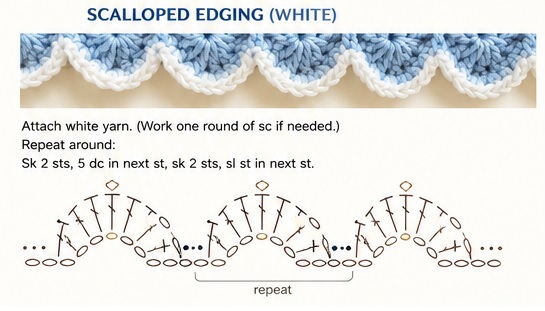
The white scalloped edging is one of the most charming details of this blanket.
Once the yellow border is complete, attach white yarn at a corner.
Work one round of single crochet around the blanket first if necessary.
Then begin the scallops.
Simple Scallop Edging
Try the following repeat:
Skip 2 stitches, work 5 dc into the next stitch, skip 2 stitches, sl st into the next stitch.
Repeat around the blanket.
This creates a series of rounded shells.
At the corners, you may need to adjust the spacing slightly so the scallops sit evenly.
White Picot-Style Finish
For an even more delicate finish, you can add a tiny decorative edge.
After completing the scallops, work:
sl st, ch 3, sl st into the same stitch
Repeat around the outer edge.
This produces small points along the scallops and gives the blanket a handmade heirloom appearance.
Corner Instructions
Corners require a little attention.
When approaching each corner, avoid forcing a scallop into an awkward space.
Instead, adjust the skipped stitches slightly.
For example, if your shell repeat does not fit perfectly:
- Skip 1 stitch instead of 2
- Or skip 3 stitches instead of 2
- Keep the next scallop centered
This is completely acceptable.
A decorative border should look balanced rather than mathematically identical at every point.
Weaving in Ends
After completing the blanket, turn it over and carefully weave in all yarn tails.
Use a yarn needle to pass each end through several stitches in different directions.
For color changes, weave the ends through the same color whenever possible.
Avoid leaving long loose ends because blankets receive considerable handling and washing.
Trim the excess yarn after the ends are securely woven in.
Blocking the Blanket
Blocking is optional, but it can make a significant difference.
Because the textured stitch creates a slightly uneven surface, gentle blocking can help straighten the edges.
Lay the blanket on a clean blocking surface.
Gently stretch it into the desired shape.
Pay special attention to:
- Straight side edges
- Even corners
- Scallop spacing
- Border alignment
Pin the blanket into place if necessary.
Allow it to dry completely.
Do not aggressively stretch acrylic yarn because excessive heat or tension can permanently change its texture.
Washing and Care
Always follow the washing instructions for your specific yarn.
For washable acrylic yarn, a gentle machine wash is usually convenient.
Recommended general care:
- Wash with similar colors
- Use a gentle cycle
- Avoid excessive heat
- Do not use harsh bleach
- Reshape while damp
- Dry according to the yarn label
For handmade baby blankets, wash the finished item before gifting if the yarn manufacturer permits it.
How to Make the Blanket Larger
This pattern is extremely easy to resize.
To make it wider, increase the foundation chain.
To make it longer, simply continue adding rows.
The most important rule is to maintain an even stitch count for the textured stitch.
For a larger throw
Increase the starting chain to approximately:
161–181 chains
For a bed-sized blanket
You can start with:
201+ chains
depending on the desired width and yarn weight.
Always make a small swatch first so you can calculate your exact dimensions.
How to Make a Baby Blanket
For a baby version, use approximately:
100–120 chains
and work until the blanket is roughly 30 × 36 inches.
You can also make it smaller for a stroller or car-seat blanket.
For babies, consider choosing a soft, washable yarn and avoid overly loose stitches.
Alternative Color Ideas
Although the original combination of yellow, blue, and white is beautiful, this pattern would look wonderful in many palettes.
Soft Pastel
- Cream
- Baby blue
- Pale yellow
Ocean Theme
- White
- Aqua
- Seafoam
- Soft blue
Garden Theme
- Cream
- Sage green
- Butter yellow
Sunset Theme
- Cream
- Peach
- Golden yellow
- Coral
Neutral Modern
- Ivory
- Beige
- Taupe
Boy Nursery
- White
- Powder blue
- Denim blue
Girl Nursery
- White
- Blush pink
- Butter yellow
Tips for Perfect Diagonal Stripes
1. Keep your tension consistent
Uneven tension can make some stripes appear wider than others.
2. Count your stitches
The textured stitch can make it easy to accidentally skip a stitch.
3. Change colors neatly
Always complete the final stitch of the previous color with the new color.
4. Do not pull color-change joins too tightly
A tight join can cause the blanket to pucker.
5. Check the blanket regularly
Lay your work flat every few rows.
This makes it easy to notice if your diagonal stripes are drifting unexpectedly.
6. Use stitch markers
Markers are especially useful for identifying the first and last stitch.
Troubleshooting
Why are my edges becoming narrower?
You may be accidentally skipping the first or last stitch.
Count the stitches at the end of every few rows.
Why is my blanket wavy?
Your stitch tension may be changing, or there may be too many stitches in some rows.
Check your stitch count.
Why are my diagonal stripes not straight?
The diagonal effect depends on consistent color placement.
Try writing your color sequence down before starting.
Why does my border curl?
You may have too few stitches around the edge.
Add a few extra stitches at the corners or along long sides.
Why is my border ruffling?
You may have too many stitches.
Reduce the number of stitches slightly on the next border round.
A Quick Pattern Summary
Main Blanket
Foundation: Chain an even number of stitches.
Row 1: Sc across.
Rows 2 onward: Alternate sc and dc across, maintaining the same stitch pattern.
Use white, yellow, and light blue in strategically positioned sections to create the diagonal stripe effect.
Continue until the desired blanket length is reached.
Yellow Border
Work 2–4 rounds of yellow around the blanket.
Work sc, ch 2, sc at each corner.
White Scalloped Edge
Attach white.
Work a base round if necessary.
Then repeat:
Sk 2, 5 dc in next st, sk 2, sl st in next st.
Continue around the entire blanket.
Weave in all ends.
Block if desired.
Why You’ll Love This Crochet Blanket
This blanket has everything that makes a handmade crochet project special: a beautiful color palette, satisfying texture, a simple repeating stitch, and a decorative border that makes the finished piece look polished.
The diagonal stripes make the design appear intricate, but the construction remains approachable for an advanced beginner or intermediate crocheter.
The pattern is also highly customizable. You can change the colors, alter the size, widen the border, or replace the scalloped edging with a simple single-crochet finish.
For a baby shower gift, the soft blue-and-yellow palette is particularly charming. For a summer throw, brighter yellow and sky blue create a fresh, cheerful look. And if you prefer something more sophisticated, cream, muted blue, and mustard would make a gorgeous modern version.
Final Thoughts
The Sunny Skies Diagonal Stripe Crochet Blanket is a cheerful project designed to bring texture and color together in a timeless handmade piece. The diagonal arrangement creates movement, while the combination of white, blue, and yellow gives the blanket a bright and welcoming character.
Whether you are crocheting your first striped blanket or adding another design to your handmade collection, this pattern offers plenty of room for creativity.
Make it small and cozy for a baby, medium-sized for a lap blanket, or continue the repeating pattern until you have a generous sofa or bed throw.
Most importantly, don’t be afraid to make the pattern your own. Change the colors, adjust the dimensions, experiment with the border, and create a blanket that feels uniquely yours.

