

 soofha
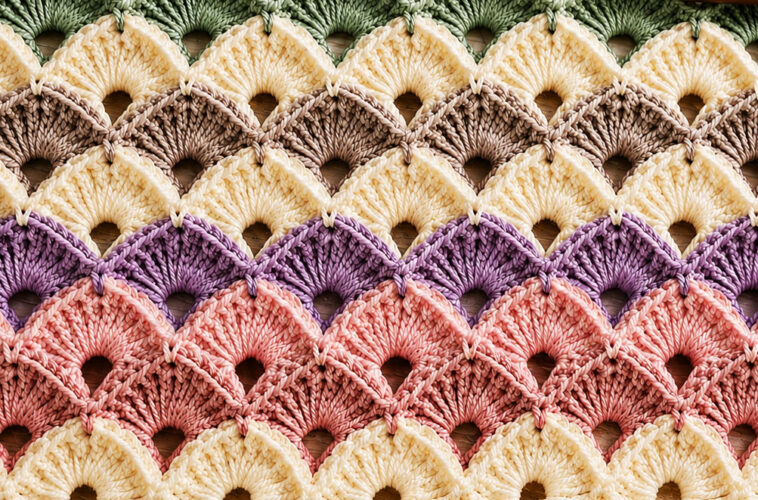
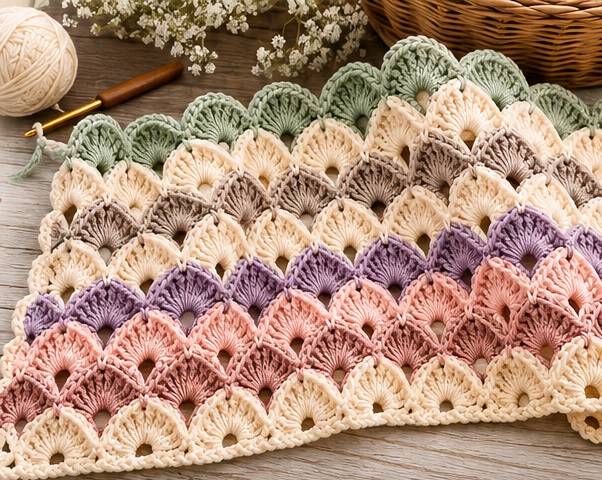
This beautiful crochet blanket features rows of oversized shell-like arches arranged in soft, flowing waves. The combination of sage green, creamy ivory, dusty taupe, lavender, and blush pink gives the design a gentle vintage-inspired look while keeping it fresh and modern.
The stitch pattern is especially attractive because each shell creates an open center, allowing the colors to stand out clearly. It would make a lovely baby blanket, lap blanket, sofa throw, or decorative crochet piece.
Pattern Name
Pastel Shell Waves Crochet Blanket
Skill Level
Intermediate
The stitch construction is repetitive once the first few rows are established, but beginners who are comfortable with double crochet, chain stitches, and working into spaces can also give it a try.
Finished Size
The pattern can easily be customized.
For a small baby blanket, approximately 30 × 36 inches is a good starting point.
For a lap blanket, try approximately 36 × 48 inches.
For a larger throw, continue the pattern until you reach your preferred width and length.
Materials
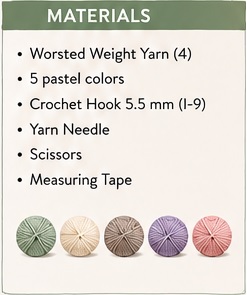
- Worsted-weight or DK-weight yarn
- Crochet hook appropriate for your yarn
- Yarn needle
- Scissors
- Measuring tape
For a pastel version inspired by the photograph, try these shades:
- Cream/Ivory
- Sage Green
- Dusty Taupe
- Soft Lavender
- Blush Pink
You can use one color throughout for a classic textured blanket, or change colors every 1–3 rows for a striped appearance.
"use strict";
var adace_load_6ac3023f4fc41 = function(){
var viewport = $(window).width();
var tabletStart = 601;
var landscapeStart = 801;
var tabletEnd = 961;
var content = '%3Cdiv%20class%3D%22adace_adsense_6ac3023f4fc19%22%3E%3Cscript%20async%20src%3D%22%2F%2Fpagead2.googlesyndication.com%2Fpagead%2Fjs%2Fadsbygoogle.js%22%3E%3C%2Fscript%3E%0A%09%09%3Cins%20class%3D%22adsbygoogle%22%0A%09%09style%3D%22display%3Ablock%3B%22%0A%09%09data-ad-client%3D%22ca-pub-2805240993257385%22%0A%09%09data-ad-slot%3D%223220898588%22%0A%09%09data-ad-format%3D%22auto%22%0A%09%09%3E%3C%2Fins%3E%0A%09%09%3Cscript%3E%28adsbygoogle%20%3D%20window.adsbygoogle%20%7C%7C%20%5B%5D%29.push%28%7B%7D%29%3B%3C%2Fscript%3E%3C%2Fdiv%3E';
var unpack = true;
if(viewport
})(jQuery);
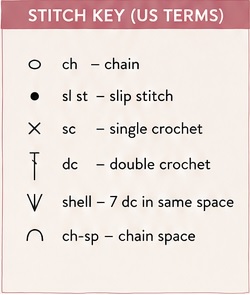
Crochet Abbreviations
US crochet terminology:
- ch – chain
- sc – single crochet
- dc – double crochet
- sl st – slip stitch
- st – stitch
- sp – space
- sk – skip
- rep – repeat
- beg – beginning
Understanding the Shell
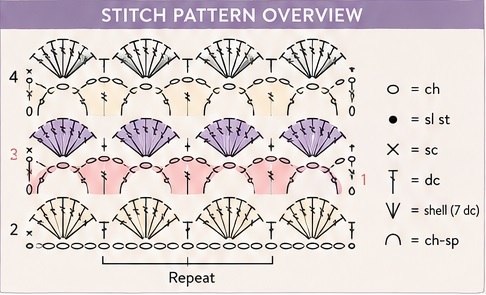
The main visual element is a large fan-shaped shell.
A simple shell can be formed with several double crochet stitches worked into the same space:
Shell = 7 dc in the indicated space
The shells are separated by smaller connecting stitches or spaces. When the next row is worked, the new shells are positioned between the shells below, creating the beautiful overlapping appearance seen in the blanket.
The important thing is to keep your shell groups consistent.
Foundation Chain
Start with a foundation chain in a multiple that works with the repeat.
For an easy sample:
Ch 42
This gives you a small swatch that you can use to practice the stitch before beginning a full blanket.
For a larger blanket, continue adding chains while maintaining the required repeat.
Tip: Crochet a small sample first. If your stitches are loose, use a smaller hook; if your fabric feels too tight, move up one hook size.
Row 1 – Foundation Row
- Ch 3 to count as the first dc.
- Work dc stitches across the foundation chain.
- Keep your tension relaxed.
- Turn.
This first row creates the foundation on which the shell design will be built.
Do not worry if the first row looks plain. The characteristic shell pattern develops in the following rows.

Row 2 – First Shell Row
Begin with your chosen shell color.
Ch 3.
Work the first shell according to the repeat:
7 dc in the designated stitch or space.
Skip the required stitches between shell groups and work the next shell.
Continue across the row.
At the end of the row, make sure the final shell is positioned evenly with the rest of the pattern.
Turn.
What you should see
The row should begin developing large fan shapes. Each group of double crochet stitches spreads outward, creating a rounded shell.

Row 3 – Connecting the Shells
This row brings the shell groups together.
Ch 1.
Work single crochet or the designated connecting stitch into the top of the previous shell.
Chain across the opening between shells.
Continue working the connecting stitches and chains across the blanket.
The spaces between the shells are important. Do not pull your chains too tightly.
The open spaces are what give the blanket its airy, lightweight appearance.
Turn.

Row 4 – Creating the Next Fan
Now work another shell row.
Ch 3.
Work the shell stitches into the appropriate chain space from the previous row.
For the basic version:
7 dc in the large chain space.
Continue:
skip/space as established, 7 dc in the next chain space
Repeat across.
Finish the row and turn.
You should now see the shells beginning to overlap visually with the previous row.

Row 5 – Repeat the Openwork Row
Work the connecting row again.
Ch 1.
Work the required sc stitches around the shell sections and chain across the open spaces.
Repeat the established sequence across the row.
Turn.
The blanket will begin to develop a beautiful repeating rhythm of:
Shell → opening → shell → opening

Main Pattern Repeat
Once you understand the first few rows, the rest of the blanket becomes much easier.
Repeat the following two-row sequence:
Shell Row
Create a large fan by working multiple dc stitches into the designated chain space.
Connecting Row
Use sc and chain spaces to separate and support the shells.
Continue repeating these rows until the blanket reaches your desired length.
Creating the Color Changes
The colors are one of the most charming features of this design.
For a look similar to the photograph, use a gentle pastel progression.
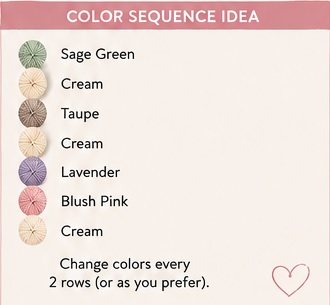
Suggested Color Sequence
Section 1 – Sage Green
Work several shell rows in sage green.
Section 2 – Cream
Change to warm ivory or cream.
Section 3 – Dusty Taupe
Add several rows in a muted beige-gray shade.
Section 4 – Cream
Return to ivory for a soft transition.
Section 5 – Lavender
Use a delicate lavender or muted purple.
Section 6 – Blush Pink
Finish the central section with dusty pink.
Section 7 – Cream
Use ivory again for the bottom border.
You don’t have to copy this exact arrangement. The stitch works beautifully with almost any combination.
How to Change Colors Neatly
For clean color transitions, finish the final stitch of the old color but stop before completing the final yarn-over.
Pick up the new color and use it to complete the stitch.
Cut the old yarn, leaving a tail of approximately 4–6 inches.
Continue crocheting with the new color.
Later, weave all ends securely into the wrong side of the blanket.
Tip: Avoid tying large knots in the yarn ends. Properly weaving the tails through several stitches creates a cleaner and more durable finish.
Maintaining Straight Edges
One of the biggest challenges with decorative shell patterns is keeping the edges even.
At the end of every row, carefully check:
- The number of shell groups
- The number of chain spaces
- The position of the final shell
- The first and last stitches
If your blanket starts becoming wider or narrower, the problem usually comes from accidentally skipping an extra stitch or working into the wrong space.
A stitch marker can be extremely helpful.
Place one at the beginning and end of the main pattern repeat.
Crochet Tension
Tension has a major effect on this pattern.
If you crochet very tightly, the shells may become stiff and lose their open, fan-like shape.
If your tension is very loose, the blanket may become extremely open and difficult to keep square.
For a soft blanket with attractive shells, aim for medium, relaxed tension.
After completing a few rows, gently lay your work flat and allow the shells to settle naturally.
How to Make the Blanket Larger
This pattern is easy to customize.
To make it wider:
Start with a longer foundation chain while maintaining the stitch repeat.
To make it longer:
Simply continue repeating the shell and connecting rows.
To make a baby blanket:
Use lightweight yarn and a smaller hook for a soft, delicate fabric.
To make a sofa throw:
Use worsted-weight yarn and continue the pattern until you reach your desired dimensions.
Border
A simple border works particularly well because the shell pattern already provides plenty of visual interest.
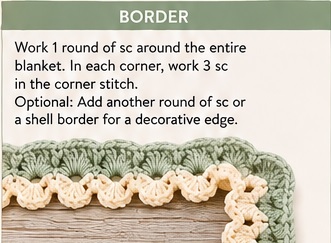
After completing the final row, work around the entire blanket with a round of single crochet.
At each corner, work several sc stitches into the corner space so the blanket can turn smoothly.
For a slightly more decorative finish, add another round of single crochet in cream.
You can also add a small shell edging along the outer edge.
Simple Shell Border
A decorative edging can be made by working a small group of double crochet stitches into selected spaces around the blanket.
Keep the border relatively simple so it complements rather than competes with the large shell motif.
Blocking the Blanket
Blocking is highly recommended for this design.
After weaving in all yarn ends, gently dampen the blanket and place it flat on a clean surface.
Smooth the fabric into shape.
Pay particular attention to the edges and corners.
Allow the blanket to dry completely before removing it from the blocking surface.
Blocking helps:
- Even out the shell shapes
- Straighten the edges
- Improve the appearance of the open spaces
- Make the color sections look more uniform
- Give the finished blanket a polished appearance
Troubleshooting
My shells look too tight.
Try using a slightly larger crochet hook or loosen your tension.
My blanket is becoming wavy.
Check that you are working the same number of shells in every repeat. Too many or too few stitches can cause unwanted rippling.
My edges aren’t straight.
Pay special attention to the first and last shell of each row. Mark the edges if necessary.
The holes look too large.
Use a smaller hook or reduce your chain tension.
The blanket looks stiff.
Your yarn may be too heavy for the hook size, or your tension may be too tight. A softer yarn and slightly larger hook can help.
Yarn Color Ideas
Although the pastel palette shown here is beautiful, this stitch is extremely versatile.
Vintage Garden
- Sage
- Dusty Rose
- Cream
- Taupe
- Lavender
Coastal
- Soft Blue
- Seafoam
- White
- Sand
- Pale Gray
Neutral Modern
- Ivory
- Beige
- Oatmeal
- Mocha
- Warm Gray
Baby Girl
- Blush
- Cream
- Pale Pink
- Lavender
- Soft Peach
Baby Boy
- Powder Blue
- Cream
- Sage
- Pale Gray
- Soft Beige
Rainbow Pastel
- Pink
- Peach
- Yellow
- Mint
- Blue
- Lavender
The large shells make every color change especially noticeable, so even a simple five-color palette can create a spectacular finished blanket.
Finishing Your Crochet Blanket
When your final row is complete, fasten off and leave a yarn tail.
Use a yarn needle to weave the tail securely through the back of several stitches.
Repeat for every loose end.
Do not cut the ends immediately after weaving them through only one or two stitches. The yarn should be woven back and forth several times to prevent unraveling during washing.
Once all ends are secure, trim the excess yarn.
Finally, block the blanket to give the shells their best shape.
Care Instructions
For a handmade crochet blanket, gentle care is best.
Always check the yarn manufacturer’s washing instructions.
Generally:
- Wash gently
- Avoid harsh detergents
- Avoid excessive agitation
- Do not wring the blanket
- Reshape while damp
- Lay flat to dry when possible
If the blanket is made as a baby gift, consider attaching a small care label with the recommended washing instructions.
Why You’ll Love This Pattern
The Pastel Shell Waves Crochet Blanket is a wonderful project for crocheters who enjoy repeating motifs and beautiful color combinations.
The large shell shapes create a decorative openwork texture without requiring complicated techniques. Once the repeat is established, the pattern becomes relaxing and rhythmic.
It is also a great project for experimenting with color.
You can make every section a different shade, alternate two colors, create a monochromatic version, or use leftover yarn to create a cheerful scrappy blanket.
The result is a soft, elegant blanket with a distinctly handmade character.
Final Thoughts
This pastel shell design is perfect when you want a crochet project that looks intricate but is based on a manageable repeating structure. The combination of fan-shaped shells, open spaces, and gentle pastel stripes gives the finished piece a romantic and cozy appearance.
Whether you make it as a baby blanket, lap throw, sofa blanket, or handmade gift, this pattern can easily be adapted to suit your preferred yarn, hook size, dimensions, and color palette.
Save this pattern for your next crochet project and experiment with your own favorite color combination!

