

 soofha
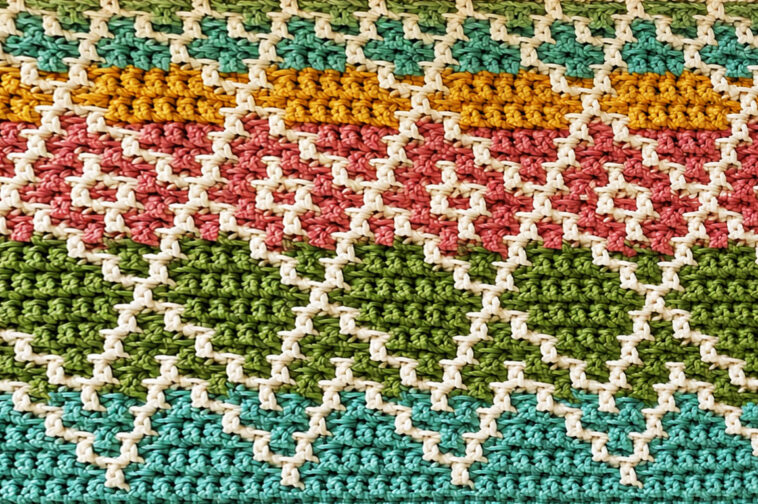
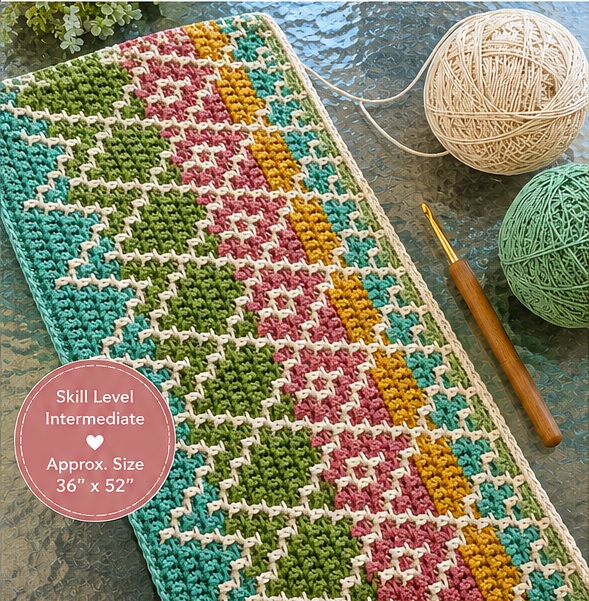
This colorful crochet blanket is inspired by the beautiful texture and cheerful striped geometry shown in the photo. The design combines wide vertical color bands, raised textured stitches, and delicate cream-colored lines that create a charming woven or mosaic appearance.
The finished blanket has a relaxed handmade look, making it perfect for a cozy throw, baby blanket, sofa blanket, guest-room accent, or colorful handmade gift.
Important note: The photograph shows the finished design but does not include the original written pattern. The instructions below are an original pattern designed to recreate the overall look and texture, rather than a claim to be the exact original pattern.
Garden Path Mosaic Crochet Blanket
Pattern Details
- Skill level: Intermediate
- Pattern type: Flat rectangular blanket
- Construction: Worked in rows
- Texture: Dense, raised, woven appearance
- Color style: Multicolor stripes with cream contrast
- US crochet terminology
- Finished size: Approximately 36 × 52 inches
- Gauge: Approximately 16 stitches × 18 rows = 4 inches
- Hook: 5.0 mm crochet hook
- Yarn: Worsted-weight yarn
The size can easily be changed by adding or removing pattern repeats.
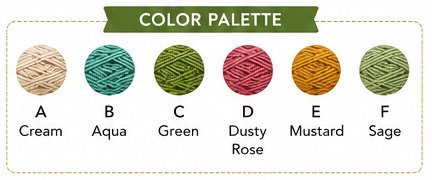
Color Palette
The blanket in the photograph has a particularly attractive combination of muted and cheerful colors.
For a similar appearance, use:
Color A – Cream
Used for the decorative lines and contrast sections.
Color B – Soft Aqua
A fresh turquoise/aqua shade.
Color C – Garden Green
A medium leafy green.
Color D – Dusty Rose
A soft pink or muted rose.
Color E – Golden Mustard
A warm mustard yellow.
Color F – Sage Green
A lighter natural green.
You can use approximately 6 colors, or simplify the pattern to four colors.
For a more modern blanket, try:
- Cream
- Teal
- Sage
- Terracotta
- Mustard
For a softer baby blanket:
- Ivory
- Powder blue
- Sage
- Blush
- Soft yellow
Materials
Yarn
Choose a medium/worsted-weight yarn with good stitch definition.
A useful starting quantity for a blanket approximately 36 × 52 inches is:
- Cream: 900–1,000 yards
- Aqua: 350–450 yards
- Green: 350–450 yards
- Pink: 300–400 yards
- Mustard: 250–350 yards
- Sage: 250–350 yards
The actual amount will depend on your gauge, hook size, and finished dimensions.
Crochet Hook
5.0 mm (H-8) crochet hook
If you crochet tightly, try 5.5 mm. If your stitches are loose, a 4.5 mm hook may produce a better fabric.
Additional Supplies
- Yarn needle
- Scissors
- Measuring tape
- Stitch markers
- Blocking mat, optional
Abbreviations
US crochet terminology:
- ch – chain
- sc – single crochet
- hdc – half double crochet
- dc – double crochet
- sl st – slip stitch
- st/sts – stitch/stitches
- sk – skip
- rep – repeat
- RS – right side
- WS – wrong side
Understanding the Design
The blanket is built around a simple principle.
Instead of making separate squares and sewing them together, you work the blanket continuously in rows.
The visual effect comes from three elements:
- Long blocks of color
- Cream contrast stitches
- Textured stitches between the contrast lines
This produces the appearance of individual woven panels without requiring complicated assembly.
The cream-colored lines are especially important because they separate the colored sections and make the pattern appear almost like a collection of connected rectangular tiles.
Starting Chain
For the sample blanket, chain:
151
This gives a finished blanket approximately 36 inches wide, depending on yarn and tension.
If you want a different width, make a foundation chain in a multiple of:
10 + 1
For example:
- 101 chains
- 111 chains
- 121 chains
- 131 chains
- 141 chains
- 151 chains
- 161 chains
Always work a small swatch first.
Foundation Row
With Color A – Cream:
Row 1:
Sc in the second chain from hook and in each chain across.
You should have:
150 sc
Turn.
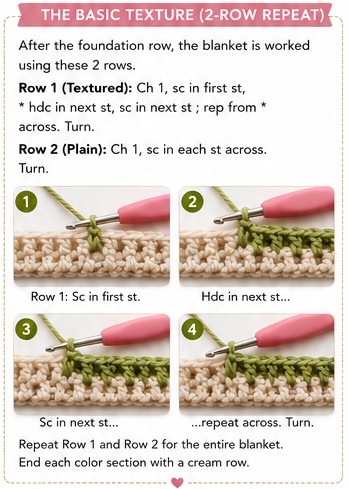
Basic Textured Stitch
The blanket’s raised appearance can be created with alternating single crochet and half-double crochet stitches.
A simple texture repeat is:
Sc in next stitch, hdc in next stitch.
Continue alternating these stitches across the row.
This produces a compact fabric with enough texture to resemble the chunky stitches in the inspiration photograph.
Main Pattern
The blanket is divided visually into vertical color sections.
For the sample, think of the width as six main sections:
- Aqua
- Green
- Rose
- Mustard
- Teal
- Sage
Cream is used between them.
You do not have to change colors at exactly the same locations as the photograph. The most important feature is maintaining the vertical color-block arrangement.
Section 1 – Aqua
Join Color B at the beginning of the next row.
Row 2
Ch 1.
Sc across.
Turn.
Row 3
Ch 1.
Sc in first stitch.
Hdc in next stitch, sc in next stitch.
Repeat across.
Turn.
Row 4
Ch 1.
Sc across.
Turn.
Repeat Rows 3–4 until you have approximately 8 rows in aqua.
Fasten off.
Cream Contrast Row
Join Color A.
Contrast Row
Ch 1.
Sc across.
Turn.
The cream row should be clearly visible against the aqua section.
This creates one of the decorative horizontal lines seen throughout the blanket.
Section 2 – Green
Join Color C.
Work approximately 8 rows using the same textured stitch.
Textured Row
Ch 1.
Sc in first stitch.
Hdc in next stitch, sc in next stitch.
Repeat across.
Turn.
Plain Row
Ch 1.
Sc in every stitch across.
Turn.
Repeat these two rows until the green section reaches the desired height.
Finish with a cream contrast row.
Section 3 – Dusty Rose
Join Color D.
Repeat the same two-row texture sequence:
Row A
Ch 1.
Sc across.
Turn.
Row B
Ch 1.
Sc in first stitch.
Hdc in next stitch, sc in next stitch.
Repeat across.
Turn.
Continue for approximately 8 rows.
Finish with one cream row.
The dusty rose section gives the blanket a warm centerpiece and works beautifully against the greens and turquoise.
Section 4 – Mustard
Join Color E.
Repeat the established stitch pattern.
Work approximately 8 rows, ending with a cream contrast row.
Mustard works particularly well as an accent because it occupies less visual space than the larger green and pink sections.
If you prefer a more subtle blanket, replace mustard with muted gold or caramel.
Section 5 – Teal
Join your teal or aqua-green yarn.
Work another textured section.
Repeat:
Plain sc row
then
sc/hdc texture row
for approximately 8 rows.
Finish with cream.
Section 6 – Sage
Join Color F.
Work approximately 8 rows in the same texture.
Finish with a final cream contrast row.
Creating the Woven Appearance
The most attractive feature of this design is the illusion of small rectangular sections outlined by cream stitches.
You can strengthen this appearance by adding occasional cream rows through the colored sections.
For example:
5 rows colored
1 row cream
5 rows colored
1 row cream
This creates a series of horizontal lines.
Because the blanket already has vertical color blocks, the horizontal cream lines visually cross them and create the impression of a woven grid.
A More Textured Version
If you want a chunkier texture similar to the photograph, replace some of the half-double crochet stitches with front-loop stitches.
Textured Row
Ch 1.
Sc in first stitch.
For the next stitch, work one sc through the front loop only.
Alternate:
sc, front-loop sc
across the row.
The front-loop stitches create subtle ridges that catch the light.
For even more texture, alternate between:
- regular sc
- front-loop sc
- hdc
- regular sc
This creates a wonderfully tactile surface.
Maintaining Straight Edges
Because textured stitches can sometimes cause the sides of a blanket to become uneven, pay close attention to the first and last stitch.
At the end of every row:
- Count your stitches.
- Make sure the first stitch is worked correctly.
- Make sure you don’t accidentally crochet into the turning chain.
- Check that you have the same stitch count as the previous row.
If the pattern begins with 150 stitches, every row should continue to contain 150 stitches.
This simple habit makes a huge difference in the final shape.
Color-Change Technique
For clean color changes, complete the final stitch of the old color using the new color.
For example:
Work the final sc until two loops remain on your hook.
Drop the old color.
Yarn over with the new color.
Pull through the remaining loops.
Your next stitch will then begin cleanly with the new color.
Do not cut the cream yarn after every single contrast row if you are working it repeatedly along the same edge.
Instead, carry it carefully along the side when practical.
Carrying Yarn
Since this blanket uses multiple colors, you may be tempted to carry unused yarn across the back.
This can save time, but avoid carrying a strand over long distances.
Long floats can:
- Catch on fingers
- Create loose loops
- Make the back messy
- Affect the blanket’s drape
For longer color sections, it is usually better to fasten off and rejoin the yarn.
How to Change the Blanket Size
The easiest way to customize this blanket is to change the foundation chain.
Remember:
Multiple of 10 + 1
For a smaller throw, you might begin with:
111 chains
For a larger blanket:
181 chains
or
201 chains
The number of rows determines the length.
Simply continue repeating the color sections until your blanket reaches the desired size.
Suggested Color Layout
For a blanket inspired closely by the photograph, try this arrangement:
Aqua → Green → Cream → Rose → Mustard → Teal → Sage
You can make the color blocks different widths to create a more handmade, artistic appearance.
For example:
| Section | Color | Approx. Width |
|---|---|---|
| 1 | Aqua | 6–7 in |
| 2 | Green | 7 in |
| 3 | Rose | 7 in |
| 4 | Mustard | 4–5 in |
| 5 | Teal | 5–6 in |
| 6 | Sage | 5–6 in |
The mustard section can remain narrower because it works best as an accent.
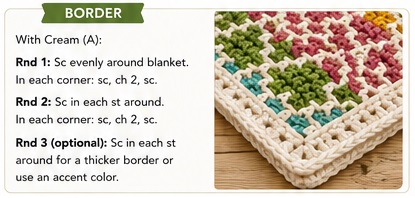
Border
A simple border is ideal because the center of the blanket already contains plenty of visual interest.
With Cream, join yarn at any corner.
Border Round 1
Ch 1.
Sc evenly around the entire blanket.
At each corner, work:
sc, ch 2, sc
Continue around.
Join with a sl st.
Border Round 2
Ch 1.
Sc in every stitch around.
In each corner space, work:
sc, ch 2, sc
Join with a slip stitch.
Fasten off.
Optional Decorative Border
For a slightly more substantial finish, work a third round.
Round 3
With cream:
Ch 1.
Sc in each stitch.
At every corner:
sc, ch 2, sc
Join.
Then add a final round using one of your accent colors.
A muted green or aqua would look especially beautiful.
Finishing the Blanket
When you have completed the final border, fasten off.
Leave a tail of approximately 6 inches.
Thread the tail onto a yarn needle.
Weave it securely through the back of several stitches.
Change direction and weave through the stitches again.
Trim the excess.
Repeat with all remaining yarn tails.
Because this design uses multiple colors, weaving in ends carefully is one of the most important finishing steps.
Blocking
Blocking isn’t absolutely necessary, but it can dramatically improve the finished appearance.
Lay the blanket flat on a clean surface.
Gently stretch the edges until they are straight.
Pay particular attention to:
- Corners
- Side edges
- Color transitions
- Border
Lightly dampen the blanket if your yarn allows wet blocking.
Allow it to dry completely before moving it.
Blocking will help the rectangular sections look more organized and polished.
Pattern Troubleshooting
Why is my blanket getting wider?
You may be accidentally increasing at the beginning or end of rows.
Count your stitches regularly.
Why are the edges wavy?
Your stitch tension may be changing between colors or textured rows.
Try to maintain consistent tension.
Why does my blanket look smaller than expected?
Crochet gauge varies considerably from person to person.
The measurements given are approximate.
If your blanket is too small, use a larger hook or add additional repeats.
Why does the texture look different?
The exact appearance depends on:
- Yarn fiber
- Yarn thickness
- Hook size
- Tension
- Stitch height
A cotton or cotton-blend yarn will often give the stitches a particularly crisp appearance.
Yarn Substitution
This design is excellent for using leftover yarn.
You can combine several colors as long as they have reasonably similar weights.
Good choices include:
- Cotton
- Cotton blends
- Acrylic
- Acrylic/cotton blends
- Worsted-weight washable yarn
For a baby blanket, choose soft yarn that is easy to wash.
For a heavier winter throw, wool or wool-blend yarn can create a warmer fabric.
How to Make It More Modern
The original color combination has a cheerful vintage-inspired quality.
For a more modern version, use only four colors:
Cream + Sage + Terracotta + Mustard
Keep the cream lines consistent throughout the design.
For a coastal version:
Ivory + Aqua + Seafoam + Soft Blue + Sage
For a boho version:
Natural + Rust + Olive + Mustard + Dusty Rose
For a farmhouse-inspired version:
Cream + Sage + Taupe + Dusty Blue + Terracotta
How to Make a Baby Blanket
To create a baby-sized version, start with approximately 101 chains.
Work fewer color sections and aim for approximately:
30 × 36 inches
Use soft washable yarn.
Avoid very loose stitches because babies’ fingers can become caught in large open spaces.
The dense textured stitch used for this design is especially appropriate because it creates a cozy, substantial fabric.
How to Make a Larger Sofa Throw
For a larger throw, begin with:
181 or 201 chains
Continue the same pattern until you reach approximately:
50 × 60 inches
You can also add more rows to make a long rectangular blanket suitable for draping over the back of a sofa.
Care Instructions
Always follow the washing instructions for your specific yarn.
For washable cotton or acrylic yarn:
- Wash according to the yarn label.
- Use a gentle cycle when appropriate.
- Avoid excessive heat.
- Reshape while damp.
- Dry flat if recommended.
Do not hang a very heavy wet blanket because its weight may stretch the fabric.
Why This Pattern Works
The beauty of this blanket comes from the contrast between simple construction and complex-looking texture.
At first glance, the pattern looks like a collection of individually crocheted pieces.
In reality, the blanket can be worked continuously in rows.
The cream lines act as visual separators, while the colorful sections provide the main personality of the design.
This makes it an excellent project for crocheters who enjoy colorful blankets but don’t necessarily want to make hundreds of individual granny squares.
Helpful Tips for Beginners
If you’re new to textured crochet, don’t worry about making the blanket immediately.
Start with a small swatch.
Try:
20–30 stitches × 10 rows
Experiment with your colors.
This lets you see whether your chosen yarns have enough contrast.
It’s particularly important to make sure the cream yarn is noticeably lighter than the colored yarns. If the contrast is too low, the woven effect will disappear.
Final Pattern Summary
Foundation: Multiple of 10 + 1
Sample: Ch 151
Foundation row: Sc across.
Texture: Alternate sc and hdc according to the pattern.
Color blocks: Approximately 8 rows per color.
Contrast: One cream row between major color sections.
Repeat: Continue the color sequence until the desired length.
Border: 2–3 rounds of sc with cream.
Finished size: Approximately 36 × 52 inches, depending on gauge.
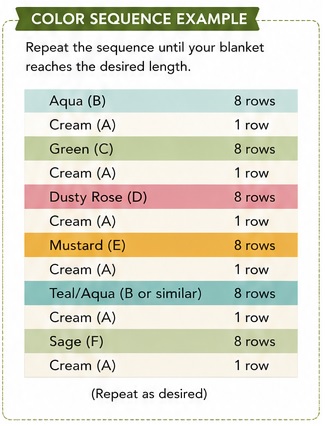
Garden Path Mosaic Blanket – Quick Color Sequence
For an easy reference while crocheting:
Cream foundation
↓
Aqua – 8 rows
↓
Cream – 1 row
↓
Green – 8 rows
↓
Cream – 1 row
↓
Dusty Rose – 8 rows
↓
Cream – 1 row
↓
Mustard – 8 rows
↓
Cream – 1 row
↓
Teal – 8 rows
↓
Cream – 1 row
↓
Sage – 8 rows
↓
Cream border
Final Thoughts
The Garden Path Mosaic Crochet Blanket is a wonderful project for anyone who loves colorful handmade blankets with plenty of texture. The combination of aqua, green, dusty rose, golden mustard, and cream gives it a warm, cheerful personality, while the repeated textured rows keep the crocheting enjoyable and rhythmic.
The best part is that you can easily make this design your own. Change the palette, increase the size, reduce the number of color blocks, or use leftover worsted-weight yarn from your stash.
Whether you make it as a cozy sofa throw, a baby blanket, a handmade gift, or a colorful addition to your crochet collection, the finished piece has that unmistakable handcrafted, cozy character that makes crochet blankets so special.

