

 soofha
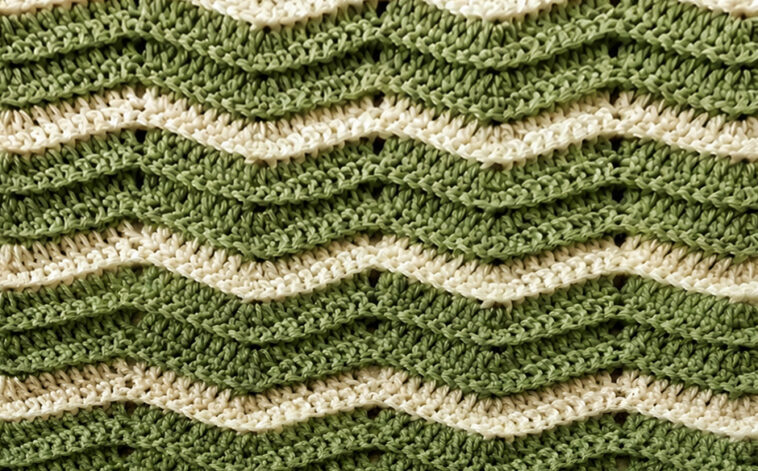
Create a cozy, textured blanket with beautiful flowing waves using this Sage Green & Cream Wavy Crochet Blanket Pattern. The design combines soft sage green with warm ivory/cream stripes, creating a calm, nature-inspired look that works beautifully in bedrooms, nurseries, living rooms, and reading corners.
The gently undulating rows give the blanket a lovely ripple effect without requiring complicated shaping. Alternating textured rows create raised ridges that emphasize the waves, while the simple two-color palette keeps the finished blanket elegant and modern.
This is also a wonderfully adaptable pattern. You can make it as a small baby blanket, lapghan, throw, or full-size bed blanket simply by adjusting the starting chain and the number of pattern repeats.
Sage Green & Cream Wavy Crochet Blanket
Skill Level: Easy to Intermediate
Project Type: Crochet Blanket
Pattern Style: Wavy / Ripple Texture
Construction: Worked flat in rows
Main Colors: Sage green and cream
Crochet Terms: US terminology
Finished Size
The blanket shown is approximately 40 × 50 inches, but the finished dimensions can easily be changed.
Suggested sizes:
- Baby blanket: 30 × 36 inches
- Small throw: 36 × 48 inches
- Standard throw: 40 × 50 inches
- Large throw: 50 × 60 inches
- Twin blanket: approximately 65 × 90 inches
Your exact size will depend on your yarn, hook, tension, and how many repeats you make.
Materials
Yarn
Choose a soft worsted-weight or aran-weight yarn.
For a blanket similar to the photograph, use:
- Sage green: approximately 1,500–1,800 yards
- Cream/Ivory: approximately 350–500 yards
The amount required will change according to the finished size.
For a larger blanket, purchase extra yarn from the beginning so that you can maintain consistent dye lots.
Crochet Hook
Use a 5.0 mm crochet hook as a starting point.
You may use:
- 4.5 mm for a firmer fabric
- 5.0 mm for a balanced blanket
- 5.5 mm for a softer, drapier blanket
Choose the hook that gives you a fabric that feels comfortable and flexible rather than stiff.
Other Supplies
- Yarn needle
- Scissors
- Measuring tape
- Stitch markers, optional
- Blocking mats, optional
Abbreviations
US crochet terminology:
- ch – chain
- sc – single crochet
- hdc – half double crochet
- dc – double crochet
- st – stitch
- sts – stitches
- sl st – slip stitch
- sk – skip
- rep – repeat
- RS – right side
- WS – wrong side
Understanding the Wave Pattern
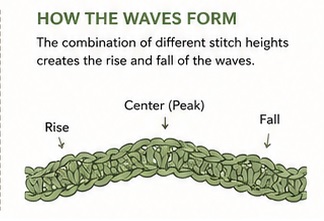
The most important thing about this blanket is maintaining the rise-and-fall rhythm of the stitches.
Instead of making the sides straight, the pattern deliberately creates sections where the fabric rises and dips. These increases and decreases form the soft waves visible across the blanket.
For a beginner-friendly version, you can think of each repeat as having three basic sections:
Rise → Center → Fall
The stitch heights gradually increase, reach the highest point of the wave, and then decrease again.
This creates a continuous flowing pattern across the row.
Foundation Chain
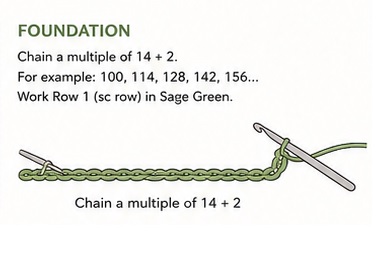
Start with a foundation chain that is a multiple of 14 + 2.
For example:
- 100 chains
- 114 chains
- 128 chains
- 142 chains
- 156 chains
The exact number isn’t important as long as it follows the required repeat.
For a blanket approximately 40 inches wide, begin with around 142 chains, then adjust according to your yarn and tension.
Do not make your foundation chain extremely tight. A tight foundation can cause the bottom edge to pull inward.
Pattern
Row 1 – Foundation Texture
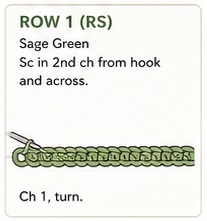
With Sage Green, chain the desired number of stitches.
Work 1 sc into the second chain from the hook.
Continue working single crochet stitches across the entire foundation chain.
Chain 1 and turn.
You should have a straight foundation row.
This first row provides a stable base for the textured waves.
Row 2 – Beginning the Wave
Continue with Sage Green.
Work the following sequence across the row:
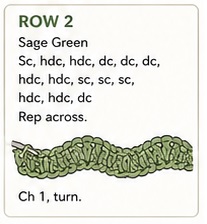
sc, hdc, hdc, dc, dc, dc, hdc, hdc, sc, sc, sc, hdc, hdc, dc
Repeat the wave sequence across the row until you reach the end.
The changing stitch heights begin to create the gentle movement of the fabric.
Chain 1 and turn.
Row 3 – Textured Wave
Work the next row using the same general rhythm, placing stitches into the corresponding stitches of the previous row.
Use:
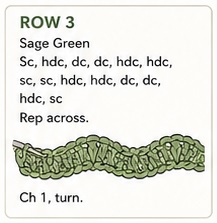
sc, hdc, dc, dc, hdc, hdc, sc, sc, hdc, hdc, dc, dc, hdc, sc
Repeat across.
Do not pull your stitches too tightly.
The blanket should already begin to develop a softly rippled texture.
Chain 1 and turn.
Row 4 – Wave Ridge
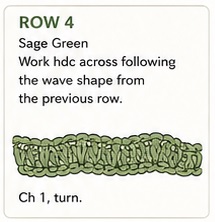
For this row, work primarily hdc stitches while following the rise-and-fall shape established by the previous rows.
A simple way to keep the wave consistent is to follow the highest and lowest areas from the row below.
Work across the row, keeping your stitch count consistent.
Chain 1 and turn.
Row 5 – Return Row
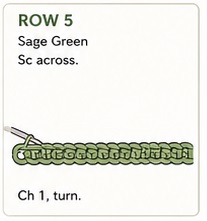
Work a row of single crochet across.
Keep the tension relaxed.
This row helps define the textured wave and gives the following color change a clean transition.
Fasten off if you are changing colors.
Color Change
The beauty of this blanket comes from the combination of sage green and cream.
For a look similar to the photograph, use several rows of sage green followed by one or two rows of cream.
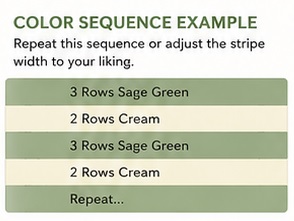
A simple color sequence is:
Sage – Sage – Sage – Cream – Sage – Sage – Sage – Cream
Repeat this sequence throughout the blanket.
For a more subtle effect, make the cream stripes narrower.
For a bolder blanket, use wider cream sections.
Cream Stripe
Join the cream yarn at the beginning of the next row.
Work the same wave pattern used for the previous rows.
Do not change the stitch pattern simply because you have changed colors. Keeping the same wave sequence makes the cream stripe follow the curves of the blanket beautifully.
At the end of the cream section, fasten off and return to Sage Green.
Creating the Wavy Texture
One of the most attractive features of this blanket is that the waves are not completely flat.
The textured stitch structure creates slightly raised ridges that catch the light.
To emphasize this effect:
- Keep your tension consistent.
- Avoid pulling the yarn too tightly.
- Keep the stitch heights clearly defined.
- Make sure your increases and decreases remain aligned.
- Change colors at the same points in the repeat whenever possible.
If the waves become uneven, stop after a row and count your stitches.
A missing or extra stitch can gradually shift the wave pattern.
Continuing the Blanket
Continue repeating the established rows.
A practical color arrangement might look like this:
Repeat A
3 rows Sage Green
Repeat B
2 rows Cream
Repeat C
4 rows Sage Green
Repeat D
2 rows Cream
Repeat these sections until the blanket reaches your desired length.
You do not have to follow the exact stripe arrangement from the photograph. One of the easiest ways to personalize this pattern is by changing the width and frequency of the cream stripes.
How to Make the Waves More Dramatic
If you want stronger waves, increase the difference between the taller and shorter stitch sections.
For example, instead of transitioning gently between sc and hdc, you can use:
sc → hdc → dc → tr → dc → hdc → sc
The taller stitches create a deeper rise in the fabric.
However, dramatic waves can also create more pronounced points.
For a soft blanket like the one shown, a more gradual transition is usually the prettiest choice.
How to Make a Larger Blanket
The easiest way to enlarge the blanket is to add additional pattern repeats to the foundation chain.
Remember to maintain the required stitch multiple.
For example, if your repeat is 14 stitches, add another 14 chains whenever you want to make the blanket wider.
Do not simply add random stitches to the foundation chain, or the wave pattern may no longer line up correctly.
To make the blanket longer, simply continue repeating the rows until you reach the desired measurement.
Baby Blanket Version
For a baby blanket, use approximately 100–114 chains, depending on your yarn and tension.
Work approximately 45–55 rows.
A smaller baby blanket looks especially pretty with:
- Sage green
- Cream
- Soft white
- Dusty blue
- Pale beige
For a nursery blanket, a soft washable acrylic or acrylic/cotton blend is especially practical.
Cozy Throw Version
For a larger sofa throw, start with approximately 142–170 chains.
Continue working until the blanket measures approximately 48–60 inches long.
The sage and cream combination works particularly well as a neutral home décor blanket because it can complement wood furniture, cream upholstery, rattan baskets, and natural décor.
Border
A simple border works best with this textured design.
After completing the final row, do not cut the yarn immediately.
Turn the blanket and begin working around the outer edge.
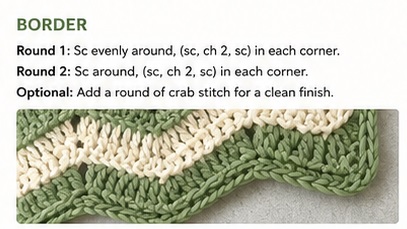
Round 1
Work single crochet evenly around the blanket.
At each corner, work:
sc, ch 2, sc
This prevents the corners from pulling inward.
When you reach the beginning, join with a slip stitch.
Round 2
Chain 1.
Work single crochet around the entire blanket.
At each corner, work:
sc, ch 2, sc
Join with a slip stitch.
Fasten off.
For a more decorative edge, add one final round of reverse single crochet (crab stitch).
Optional Scalloped Border
If you want the blanket to have a more feminine, decorative finish, try a scalloped edge.
Work single crochet around the blanket first.
Then create small shells along the edge:
Skip 1 stitch, work 5 dc into the next stitch, skip 1 stitch, slip stitch into the next stitch.
Repeat around the blanket.
At the corners, adjust the spacing slightly so that the border remains flat.
A simple sage-green scalloped border would look beautiful around the cream-and-green waves.
Finishing the Blanket
When you reach the final stitch, fasten off securely.
Use a yarn needle to weave all loose ends into the back of the blanket.
Because this blanket uses multiple color changes, there may be several yarn tails.
Take time to weave each end securely.
Do not simply trim the ends close to the fabric. They can work loose after washing.
Instead:
- Thread the tail onto a yarn needle.
- Weave through several stitches.
- Change direction.
- Weave through another section.
- Trim the excess yarn.
Blocking
Blocking is optional, but it can dramatically improve the finished appearance.
The wavy edges may look uneven immediately after crocheting. This is normal.
Lightly dampen the blanket and gently arrange it on a flat surface.
Do not stretch it aggressively.
Instead, carefully straighten the sides and allow the waves to settle naturally.
Pin the corners and edges if necessary.
Let the blanket dry completely before removing it from the blocking surface.
Choosing Yarn Colors
The sage and cream palette is especially beautiful, but this pattern works with almost any color combination.
Soft Neutral
- Sage
- Ivory
- Oatmeal
- Cream
Coastal
- Seafoam
- White
- Pale blue
Earthy
- Olive
- Beige
- Natural
- Warm brown
Feminine
- Sage
- Blush
- Cream
Modern
- Charcoal
- White
- Sage
Autumn
- Moss
- Cream
- Rust
- Camel
The stripe pattern can remain identical while completely changing the personality of the finished blanket.
Tips for Perfect Waves
1. Count your stitches
The most common problem with ripple blankets is accidentally adding or losing stitches.
Count periodically, especially during the first few repeats.
2. Use stitch markers
Place a marker at the beginning and end of important pattern sections.
This is particularly useful when working a large blanket.
3. Don’t crochet too tightly
Tight tension can flatten the waves.
Keep your hands relaxed and allow the hook to move naturally.
4. Check the first few repeats
Before crocheting dozens of rows, make sure the waves are forming correctly.
It is much easier to correct a mistake after four rows than after forty.
5. Buy enough yarn
If possible, purchase all yarn for the project at the same time.
This helps ensure that the colors match throughout the blanket.
Why You’ll Love This Pattern
This blanket combines several qualities that make it an enjoyable crochet project.
The repeating wave pattern is relaxing once established, while the color changes keep the project interesting.
The textured rows also make the blanket visually interesting from a distance and up close.
The finished fabric has a cozy handmade appearance without looking overly complicated.
It is suitable for:
- Baby gifts
- Wedding gifts
- Birthday gifts
- Housewarming presents
- Sofa throws
- Nursery décor
- Lap blankets
- Cold-weather blankets
- Handmade Christmas gifts
Troubleshooting
Why aren’t my waves lining up?
Check your stitch count first.
If you accidentally add or remove one stitch, the high and low points can gradually move across the blanket.
Why does my blanket curl?
A small amount of curling during the first few rows is normal.
If the blanket continues to curl significantly, try using a slightly larger hook or loosening your tension.
Why does my blanket look stiff?
Your yarn may be too thick for the selected hook, or your tension may be too tight.
Try moving up by 0.5 mm.
Why are my stripes uneven?
Color changes may look different if your row height changes.
Try maintaining consistent tension and changing colors at the same point in the repeat.
Why is one side wider than the other?
This usually means stitches have been added or lost along the edges.
Count the stitches at the end of every row during the beginning of the project.
Care Instructions
Always check the yarn manufacturer’s washing instructions first.
For washable acrylic yarn, the finished blanket can generally be machine washed using a gentle cycle.
Use cool or lukewarm water and avoid excessive heat.
Lay flat to dry whenever possible to help preserve the shape and texture of the waves.
If using wool or another natural fiber, follow the specific care instructions for that yarn.
Frequently Asked Questions
Is this wavy crochet blanket suitable for beginners?
Yes. The pattern is a good project for an advanced beginner who is comfortable with basic crochet stitches and changing colors. The wave effect looks complicated, but once the repeat is established, it becomes repetitive and relaxing.
Can I use different yarn?
Absolutely. You can substitute another yarn as long as you adjust your hook size and starting chain accordingly.
Always make a small swatch first.
Can I make this blanket without the cream stripes?
Yes. A solid sage green version would create a beautiful textured throw.
You could also reverse the colors and make cream the main color with sage stripes.
Can I use cotton yarn?
Yes. Cotton creates a beautiful, breathable blanket, although it may feel heavier than acrylic.
For a baby blanket, cotton or a cotton blend can be an excellent choice.
How much yarn will I need?
The amount depends on the final size, yarn weight, hook size, and your tension. For a medium throw, approximately 1,800–2,300 total yards is a reasonable starting estimate.
Always purchase extra if you want to avoid running short.
Final Thoughts
The Sage Green & Cream Wavy Crochet Blanket is a beautiful project for anyone who loves textured crochet and calming neutral colors. The flowing wave pattern gives the blanket plenty of visual movement, while the narrow cream stripes provide just enough contrast to highlight the texture.
The pattern is also wonderfully versatile. Make it small and delicate for a baby blanket, increase the width and length for a generous sofa throw, or create a larger version for a bed.
Most importantly, don’t be afraid to make the pattern your own. Experiment with stripe widths, yarn fibers, and color combinations until you find a version that fits your style.
Save this pattern, choose your favorite yarn, and enjoy creating your own soft, cozy wavy crochet blanket.

