

 soofha
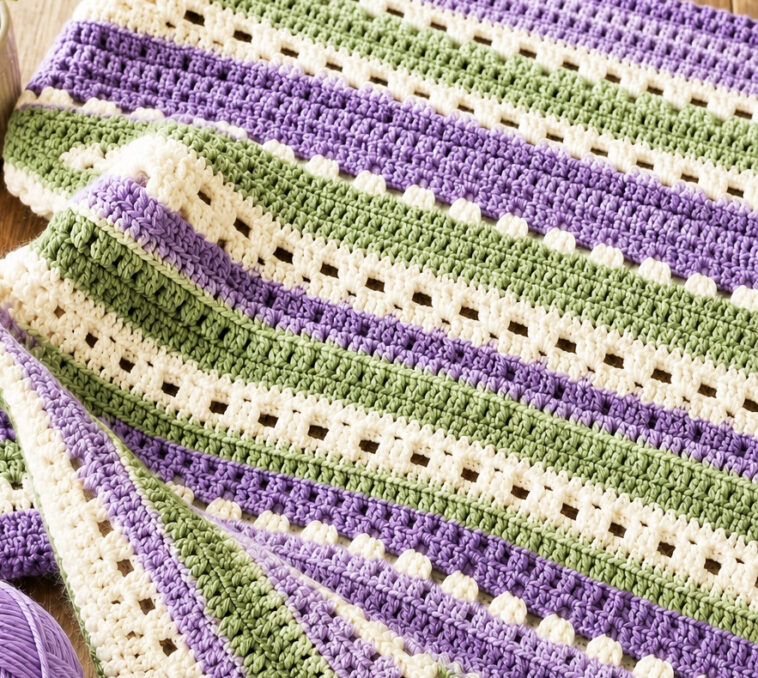
There is something wonderfully comforting about a handmade crochet blanket, especially one featuring classic stripes in rich, timeless colors. This Granny Stripe Crochet Blanket combines traditional granny-style texture with simple solid rows and delicate openwork to create a cozy throw with plenty of visual interest.
The combination of deep burgundy, warm cream, and medium grey gives this blanket a sophisticated look that works beautifully with both traditional and modern home décor. The solid stripes provide a substantial, cozy feel, while the lighter granny-inspired sections add an airy, decorative touch.
Whether you are an experienced crocheter or someone ready to take on a larger beginner-friendly project, this blanket is a relaxing make that can be worked one stripe at a time. The repetitive stitch pattern makes it easy to settle into a comfortable rhythm while watching the colors gradually come together.
The finished blanket measures approximately 48 inches wide by 60 inches long, making it a practical size for a sofa throw, lap blanket, guest room accent, or handmade gift.
In this tutorial, you’ll learn how to combine straightforward double crochet rows with granny-style shell sections and textured post stitches. The result is a striped blanket with beautiful dimension and a soft, flowing appearance.
What Makes This Granny Stripe Blanket Special?
The appeal of this design comes from the balance between its colors and textures.
The burgundy stripes bring warmth and richness to the blanket, while the off-white cream sections brighten the overall design. Medium grey adds a cool neutral element that helps connect the darker and lighter shades.
The combination creates a blanket that feels cozy without looking overly busy.
Another feature that makes this project enjoyable is the variety of stitch textures. The solid double crochet sections create dense, warm rows, while the lacy granny-style sections introduce open spaces and decorative shells. Front post and back post stitches can also be incorporated to create raised areas and additional depth.
This pattern can easily be customized, too. Change the colors, make the stripes wider or narrower, or continue the repeat until you reach your preferred blanket size.
Materials You’ll Need
Before starting, gather your yarn and basic crochet supplies.
Worsted Weight Yarn – Deep Burgundy
You will need approximately 800 yards of Category 4 worsted-weight yarn for the burgundy sections.
Choose a soft acrylic, wool blend, or another comfortable worsted-weight yarn with good stitch definition.
Example: Lion Brand Vanna’s Choice in Terracotta.
Worsted Weight Yarn – Off-White Cream
Approximately 1,000 yards of cream-colored yarn is recommended for the lighter solid and lacy sections.
A soft, machine-washable yarn is especially convenient if you plan to use the finished blanket regularly.
Example: Lion Brand Vanna’s Choice in White.
Worsted Weight Yarn – Medium Grey
Plan for approximately 600 yards of medium-grey worsted-weight yarn.
The grey works as a neutral transition shade between the warm burgundy and lighter cream.
Example: Lion Brand Vanna’s Choice in Silver Heather.
Crochet Hook
- 6 mm / US J-10 crochet hook
- An ergonomic hook is recommended for comfort during long crochet sessions.
Other Supplies
You will also need:
- Yarn needle
- Stitch markers
- Measuring tape
- Scissors
- Blocking mats and pins, if desired
The stitch markers can be especially helpful when working the open granny-style sections and keeping track of the row structure.
Gauge and Finished Measurements
For the best results, check your gauge before beginning the full blanket.
Gauge:
14 double crochet stitches × 8 rows = approximately 4 × 4 inches in the solid double crochet pattern.
Finished size:
Approximately 48 inches wide × 60 inches long.
Keep in mind that your final measurements may vary depending on your yarn, hook size, and personal crochet tension.
If your swatch is smaller than the recommended gauge, try a larger hook. If it is too large, move down to a smaller hook.
Checking gauge before starting can save you from discovering later that your blanket is significantly wider or narrower than expected.
Granny Stripe Crochet Blanket Pattern
Foundation Chain
Using the deep burgundy yarn, chain 152 stitches.
This foundation chain is designed to produce a blanket approximately 48 inches wide.
For a different blanket width, adjust the starting chain while maintaining the appropriate stitch repeat.
Row 1 – Burgundy Foundation Row
With burgundy yarn:
- Chain 3. This counts as the first double crochet.
- Work a double crochet into the fourth chain from the hook.
- Continue working double crochet stitches across the foundation chain.
- Turn.
You should have approximately 150 double crochet stitches across the row.
This first row creates a firm foundation for the remainder of the blanket.
Rows 2–6 – Solid Burgundy Stripe
Continue with burgundy yarn.
Row 2:
Chain 3, then double crochet across the entire row. Turn.
Repeat the same basic row for Rows 3–6.
At the end of Row 6, fasten off the burgundy yarn.
These five solid rows create one of the bold, cozy stripes that gives the blanket its structured appearance.
Rows 7–10 – Cream Granny-Style Section
Attach the off-white cream yarn.
The next four rows introduce the open granny-style texture.
Row 7
Chain 5, which works as a double crochet and chain-2 space.
Skip the next 2 double crochet stitches.
Work:
3 dc in the next stitch, ch 2, skip 2 stitches
Repeat this sequence across the row.
Finish with a double crochet in the top of the turning chain and turn.
The combination of shell groups and chain spaces creates the open texture that contrasts beautifully with the dense burgundy stripe.
Row 8
Chain 3.
Work 2 double crochet stitches into the first chain-2 space.
Chain 2.
Continue working 3 dc into each following chain-2 space, separated by chain-2 spaces, across the row.
Finish with a double crochet in the third chain of the turning chain.
Turn.
Rows 9–10
Continue repeating the granny-style shell arrangement for two additional rows.
Keep your chain spaces consistent throughout the section. Even tension will help the openwork remain neat and evenly distributed.
Adding Raised Texture With Post Stitches
For extra dimension, the lacy sections can be enhanced with front post double crochet (FPdc) and back post double crochet (BPdc).
These stitches create raised and recessed areas that emphasize the wave-like appearance of the stripe.
Front Post Double Crochet
To make an FPdc, yarn over and insert your hook from the front of the work around the post of the indicated stitch. Complete the double crochet as usual.
Back Post Double Crochet
For a BPdc, yarn over and insert the hook from the back of the work around the post of the indicated stitch. Complete the double crochet.
Alternating these stitches can create a subtle ribbed texture within the granny sections.
If you are new to post stitches, practice on a small swatch first. Once you understand where the hook should go, the technique becomes much easier.
Rows 11–15 – Medium Grey Stripe
Now introduce the medium grey yarn.
Work five rows of solid double crochet.
For each row:
Ch 3, dc across, turn.
Repeat for a total of 5 grey rows.
Fasten off when the fifth row is complete.
The grey stripe provides a calm neutral break between the stronger burgundy and cream sections.
Continue the Stripe Sequence
Continue repeating the following sequence:
- 5 rows burgundy – solid double crochet
- 4 rows cream – granny-style lacy pattern
- 5 rows grey – solid double crochet
Repeat the complete sequence until the blanket reaches approximately 60 inches long.
For a similar overall appearance, you can work approximately 8 complete stripe cycles, adjusting the final number of rows as needed to reach your desired finished length.
Remember that yarn tension can affect the finished measurement, so measure your blanket periodically rather than relying exclusively on row count.
How to Customize the Blanket Size
One of the best things about this pattern is how easily it can be modified.
To Make It Wider
Increase your starting chain while keeping the stitch count compatible with the pattern repeat.
To Make It Longer
Simply continue repeating the stripe sequence until you reach your preferred length.
To Create a Baby Blanket
Use fewer stripe repeats and consider choosing soft pastel colors.
To Make a Large Bed Blanket
Increase both the foundation chain and the number of stripe repeats.
Always make a gauge swatch when changing yarn weight or hook size because these changes can significantly alter the finished dimensions.
Crochet Blanket Edging
Once the main body of the blanket is finished, add a simple cream border.
Attach the cream yarn in a corner.
Work single crochet evenly around the entire blanket.
At each corner, work:
3 sc in the corner stitch or space.
Continue around the blanket, taking care not to make the border too tight.
A relaxed border will help the blanket lie flat. If you notice curling or rippling, check your stitch spacing and adjust as necessary.
Optional Fringe
For a decorative finishing touch, add fringe along the two shorter ends.
Cut approximately 12-inch strands of burgundy, cream, and grey yarn.
Group approximately three strands together and attach them along the edge at evenly spaced intervals.
You can use all three colors together for a multicolored fringe or choose one shade for a cleaner appearance.
Trim the ends evenly once the fringe has been attached.
Blocking Your Finished Blanket
Blocking is optional, but it can make a noticeable difference in the final appearance of your project.
Lay the finished blanket flat on blocking mats.
Gently stretch it until it reaches approximately your desired dimensions.
Pin the edges carefully into place, paying particular attention to the corners and sides.
If your yarn allows it, lightly steam the blanket while avoiding excessive heat.
Allow the blanket to cool and dry completely before removing the pins.
Blocking can help straighten uneven edges, open up the lacy sections, and give the finished blanket a more polished appearance.
Helpful Tips for a Beautiful Granny Stripe Blanket
Keep Your Tension Consistent
Consistent tension is especially important when switching between solid and lacy sections.
Try to maintain the same relaxed grip throughout the project.
Count Your Stitches
It can be tempting to skip counting once you become comfortable with the repeat, but checking your stitch count periodically can prevent the blanket from gradually becoming wider or narrower.
Weave in Ends as You Go
With three colors and frequent color changes, you will have several yarn tails to deal with.
Instead of leaving everything until the end, weave in a few ends after completing each section.
Measure as You Work
Lay your blanket flat every few stripe repeats and check its width and length.
This makes it much easier to correct size differences early.
Use Stitch Markers
Stitch markers can help identify corners, turning chains, or important stitch positions, particularly when working the textured sections.
Color Ideas for Your Own Granny Stripe Blanket
Although burgundy, cream, and grey create a sophisticated combination, you can easily give this blanket a completely different personality.
Try:
- Navy, cream, and light grey
- Forest green, beige, and charcoal
- Dusty rose, ivory, and taupe
- Mustard, cream, and chocolate brown
- Sage green, white, and soft grey
- Terracotta, oatmeal, and natural beige
For a modern minimalist blanket, choose one strong color and two neutrals.
For a cheerful children’s blanket, experiment with several bright shades.
Frequently Asked Questions
Is this granny stripe blanket suitable for beginners?
Yes. The primary solid sections use basic double crochet, while the granny-style sections introduce shell groups and chain spaces. Beginners may want to practice the lacy section separately before working on the full blanket.
Can I use a different yarn weight?
Yes, but your finished blanket size and yarn requirements will change. If you switch yarn weights, make a gauge swatch and adjust your hook size accordingly.
Can I make the blanket without fringe?
Absolutely. The fringe is optional. A simple single crochet border looks attractive on its own.
Can I change the colors?
Definitely. This pattern is ideal for experimenting with different color combinations. Keep the same stripe sequence or create your own variation.
How do I prevent the blanket from becoming uneven?
Check your stitch count regularly and maintain consistent tension. Measuring the blanket every few stripe sections can also help you identify problems early.
Video Tutorial
If you prefer learning visually, a video tutorial can be a helpful companion while making this blanket.
Please keep in mind that the yarn colors and exact finished fabric shown in a video may differ from the blanket featured in this article. The tutorial can still be useful for understanding the basic construction, granny-style shells, double crochet rows, and post-stitch techniques used throughout the project.
Final Thoughts
This Granny Stripe Crochet Blanket brings together traditional crochet techniques with a fresh combination of color, texture, and openwork.
The rich burgundy stripes add warmth and depth, cream granny sections create brightness and movement, and medium grey provides a soft neutral contrast. Together, these elements create a blanket that feels both classic and contemporary.
At approximately 48 × 60 inches, the finished throw is a useful size for curling up on the couch, layering across the end of a bed, taking along to outdoor gatherings, or giving as a thoughtful handmade gift.
The pattern is also easy to personalize. Change the yarn colors, adjust the blanket dimensions, remove the fringe, or add additional textured rows to make the design your own.
Most importantly, enjoy the process. Crochet blankets are made one stitch at a time, and every row brings you closer to something that can be enjoyed for years.
Once your blanket is complete, weave in those final ends, give it a gentle block if desired, and admire the handmade texture you created.
Happy crocheting!

