

 soofha
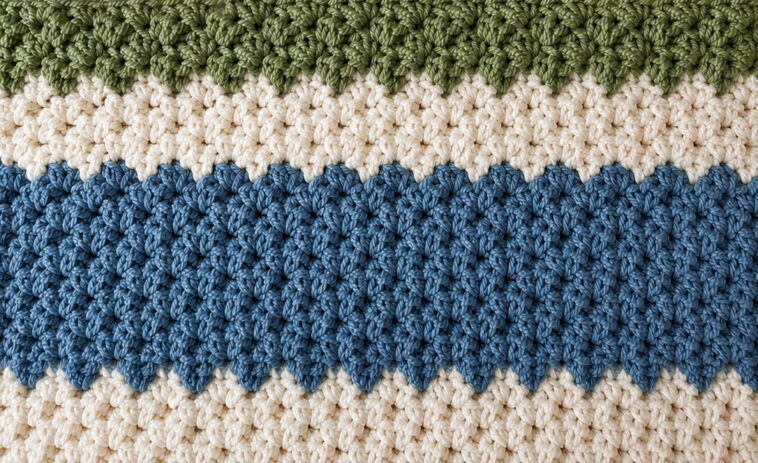
The Suzette Stitch Crochet Blanket is a beautiful project for anyone who loves a dense, textured crochet fabric with a simple repeating pattern. The stitch looks intricate, but it is made using only single crochet and double crochet stitches.
The blanket in the photo combines sage green, creamy white, and soft denim blue, creating a calm, modern color palette that works beautifully for a cozy throw, baby blanket, or bedroom accent.
The classic Suzette stitch is worked by placing one single crochet and one double crochet into the same stitch, then skipping the next stitch. The result is a wonderfully textured fabric that is relatively dense and has very little open space.
What Is the Suzette Stitch?
The Suzette stitch is a beginner-friendly crochet stitch made from two basic stitches:
- Single crochet (sc)
- Double crochet (dc)
The fundamental repeat is:
(sc, dc) in the same stitch, skip 1 stitch.
The stitch is worked in multiples of 2, making it easy to adapt to almost any blanket size. Many tutorials also point out that the finished fabric looks attractive from both sides, which makes it particularly useful for blankets, scarves, and other reversible projects.
Why crocheters love it
- Easy one-row repeat
- Beginner friendly
- Beautiful texture
- Dense and warm fabric
- Minimal holes
- Great for blankets
- Works with many yarn weights
- Easy to customize with stripes
- Attractive on both sides
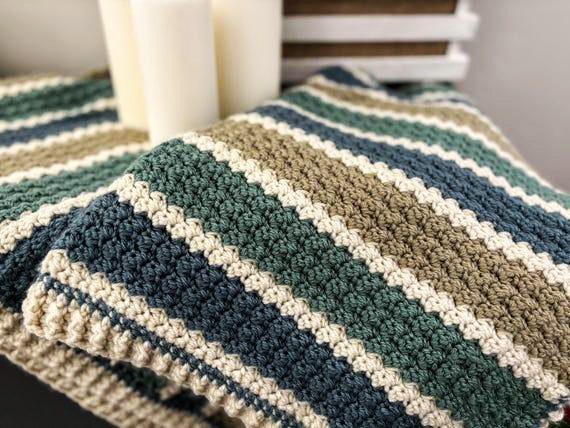
Suzette Stitch Crochet Blanket Pattern
Skill Level
Easy / Advanced Beginner
You should be comfortable with:
- Chain stitch
- Single crochet
- Double crochet
- Turning your work
- Changing yarn colors
Materials
For a blanket inspired by the pictured design, you can use:
- Medium #4 worsted-weight yarn
- Crochet hook appropriate for your yarn, approximately 5.0–6.0 mm
- Yarn needle
- Scissors
- Stitch markers, optional
Suggested colors
For a similar look, try:
- Sage Green
- Warm Cream
- Denim Blue
- Cream
- Sage Green for the upper border
You can substitute any colors you like. The Suzette stitch looks especially attractive with alternating neutral and deeper shades.
Finished Blanket Size
The pattern is completely adjustable.
For example:
- Baby blanket: approximately 30 × 36 inches
- Small throw: approximately 40 × 50 inches
- Lap blanket: approximately 45 × 55 inches
- Large throw: approximately 50 × 60 inches
The easiest way to change the width is to adjust your foundation chain while keeping the required stitch multiple.
Chain any even number.
The finished size will depend on your yarn, hook, tension, and number of rows.
Crochet Abbreviations
The pattern uses standard US crochet terminology.
| Abbreviation | Meaning |
|---|---|
| ch | Chain |
| sc | Single Crochet |
| dc | Double Crochet |
| st | Stitch |
| sk | Skip |
| rep | Repeat |
| sl st | Slip Stitch |
Suzette Stitch Foundation
Start with a foundation chain of an even number of chains.
For example:
Chain 102
This will give you a blanket approximately suitable for a medium-width project, although your final size will vary according to yarn and tension.
Do not worry if you need a different width. Simply chain an even number.
Row 1
Work into the second chain from your hook.
(sc, dc) in the same chain.
Skip the next chain.
Then:
(sc, dc) in the next chain, skip the next chain.
Continue this repeat across the row.
When you reach the final two chains:
Skip 1 chain, sc in the final chain.
Turn.
Row 1 repeat
(sc, dc) in next chain, sk next chain across, ending with sc in last chain.
This creates the first row of the characteristic Suzette texture.
Row 2 — Suzette Stitch
Chain 1.
Turn your work.
Work:
(sc, dc) in the first stitch.
Skip the next stitch.
Then:
(sc, dc) in the next stitch, skip the next stitch.
Continue across the row.
When you reach the final two stitches:
Skip 1 stitch, sc in the final stitch.
Turn.
Row 3 and Beyond
Repeat Row 2.
Your basic repeat is:
(sc, dc) in one stitch, skip the next stitch.
Continue this pattern until your blanket reaches the desired length.
The important thing to remember is that the single crochet and double crochet are worked together into the same stitch.
This creates the little raised clusters that give the Suzette stitch its distinctive appearance.
How to Create the Stripes
The pictured blanket is particularly attractive because the texture is combined with horizontal color blocks.
You can create your own stripe sequence using the following example.
Suggested Stripe Sequence
Color A – Sage Green
Work 8 rows.
Color B – Cream
Work 6 rows.
Color C – Denim Blue
Work 12–15 rows.
Color B – Cream
Work 6 rows.
Color A – Sage Green
Work 8 rows.
Repeat or adjust the sections until you reach your desired blanket length.
For a more dramatic design, make the blue section considerably wider than the cream sections.
How to Change Colors
For clean-looking stripes, change colors at the end of a row.
When working the final single crochet of the row, begin the stitch with the old color. Before completing the final yarn-over and pull-through, switch to the new yarn color.
Then chain 1 with the new color and turn.
This helps create a neat transition between your stripes.
Tip
Don’t cut your yarn after every single row if you’re working several rows of the same color. Carrying the yarn or joining colors strategically can reduce the number of ends that need weaving in.
Creating the Blanket Shown in the Photo
To recreate the overall visual feeling of the pictured blanket, use a deep denim blue as the dominant center stripe, surrounded by warm cream and sage green.
A simple layout could be:
Sage Green — narrow stripe
Cream — narrow stripe
Denim Blue — wide section
Cream — medium stripe
Sage Green — upper section
The textured Suzette stitch makes each color section appear almost three-dimensional, especially when using a yarn with good stitch definition.
Border Ideas
A simple border is ideal because the Suzette stitch already provides plenty of texture.
Option 1: Simple Single Crochet Border
Work one round of single crochet around the entire blanket.
At each corner:
sc, ch 1, sc
This produces a clean and understated finish.
For the pictured color palette, a sage green border would complement the blanket beautifully.
Option 2: Double-Round Border
For a slightly more substantial edge:
Round 1
Work single crochet around the blanket.
Round 2
Work another round of single crochet or half double crochet.
Use cream for the first round and sage green for the final round.
Option 3: Textured Border
If you want the border to stand out, use the Suzette stitch around the blanket where practical, paying special attention to the corners so the edge remains flat.
For beginners, however, a simple single crochet border is easier to control.
Tips for Perfect Suzette Stitch
1. Don’t accidentally crochet into the skipped stitch
The skipped stitch is an important part of the pattern.
The repeat is:
Cluster — skip — cluster — skip.
2. Keep your tension relaxed
Suzette stitch naturally creates a dense fabric. If you crochet too tightly, the blanket can become stiff.
Try to keep your tension relaxed and consistent.
3. Check your stitch count
After each row, make sure the stitch count remains consistent.
If the blanket starts getting wider or narrower, check whether you accidentally:
- crocheted into a skipped stitch,
- skipped the wrong stitch,
- missed the final single crochet,
- added an extra stitch at the edge.
4. Use a larger hook for a softer blanket
If your fabric feels too stiff, try going up by 0.5–1 mm in hook size.
Always make a small swatch first.
Crochet Gauge
Gauge isn’t absolutely critical for a decorative throw, but it becomes important if you want a particular finished size.
Make a small Suzette stitch swatch before starting the blanket.
Measure:
- stitches across 4 inches
- rows across 4 inches
If your swatch is too tight, use a larger hook.
If your swatch is too loose, use a smaller hook.
Why Suzette Stitch Is Great for Blankets
The Suzette stitch is particularly well suited to blankets because it produces a dense, textured fabric without complicated stitch combinations. Several crochet tutorials specifically recommend the stitch for blankets, scarves, baby blankets, washcloths, and other projects.
It is also a great stitch for striped designs because the clusters create a beautiful texture even when the color changes are very simple.
The stitch is easy enough to memorize, so after a few rows you can often work while watching television or listening to music.
Easy Suzette Stitch Pattern Summary
For quick reference:
Foundation: Chain any even number.
Row 1:
(sc, dc) in 2nd ch from hook, *skip 1 ch, (sc, dc) in next ch; repeat from * across, ending with sc in last ch.
Row 2:
Ch 1, (sc, dc) in first st, *skip 1 st, (sc, dc) in next st; repeat from * across, ending with sc in last st.
Repeat Row 2 until your blanket reaches the desired length.
This basic construction is consistent with several published Suzette stitch tutorials.
Video Tutorial — Suzette Stitch
If you prefer learning visually, this YouTube tutorial from Make & Do Crew demonstrates the Suzette stitch step by step and is specifically aimed at beginners.
Another useful option is the Hope Corner Farm Crochet slow, close-up tutorial, which demonstrates the foundation, first row, second row, and continuing repeat.
More Written Suzette Stitch Tutorials
For another detailed written explanation with photos and video, see The Knotty Lace — Suzette Stitch Crochet Pattern + Video. It includes instructions, variations, project ideas, and troubleshooting tips.
You can also use Free Crochet Patterns — How to Crochet the Suzette Stitch for a written pattern and stitch chart.
Final Thoughts
The Suzette Stitch Crochet Blanket is a wonderful choice when you want a project that looks sophisticated without requiring complicated crochet techniques. The combination of single crochet + double crochet creates a richly textured fabric, while simple color changes transform the basic stitch into a striking striped blanket.
For the look in your photo, I would choose sage green, warm ivory, and denim blue, with the blue used for the largest central section. A simple sage green border would bring all three colors together beautifully.
Pin this pattern for later and save the video tutorial so you can easily return to the Suzette stitch when you’re ready to crochet!

