

 soofha
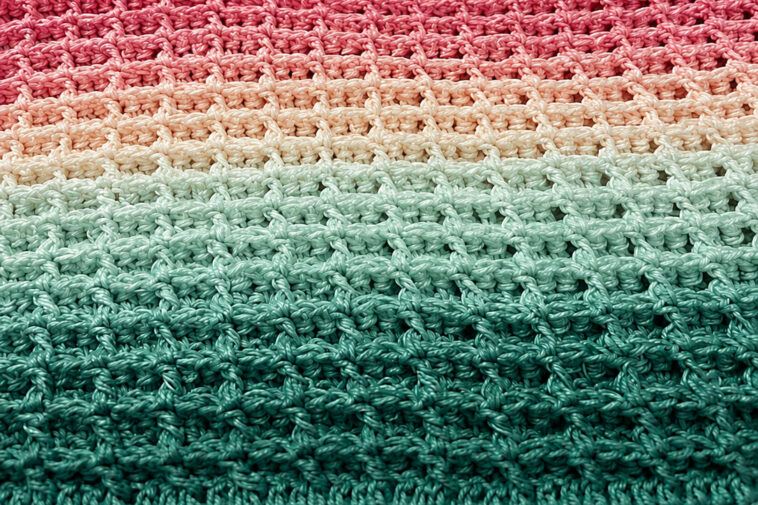
The Crochet Waffle Stitch is one of the best crochet stitches to choose when you want a blanket with rich texture, warmth, and a beautiful three-dimensional appearance. The raised squares resemble a classic waffle pattern, making this stitch especially popular for cozy blankets, baby blankets, throws, scarves, pillows, and home décor.
The blanket in your photo has a beautiful soft waffle texture with gradual pink, cream, and mint-to-teal shades. The color changes make the raised stitches particularly noticeable while giving the finished blanket a modern, handmade look.
The classic waffle stitch is created primarily with double crochet (DC) and front post double crochet (FPDC) stitches. Although the finished fabric looks complicated, the stitch is based on a simple repeating sequence.
🧶 Crochet Waffle Stitch Blanket Pattern
Skill Level
Easy to Intermediate
The basic stitch is straightforward once you understand how to work a front post double crochet. The most important part is keeping track of the raised stitches from the previous row.
Crochet Terms
This tutorial uses US crochet terminology.
Abbreviations
- ch – chain
- st/sts – stitch/stitches
- dc – double crochet
- FPdc – front post double crochet
- rep – repeat
- RS – right side
- WS – wrong side
Materials
For a blanket similar to the one shown:
- Worsted-weight yarn (#4) or your preferred blanket yarn
- Crochet hook appropriate for your yarn
- Scissors
- Tapestry needle
- Stitch markers
- Measuring tape
For a soft, squishy blanket, choose a yarn with good stitch definition. The waffle texture is created by the raised post stitches, so a yarn that is not excessively fuzzy will show the pattern more clearly.
How Many Chains Do You Need?
The traditional waffle stitch pattern is worked over a multiple of 3 stitches, plus 2 for the foundation chain. This construction is also used in several established waffle stitch tutorials.
For example:
- Small project: 32 chains
- Baby blanket: 92 chains
- Medium throw: 122 chains
- Larger blanket: 152 chains
The exact number should be adjusted according to your yarn, hook, gauge, and desired finished width.
Tip: Crochet a small sample before beginning the blanket. Waffle stitch tends to produce a thick fabric and can use more yarn than a simple double-crochet blanket.
Waffle Stitch Crochet Instructions
Foundation Chain
Chain a multiple of 3 + 2.
For example:
Ch 122
You can make the chain longer or shorter depending on the blanket size you want.
Row 1 – Double Crochet Base
Make 1 dc in the 3rd chain from the hook.
Continue working 1 dc in every chain across.
At the end of the row:
Ch 2 and turn.
The turning chain is not counted as a stitch in this version.
This first row creates the foundation that you will use to build the raised waffle texture.
Row 2 – First Waffle Texture Row
Start with:
1 dc in the first stitch.
Then repeat:
FPdc around the next stitch, dc in the next 2 stitches.
Continue this sequence across the row.
You should see the beginning of the raised vertical ridges forming.
Finish the row with a dc in the final stitch.
Ch 2 and turn.
The waffle pattern is created by pushing some stitches forward with FPdc while leaving the regular double crochets recessed.
Row 3 – Second Texture Row
Begin with:
1 dc in the first 2 stitches.
Then work:
FPdc around the next 2 stitches, dc in the next stitch.
Continue repeating:
1 dc, 2 FPdc
across the row.
Finish with the appropriate double crochet stitches at the end.
Ch 2 and turn.
This row creates the opposite arrangement of raised stitches and completes the first waffle repeat.
Rows 4 and Beyond
Now simply repeat:
Row A
Dc, FPdc, 2 dc
Row B
2 dc, 2 FPdc, dc
Continue alternating the two pattern rows until your blanket reaches the desired length.
The combination of regular double crochet and front post double crochet produces the characteristic raised squares of the waffle stitch.
How to Make a Front Post Double Crochet
The FPdc is the stitch that creates the beautiful raised texture.
- Yarn over.
- Insert your hook from front to back around the post of the indicated stitch.
- Bring the hook back toward the front.
- Yarn over and pull up a loop.
- You should now have three loops on your hook.
- Yarn over and pull through two loops.
- Yarn over again.
- Pull through the remaining two loops.
You have completed one front post double crochet.
Important Tip
Do not insert the hook through the top loops of the stitch when making an FPdc. Instead, the hook goes around the vertical post of the stitch.
This is what pushes the stitch toward the front of the fabric.
🎨 Creating the Color Effect Shown in the Photo
The blanket pictured has a gorgeous ombre-style color progression.
You could reproduce a similar effect with several shades such as:
- Deep teal
- Medium teal
- Sea green
- Pale mint
- Cream
- Blush
- Dusty pink
- Rose pink
Instead of changing colors randomly, work several rows in each color to create clean horizontal bands.
Example Color Sequence
Color A – Deep Teal: 15 rows
Color B – Emerald Teal: 15 rows
Color C – Seafoam: 15 rows
Color D – Pale Mint: 12 rows
Color E – Cream: 12 rows
Color F – Blush: 12 rows
Color G – Dusty Rose: 15 rows
Color H – Pink: 15 rows
You can modify the number of rows depending on the finished size.
For an even softer transition, use shades that gradually become lighter as you move toward the center and then gradually darker again.
How to Change Yarn Colors
For a neat color change:
- Crochet the final stitch of the old color.
- Stop before completing the final yarn-over.
- Place the new color on your hook.
- Pull the new yarn through the remaining loops.
- Continue crocheting with the new color.
- Weave in the loose ends later with a tapestry needle.
For blankets with many color changes, weave the ends in securely so they don’t loosen after washing.
Adding a Border
A simple border can give the waffle stitch blanket a polished finished edge.
After completing the final waffle row, work a round of single crochet (sc) around the entire blanket.
At the corners, work approximately:
3 sc in the corner stitch
This helps the blanket turn neatly around each corner.
You can then add:
- Another round of single crochet
- Half-double crochet
- Crab stitch
- Moss stitch
- Simple scalloped edging
For the blanket in the photo, I would recommend a simple single-crochet border in the darkest teal. It would frame the pastel center beautifully without competing with the waffle texture.
Why Crochet Waffle Stitch Is Perfect for Blankets
The waffle stitch is especially popular for blankets because it creates a thick, cushioned fabric.
Warm and Cozy
The raised stitches create extra depth, making the finished blanket feel wonderfully substantial.
Beautiful Texture
Unlike a flat crochet stitch, waffle stitch creates prominent squares that catch the light beautifully.
Great for Baby Blankets
The dense construction has relatively few open spaces, which makes it an attractive choice for baby blankets. One published waffle blanket tutorial specifically describes it as suitable for newborn blankets because of its dense fabric.
Excellent for Color Changes
The horizontal rows make waffle stitch particularly effective for stripes, ombré effects, and gradient yarn.
Versatile
Once you’ve learned the stitch, you can use it for:
- Baby blankets
- Lap blankets
- Couch throws
- Bed blankets
- Scarves
- Cowls
- Pillows
- Dishcloths
- Bags
- Table runners
Tips for Perfect Waffle Stitch
1. Don’t crochet too tightly
FPdc stitches can naturally make the fabric tighter. If you crochet very tightly, the blanket can become stiff or narrower than expected.
Try relaxing your tension or going up a hook size.
2. Count your stitches
It can be easy to accidentally skip a stitch when working around the posts.
Count your stitches at the end of every row, particularly during the first few repeats.
3. Mark the first stitch
A stitch marker can make it much easier to identify the first and last stitches of each row.
4. Check the direction of your post stitches
The raised FPdc stitches need to line up correctly to create the waffle squares.
5. Make a gauge swatch
Waffle stitch can vary considerably depending on yarn and tension. Make a small sample before calculating the final number of chains.
📏 Making the Blanket Larger or Smaller
The easiest way to adjust the width is to change the starting chain.
Remember:
Multiple of 3 + 2
So you can choose:
Ch 62
Ch 92
Ch 122
Ch 152
Ch 182
and so on.
For the length, simply continue repeating the two pattern rows until you reach your desired measurement.
🧼 Washing Your Finished Blanket
Always follow the washing instructions for your particular yarn.
For most washable acrylic yarns:
- Wash gently
- Use cool or lukewarm water
- Avoid excessive agitation
- Dry according to the yarn label
- Avoid very high heat
Because waffle stitch is quite textured, laying the blanket flat to dry can help it maintain its shape.
🎥 Waffle Stitch Video Tutorials
If you prefer learning by watching someone crochet each row, these are useful video tutorials.
⭐ Recommended: Jo to the World Creations
This tutorial demonstrates a waffle stitch blanket from start to finish, including the beginning, rows 1–5, and the border. The video is particularly useful because the timestamps make it easy to jump directly to the row you need.

