

 soofha
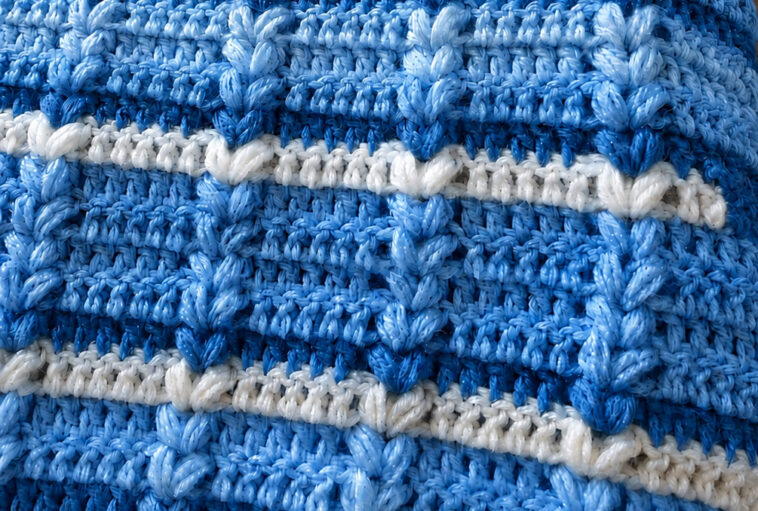
If you love crochet blankets with bold color changes, rich texture, and a little bit of vintage charm, the Pulled Taffy Crochet Blanket is a beautiful project to add to your handmade collection.
Inspired by the look of stretched and twisted pieces of colorful taffy, this style of blanket combines horizontal stripes with raised, braided-looking texture. The result is a cozy blanket that looks much more complicated than it actually is.
The original Pulled Taffy Blanket was designed by Marly Bird and published through Yarnspirations/Red Heart. The original design is available as a free pattern and includes baby and larger throw sizing.
The blue-and-white version shown here is especially pretty for a nursery, child’s bedroom, or a calm coastal-inspired living space.
Pattern note: This article provides an original, simplified taffy-inspired crochet blanket pattern rather than reproducing the designer’s copyrighted pattern instructions. For the original Marly Bird design, use the official free pattern source linked below.
About the Pulled Taffy Crochet Blanket
The beauty of this blanket comes from its combination of color and texture.
Instead of relying on complicated motifs or individual squares, the blanket is worked in rows. Alternating colors create the striped appearance, while textured stitches form raised sections that resemble strands of pulled candy.
The original design uses Aran/worsted-weight yarn and a 6 mm (J) crochet hook, and is categorized as an intermediate crochet project. The original pattern lists baby and larger throw dimensions.
For the version in the photograph, shades of blue and white create a softer interpretation of the traditional colorful taffy look.
Finished Size
This original stitch recipe can be customized to almost any size.
Suggested sizes:
- Baby blanket: approximately 36 × 40 inches
- Small throw: approximately 46 × 56 inches
- Lap blanket: approximately 48 × 60 inches
- Large throw: approximately 56 × 72 inches
Because crochet tension varies, use your measurements rather than relying only on stitch counts when creating a specific finished size.
Materials
For a medium-sized throw, gather:
- Worsted/Aran-weight yarn – approximately 2,500–3,300 yards depending on size
- 6 mm (J) crochet hook
- Yarn needle
- Scissors
- Measuring tape
- Stitch markers, optional
Suggested Blue Color Palette
For a blanket similar to the photograph, try:
- Color A: White
- Color B: Pale blue
- Color C: Sky blue
- Color D: Medium blue
- Color E: Deep ocean blue
You can use fewer colors if you prefer a simpler design.
A blue-and-white palette gives the blanket a fresh, airy appearance, while brighter colors such as pink, green, yellow, turquoise, and coral can create a playful candy-inspired effect.
Crochet Abbreviations
US crochet terminology:
- ch – chain
- sc – single crochet
- hdc – half double crochet
- dc – double crochet
- fpdc – front post double crochet
- sl st – slip stitch
- st – stitch
- sk – skip
- yo – yarn over
- rep – repeat
Special Textured Stitch
The raised appearance of this blanket can be created with front-post stitches.
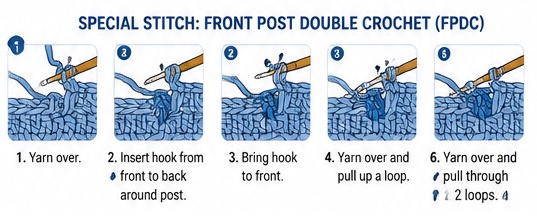
A front post double crochet (FPDC) is worked around the post of a stitch from the previous row rather than through the normal top loops.
How to Make a Front Post Double Crochet
- Yarn over.
- Insert your hook from front to back around the post of the indicated stitch.
- Bring the hook back toward the front.
- Yarn over and pull up a loop.
- Yarn over and pull through two loops.
- Yarn over and pull through the remaining two loops.
The stitch sits in front of the fabric and creates a raised ridge.
Gauge
A practical starting gauge for worsted-weight yarn is approximately:
12–14 stitches × 13–15 rows = 4 inches
However, the exact gauge will depend on your yarn, hook, and tension.
Make a small swatch before beginning the blanket.
If your swatch is too small, move up to a larger hook. If it is too large, try a smaller hook.
For blankets, matching the exact gauge is less important than achieving the finished dimensions you want, but checking your gauge will help you estimate yarn requirements.
Pulled Taffy-Inspired Blanket Pattern
This version uses a simple repeating textured-row concept that you can expand to your preferred width.
Step 1: Foundation Chain
Choose a starting chain that gives you the desired blanket width.
For an easy repeating structure, use a foundation chain based on a multiple of 8 stitches + 2.
For example:
Chain 138 for a generously sized starting width.
You may increase or decrease the number of repeats to make the blanket narrower or wider.
Row 1
Work 1 sc in the second chain from the hook.
Continue working 1 sc across.
Turn.

Row 2
Chain 1.
Work 1 sc in every stitch across.
Turn.
This simple row establishes a firm foundation before beginning the textured sections.

Row 3 – Begin the Texture
Chain 2.
Work the first few stitches in the basic stitch pattern, then introduce front-post stitches across selected stitches.
A simple repeat is:
3 sc, 2 FPDC, 3 sc
Repeat across the row, adjusting the final stitches as necessary.
Turn.

Row 4
Chain 1.
Work 1 sc across the entire row.
Turn.
The plain row helps separate the raised texture and keeps the blanket from becoming overly dense.

Row 5 – Create the Pulled Effect
Chain 2.
Work the basic stitches across until reaching the textured section.
Cross the raised stitches by working the post stitches in a slightly different order.
The goal is to create a raised diagonal movement that visually resembles a strand of pulled taffy.
Continue the repeat across the row.
Turn.

Row 6
Chain 1.
Work single crochet across.
Turn.

Rows 7–10
Repeat the textured and plain-row sequence.
Change colors at the end of selected rows to create the striped appearance.
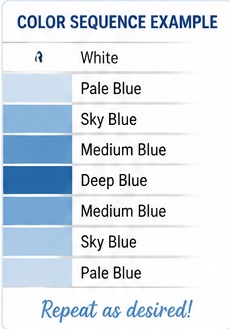
A useful color sequence is:
White → pale blue → sky blue → medium blue → deep blue → medium blue → sky blue → pale blue
Then repeat.
This creates a soft gradient effect similar to the blanket shown in the photograph.

How to Change Colors Neatly
Color changes are an important part of the finished appearance.
When you’re ready to change colors, work the final stitch of the old color until only two loops remain on your hook.
Drop the old yarn.
Yarn over with the new color and pull through the final loops.
Then continue with the new color.
For cleaner edges, avoid carrying unused yarn across long sections of the blanket. Instead, cut the yarn when appropriate and weave the ends in later.
Creating the Braided Look
The most recognizable feature of a taffy-inspired blanket is the raised, twisted appearance.
You can emphasize this effect by alternating the position of your post stitches.
For example, one textured row can have the raised stitches leaning visually toward the right, while the next textured section can be arranged to create a crossing effect.
The plain single-crochet rows between textured rows make the raised portions stand out.
Don’t worry if your first few repeats don’t look perfectly braided. The texture becomes much easier to recognize as additional rows are worked.
Color Ideas
The photograph uses a beautiful blue-and-white palette, but this design is perfect for experimenting with color.
Ocean Blue
- White
- Ice blue
- Sky blue
- Medium blue
- Deep blue
Candy Shop
- White
- Bubblegum pink
- Lavender
- Mint
- Aqua
Sunset Taffy
- Cream
- Peach
- Coral
- Rose
- Golden yellow
Rainbow
- Red
- Orange
- Yellow
- Green
- Blue
- Purple
- White
Neutral Taffy
- Ivory
- Beige
- Taupe
- Soft brown
- Charcoal
One of the advantages of this type of striped blanket is that you can completely change its personality simply by changing the yarn colors.
How to Make the Blanket Larger
One of the best things about a striped textured blanket is that you don’t have to follow a fixed finished size.
To make it wider, add additional stitch repeats to your foundation chain.
To make it longer, continue repeating the established rows until the blanket reaches your desired length.
Before starting a very large blanket, remember that textured crochet can consume considerably more yarn than a simple single-crochet fabric.
The original Pulled Taffy design is also available in both a smaller baby size and a larger throw size, making the concept suitable for different projects.
Border
A simple border works beautifully with a heavily textured blanket.
For a clean finish, use white or one of your palest blue shades.
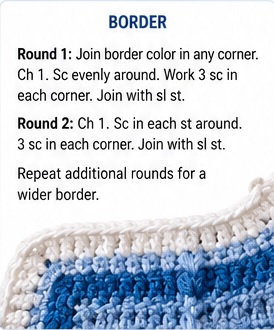
Round 1
Join your border color at a corner.
Chain 1.
Work single crochet evenly around the blanket.
At each corner, work 3 sc in the corner stitch or space.
Continue around the blanket and join with a slip stitch.
Round 2
Chain 1.
Work single crochet around.
Place 3 sc in each corner.
Join with a slip stitch.
Repeat additional rounds if you want a wider border.
A white border is particularly effective with the blue blanket because it frames the textured center without competing with the raised stitches.
Finishing
Once the blanket has reached the desired size:
- Fasten off the final color.
- Cut the yarn, leaving a tail.
- Pull the tail through the final loop.
- Thread the yarn onto a yarn needle.
- Weave the end securely through several stitches.
- Trim the excess yarn.
- Repeat for all remaining yarn tails.
Because striped blankets can create many loose ends, weaving them in as you go can save a lot of time at the end.
Blocking the Blanket
Blocking is optional, but it can make a noticeable difference.
Lay the finished blanket on a clean surface.
Gently straighten the edges and corners.
If using wet blocking, dampen the blanket according to the care instructions of your yarn. Pin it into the desired shape and allow it to dry completely.
Avoid stretching the blanket aggressively. The goal is simply to encourage the edges and stitches to settle into a more uniform shape.
Tips for Crocheting This Blanket
1. Keep your tension consistent
Textured stitches can become tight, particularly when working front-post stitches.
If your fabric feels stiff, try relaxing your hands or moving up half a hook size.
2. Count your stitches regularly
A textured pattern can make stitches difficult to see.
Count your stitches at the end of every few rows to make sure the blanket hasn’t accidentally become wider or narrower.
3. Use stitch markers
Place markers at important repeat sections.
This is especially helpful when working a large blanket with many repeated textured areas.
4. Don’t pull post stitches too tightly
The raised stitches need enough room to create their characteristic texture.
Pulling them too tightly can cause the blanket to curl or become rigid.
5. Alternate your colors thoughtfully
You don’t need to change color every row.
Wider color bands can create a calmer appearance, while frequent color changes produce a more playful candy-like effect.
Is the Pulled Taffy Blanket Beginner Friendly?
The original Pulled Taffy Blanket is generally classified around the intermediate level because of its textured construction and raised stitch work.
A confident beginner who already knows single crochet, double crochet, and basic color changes can use this project as a way to learn front-post stitches.
If you’re completely new to crochet, practice the textured stitch on a small swatch before committing to an entire blanket.
Why You’ll Love This Pattern
There are several reasons this style of blanket remains popular.
It’s colorful.
You can create everything from soft nursery colors to bright rainbow stripes.
It’s textured.
The raised stitches give the blanket a dimensional surface that looks beautiful in photographs.
It’s customizable.
The width and length can be adjusted for baby blankets, lap throws, couch blankets, or larger bed-sized projects.
It’s practical.
A worsted-weight yarn and a 6 mm hook make it a substantial project without requiring an extremely small hook.
It makes a wonderful gift.
A blue-and-white version would make a lovely baby shower gift, while brighter colors can work beautifully for birthdays or holiday presents.
Care Instructions
Always follow the care instructions for the specific yarn you choose.
For many washable acrylic yarns, gentle machine washing and low-temperature drying may be suitable. The official Red Heart version lists machine washing in warm water and tumble drying on low, while also advising against bleach and ironing.
For a handmade gift, it is always helpful to include a small care note with the finished blanket.
Frequently Asked Questions
What is a Pulled Taffy crochet blanket?
A Pulled Taffy blanket is a colorful textured crochet blanket inspired by the twisted appearance of pulled taffy candy. The design combines stripes with raised crochet texture to create a dimensional effect.
What yarn is used for the original Pulled Taffy blanket?
The original design uses Red Heart Super Saver, an Aran/worsted-weight yarn. The original pattern recommends a 6 mm (J) hook.
What size is the original blanket?
The original pattern includes a baby blanket size of approximately 39 × 36 inches and a larger throw size of approximately 56½ × 46 inches, according to the Ravelry listing.
Can I use different colors?
Absolutely. Color is one of the most enjoyable parts of this design. Blue and white create a soft coastal appearance, while pink, green, yellow, purple, and turquoise can produce a fun candy-inspired blanket.
Can I make the blanket bigger?
Yes. The concept can be expanded by adding additional stitch repeats to the foundation chain and continuing the row sequence until the desired length is reached.
Is this a good baby blanket?
Yes. The original Pulled Taffy design was published as a baby blanket and is also suitable for larger throws.
For a baby blanket, choose soft, washable yarn and avoid loose embellishments that could become detached.
Final Thoughts
The Pulled Taffy Crochet Blanket is a wonderful example of how simple crochet techniques can be combined to create a spectacular finished texture.
The blue version shown here has a particularly calming look, with layers of pale blue, bright blue, deep blue, and crisp white creating a beautiful wave of color. The raised stitches give the blanket a cozy three-dimensional surface, while the striped construction makes it an enjoyable project to customize.
If you want to see the original Marly Bird Pulled Taffy Blanket pattern, you can find the free pattern through Yarnspirations. The original pattern is credited to Marly Bird and was published in 2016.
Whether you make yours in ocean blues like the example, cheerful rainbow shades, or soft pastel colors, this textured blanket is sure to become a cozy handmade favorite.

