

 soofha
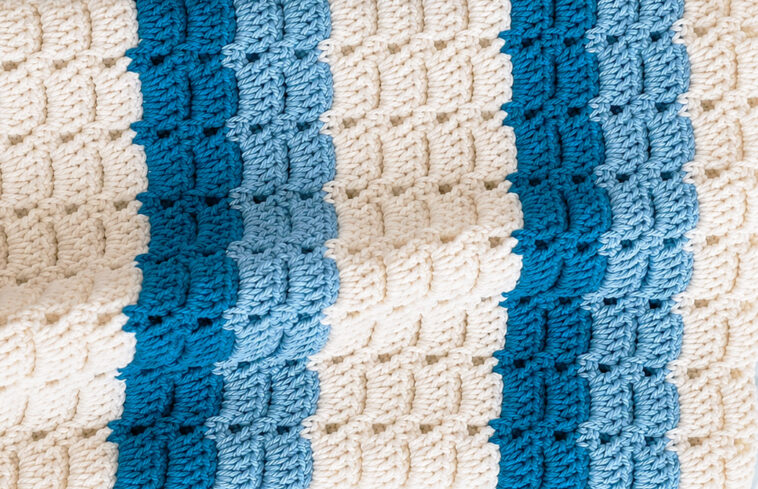
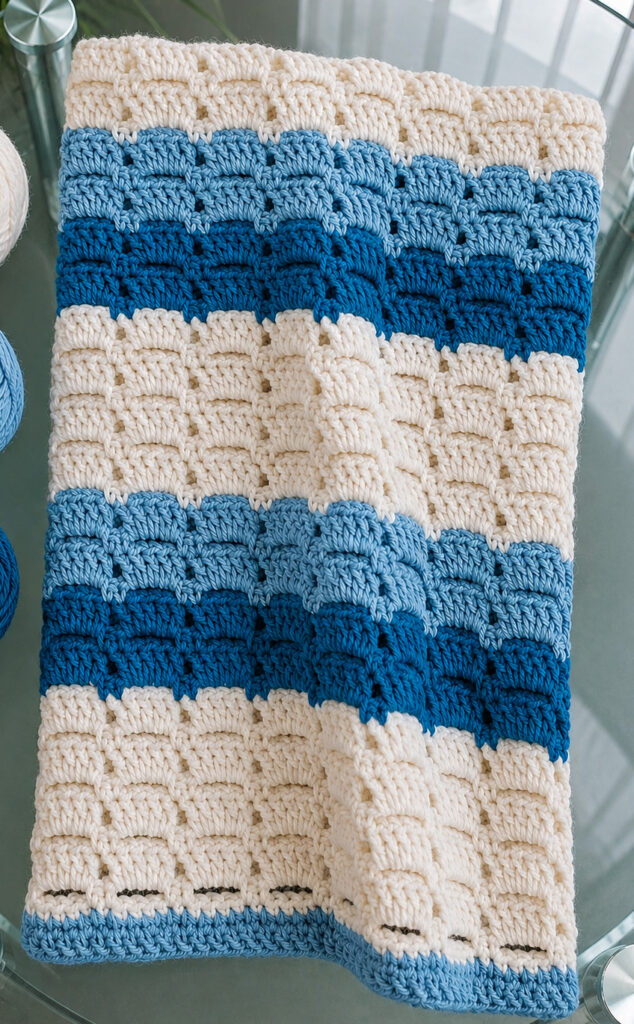
There is something truly special about making a handmade baby blanket. This Crochet Block Stitch Baby Blanket combines cheerful colors, beautiful texture, and an easy-to-follow stitch pattern to create a cozy project that is both practical and memorable.
Soft bubblegum pink is paired with crisp white and lively lime green stripes, while a warm taupe border brings everything together with a subtle, sophisticated finish.
The block stitch gives the blanket its eye-catching textured appearance. Although the finished fabric looks intricate, the stitch construction is surprisingly simple, making this project suitable for confident beginners as well as experienced crocheters looking for a relaxing pattern.
This blanket makes a lovely baby-shower gift, nursery accessory, or handmade keepsake. The repeating rows are wonderfully rhythmic, so once you get comfortable with the pattern, the project works up quickly.
Choosing Yarn for Your Baby Blanket
Selecting the right yarn is an important part of making a baby blanket. Since baby blankets are frequently washed and handled, choose a yarn that is soft, durable, and easy to care for.
Worsted-weight acrylic or acrylic-blend yarn is an excellent choice. These fibers are generally lightweight, machine washable, and available in a wide variety of colors.
For this particular design, the combination of pink, green, white, and taupe creates a cheerful yet balanced color palette. You can, of course, substitute your favorite colors to personalize the blanket.
The block stitch is built around alternating rows of single crochet and clustered double crochet. The clusters and chain spaces create an attractive lattice-like texture while keeping the fabric comfortable and flexible.
If you are unfamiliar with written crochet patterns, learning common abbreviations and understanding crochet charts can make projects like this much easier to follow.
Finished Size
The completed blanket measures approximately 32 inches wide × 38 inches long.
This size works well as a baby blanket, stroller blanket, or cozy lap-sized throw. Individual color sections are approximately 3–4 inches deep, while the taupe edging adds a neat finishing frame around the outside.
You can easily customize the dimensions by adjusting the foundation chain, keeping the required stitch multiple in mind.
Materials and Tools
Yarn
- Color A – Pink: Approximately 500 yards of worsted-weight Category 4 acrylic or acrylic-blend yarn.
- Color B – Green: Approximately 250 yards of worsted-weight yarn in lime or grass green.
- Color C – White: Approximately 200 yards of worsted-weight yarn in white or cream.
- Color D – Taupe: Approximately 100 yards of worsted-weight yarn for the border.
Suggested yarn examples include Lion Brand Heartland, Red Heart Super Saver, Bernat Super Value, and Caron Simply Soft. Feel free to substitute comparable worsted-weight yarns.
Other Supplies
- H-8 (5 mm) crochet hook, or size needed to obtain gauge
- Scissors
- Tapestry needle
- Stitch markers
- Blocking mats, if desired
Disclosure: This pattern may contain affiliate links. If you purchase through one of these links, I may receive a small commission at no additional cost to you.
Crochet Abbreviations
- ch – chain
- sc – single crochet
- dc – double crochet
- ch-2 sp – chain-2 space
- sk – skip
- st/sts – stitch/stitches
- FPDC – front post double crochet
- BPDC – back post double crochet
- RS – right side
Understanding the Block Stitch
The block stitch uses a simple repeating sequence.
One row is worked in single crochet, while the following row creates groups of three double crochet separated by chain spaces. Alternating these two rows produces the characteristic blocks and open spaces that give the pattern its textured appearance.
Once the first few repeats are established, the stitch becomes very repetitive and enjoyable to work.
Color Scheme
The color arrangement gives this blanket much of its personality.
The soft pink creates a warm, sweet foundation, while the lime green stripes provide a bright pop of color. White sections add contrast and give the eye a place to rest between the stronger colors.
The stripe sequence is:
White → Pink → Green → Pink → Green → Pink → White
A taupe border completes the design and gives the bright colors a more grounded appearance.
You can easily change the palette to suit a nursery, holiday theme, or personal preference. Pastels would create a softer look, while jewel tones would produce a more dramatic blanket.
Crochet Block Stitch Baby Blanket Pattern
Gauge
14 dc and 8 rows = 4 inches in the block stitch pattern.
Gauge can vary depending on yarn, hook size, and personal tension. If your measurements differ considerably, adjust your hook size before beginning the full blanket.
Foundation Chain
With Color C – White, chain 91.
The foundation chain uses a multiple of 3 plus 1, allowing the block stitch pattern to repeat evenly across the blanket.
Section 1 – White
Rows 1–4
Row 1 – RS:
Sc in the second chain from the hook and in each chain across. You should have 90 sc. Turn.
Row 2:
Ch 3, which counts as the first dc. Skip the next 2 sc, then work 3 dc in the next sc. Ch 2.
Repeat the sequence across the row. Near the end, skip the appropriate stitch and finish with a dc in the final stitch. Turn.
Row 3:
Ch 1. Work sc across, placing a single crochet in each stitch and in each ch-2 space. Turn.
Row 4:
Repeat Row 2. Turn, but do not fasten off.
Changing to Pink
At the end of Row 4, change to Color A – Pink. Complete the final stitch of the row using the existing color, then use pink for the final yarn-over and pull-through.
This creates a clean transition between the two colors.
Section 2 – Pink
Rows 5–12
Continue alternating the single-crochet row and the block row.
Work 4 complete two-row repeats, for a total of 8 rows.
This produces the first substantial pink section of the blanket.
At the end of Row 12, prepare to change colors.
Section 3 – Green Stripe
Change to Color B – Green.
Rows 13–16
Work 2 complete block-stitch repeats, for a total of 4 rows.
This creates a narrower green stripe that adds contrast without overpowering the pink sections.
At the end of Row 16, change back to pink.
Section 4 – Pink
Change to Color A – Pink.
Rows 17–24
Work 4 complete two-row repeats, totaling 8 rows.
Keep your tension consistent so the sides remain straight and the pink section matches the first pink band.
At the end of Row 24, change to green.
Section 5 – Green Stripe
Change to Color B – Green.
Rows 25–28
Work 2 complete two-row repeats, for a total of 4 rows.
At the end of Row 28, change back to pink.
Section 6 – Pink
Change to Color A – Pink.
Rows 29–36
Work another 4 complete two-row repeats, totaling 8 rows.
This is the final large pink section of the blanket.
At the end of Row 36, prepare to change to white.
Section 7 – White
Change to Color C – White.
Rows 37–40
Work 2 complete two-row repeats, totaling 4 rows.
Fasten off at the end of Row 40, leaving a long enough yarn tail for weaving in.
The main blanket is now complete.
Crochet Border
The taupe edging provides a neat frame and adds additional texture to the finished blanket.
Join Color D – Taupe with a slip stitch in any corner.
Round 1 – Single Crochet
Ch 1.
Work sc evenly around the entire blanket. Place 3 sc in each corner to help the border turn smoothly.
Join with a slip stitch to the first sc.
Try to distribute the side stitches evenly rather than forcing an exact number into each row. The goal is to keep the blanket lying flat without puckering or curling.
Round 2 – Ribbed Border
Ch 3, counting as the first FPDC.
Alternate:
BPDC in the next stitch, FPDC in the next stitch
Continue this alternating pattern around the blanket.
At each corner, work 3 FPDC to maintain a smooth corner.
Join with a slip stitch to the first FPDC.
Fasten off and weave in the remaining yarn ends.
The alternating front-post and back-post stitches create a raised ribbed texture that gives the blanket a more finished appearance while reinforcing the outer edge.
Finishing the Blanket
Use a tapestry needle to weave in every remaining yarn end. For added security, work each tail through several stitches on the wrong side of the blanket before trimming the excess.
Blocking is optional, but it can significantly improve the finished appearance.
To block the blanket, gently soak it in lukewarm water with a mild wool wash or suitable fiber-safe cleanser. Carefully squeeze out excess water without twisting or wringing the fabric.
Lay the blanket flat on blocking mats and gently shape it to the desired measurements. Pin the edges if necessary and allow the blanket to dry completely.
Blocking can help relax uneven stitches, straighten the edges, and open the block-stitch texture.
Tips for a Beautiful Finished Blanket
Keep Your Tension Consistent
The block stitch alternates between denser single-crochet rows and more open clustered rows. Maintaining consistent tension helps prevent the blanket from becoming wider or narrower as you work.
Check your stitch count regularly, especially at the beginning and end of each row.
Pay Attention to Color Changes
For the cleanest color transitions, change colors during the final pull-through of the last stitch in the previous color.
This prevents visible bumps and gives each stripe a crisp transition.
Use Stitch Markers
Place markers in the first and last stitches of difficult rows if you tend to lose track of your edges.
This is particularly helpful when working the clustered sections.
Carry Yarn Carefully
When practical, carry colors neatly along the side rather than cutting the yarn after every small stripe. This can reduce the number of ends that need to be woven in later.
Take Breaks
Blankets require many repeated stitches, so remember to take regular breaks. Relax your hands and shoulders and change your grip occasionally to avoid unnecessary tension.
Most importantly, do not worry if your finished blanket has a few small imperfections. Handmade pieces have their own character, and those little differences are part of what makes them special.
Customizing Your Crochet Blanket
One of the best things about this pattern is how easy it is to personalize.
You can create a completely different look simply by changing the colors.
For a classic nursery design, try:
- Cream and beige
- Dusty pink and sage
- Baby blue and white
- Lavender and cream
For a more modern blanket, consider:
- Mustard
- Terracotta
- Olive
- Navy
- Charcoal
You can also make the blanket larger by adding additional stripe sections. Just remember to maintain the same stitch repeat and keep the color sequence balanced.
Why You Will Love the Block Stitch
The block stitch is an excellent choice for crocheters who want texture without an overly complicated pattern.
Its repeating structure makes it easy to memorize, while the combination of clustered double crochet and chain spaces gives the finished fabric plenty of visual interest.
The stitch also works beautifully with stripes because each color change clearly highlights the individual blocks.
Whether you are making your first baby blanket or your fiftieth, this pattern offers a relaxing project with a rewarding finished result.
More Crochet Projects to Try
If you enjoyed making this textured baby blanket, consider adding these projects to your crochet list:
- Delicate Light Pink Star Motif Blanket – A sweet design for a special baby gift.
- Ribbed Baby Blanket with Half Double Crochet – A simple textured blanket with a timeless appearance.
- Beginner Bunny Pair – Cute crochet companions that make wonderful handmade gifts.
- Choosing the Perfect Yarn for Crochet Blankets – Helpful information for selecting yarn for future projects.
Video Tutorial
A video tutorial can be especially helpful when learning the block stitch because you can watch how the clusters, chain spaces, and color changes are formed.
Keep in mind that the yarn colors and exact materials shown in a tutorial may differ from those used for this particular blanket. The video should be considered a visual guide to the stitch technique and construction rather than an exact representation of the finished colorway.
Frequently Asked Questions
Is the block stitch easy for beginners?
Yes. Once you understand the two-row repeat, the pattern is quite straightforward. Beginners who are comfortable with single crochet, double crochet, and chain stitches should be able to follow it with practice.
What yarn is best for a baby blanket?
Soft, washable acrylic or acrylic-blend worsted-weight yarn is a practical option. It is generally durable, easy to care for, and available in many colors.
Can I use a different hook size?
Yes. Your hook size can be adjusted depending on your yarn and tension. Always check your gauge if maintaining the approximate finished size is important.
Can I make this blanket larger?
Absolutely. Add additional block-stitch repeats to increase the length. To increase the width, adjust the foundation chain while maintaining the required multiple of 3 plus 1.
Do I have to use these exact colors?
No. The color palette is completely customizable. Choose colors that complement your nursery, match a gift recipient’s preferences, or simply make you happy.
Does the blanket need to be blocked?
Blocking is optional, but it can help straighten the edges and improve the appearance of the textured stitch pattern.
Final Thoughts
This Crochet Block Stitch Baby Blanket is a wonderful combination of simple construction and eye-catching texture. The cheerful pink, green, and white stripes give the blanket a playful personality, while the taupe ribbed border adds a polished finishing touch.
The repeating block stitch makes the project enjoyable to work on, whether you are crocheting a thoughtful baby-shower gift or creating something special for your own family.
Grab your favorite yarn, choose your hook, and settle into the soothing rhythm of the block stitch. Row by row, those simple clusters will transform into a beautiful handmade blanket that can be enjoyed for years to come.
Most importantly, enjoy the process. Every stitch represents time, creativity, and care—and that is what makes a handmade crochet blanket truly special.

