

 soofha
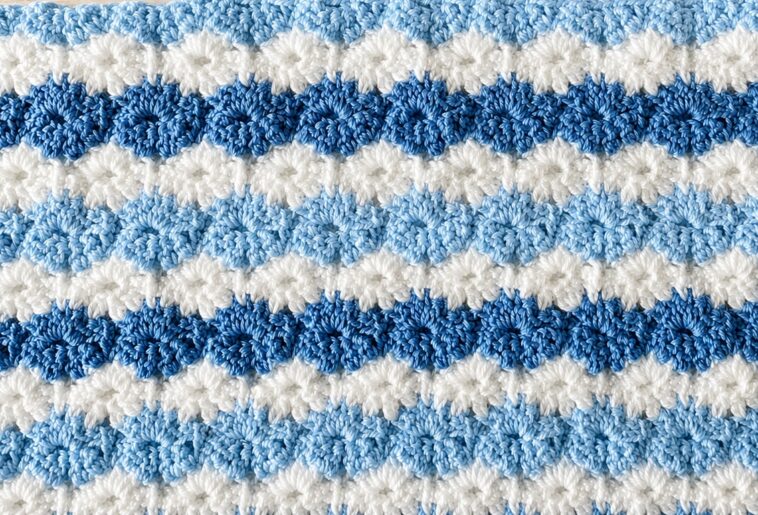
The Crochet Starburst Stitch is a beautiful textured crochet stitch that creates repeating bursts or flower-like shapes across your fabric. It has a wonderfully dense texture, making it especially suitable for cozy blankets, baby blankets, scarves, cowls, cushions, and other projects where you want warmth and visual interest.
The stitch is sometimes associated with names such as Star Stitch, Daisy Stitch, Marguerite Stitch, or Catherine Wheel/Starburst Stitch, although these names can refer to slightly different stitch variations. The version in this tutorial is the classic four-row Starburst-style pattern with clusters of double crochets.
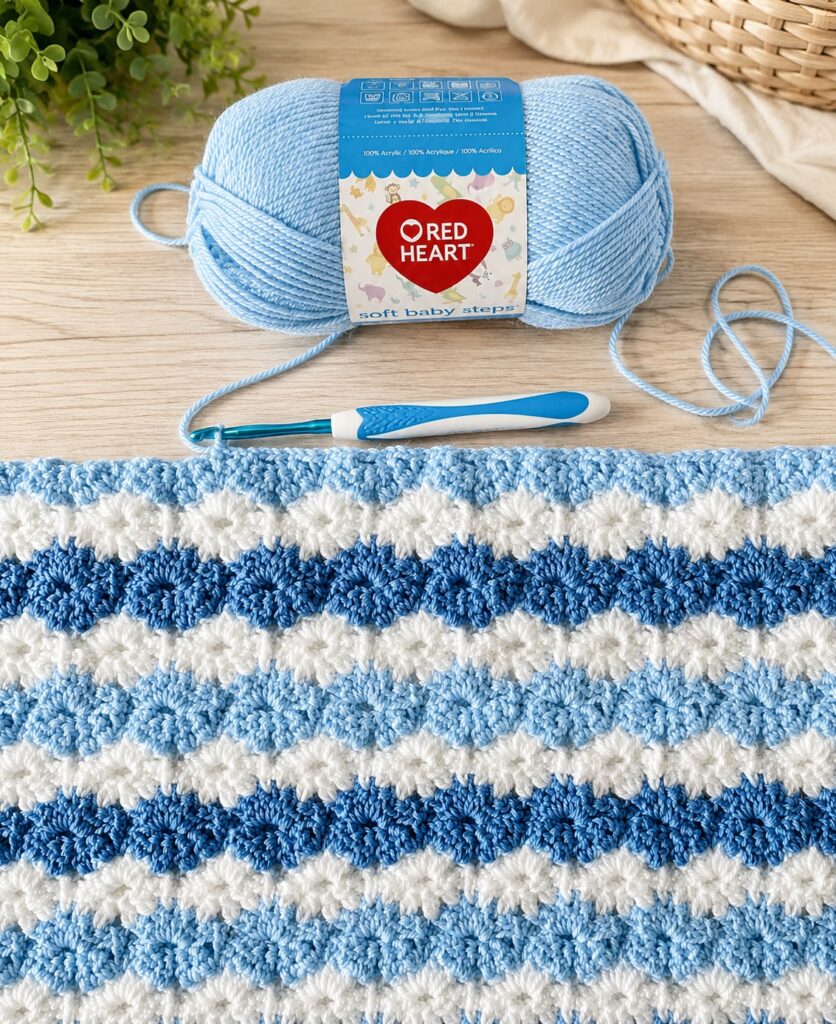
The blue-and-white color combination shown in the sample gives the stitch a soft, clean appearance that would be perfect for a baby blanket or nursery throw.
Why You’ll Love the Crochet Starburst Stitch
This stitch has several qualities that make it a fantastic choice for crochet blankets:
- Creates beautiful raised texture
- Works wonderfully with two or more colors
- Produces a relatively dense fabric
- Looks attractive from a distance and up close
- Perfect for baby blankets and throws
- Easy to customize for different project sizes
- Works with many different yarn weights
- Creates interesting horizontal color stripes
Alternating two colors every one or two rows can make the starburst shapes stand out dramatically.
Materials
For a small crochet swatch, you will need:
- Medium-weight acrylic yarn
- Crochet hook suitable for your yarn
- Scissors
- Yarn needle
For a blanket similar to the sample, you could use:
Color A: Light blue
Color B: White
Color C: Dark blue
A soft acrylic such as Red Heart Soft Baby Steps works particularly well for a cozy baby blanket.
The exact amount of yarn depends on the finished dimensions of your project.
Crochet Hook
A 5 mm crochet hook is a good starting point for medium-weight yarn.
If your fabric feels too stiff, try going up by 0.5–1 mm. Starburst-style stitches can create a dense fabric, so a slightly larger hook may produce a softer blanket.
Crochet Abbreviations
US crochet terminology:
- ch – chain
- sc – single crochet
- dc – double crochet
- dc2tog – double crochet two together
- dc4tog – double crochet four together
- dc9tog – double crochet nine together
- st – stitch
- sk – skip
- rep – repeat
- yo – yarn over
- sl st – slip stitch
Special Stitch: Double Crochet Together
The most important technique in this pattern is working several double crochets together.
To make a dc9tog, work an incomplete double crochet into each of the next nine stitches, leaving the final loop of each stitch on your hook.
You will have multiple loops on your hook.
Yarn over and pull through all remaining loops.
This creates the center of the starburst.
The same technique can be used for smaller groups such as dc4tog.
Don’t worry if this feels awkward at first. After making a few repeats, the movement becomes much easier.
Foundation Chain
The Starburst Stitch works over a repeating stitch multiple.
For this variation, begin with a foundation chain based on:
Multiples of 8 + 1
For a blanket swatch, you could start with:
ch 25
For a wider project, simply increase the foundation chain in multiples of 8.
For example:
- 25 chains
- 33 chains
- 41 chains
- 49 chains
- 57 chains
- 65 chains
For a large blanket, continue increasing by 8 chains until you reach your desired width.
Row 1 – Establish the Starburst Groups
Begin with your foundation chain.
Work across the chain by creating groups of double crochet stitches separated by single crochet sections.
A simple setup is:
Skip 4 chains, work 9 dc into the next chain, skip 3 chains, sc into the next chain.
Repeat this sequence across the row.
The first row creates the foundation for the rounded starburst shapes.
When working several stitches into one chain, keep your tension relaxed. Trying to pull each stitch too tightly can make the following rows difficult to work.
Row 2 – Form the Starbursts
Turn your work.
This is the row where the individual starburst shapes begin to become visible.
Work the decrease clusters across the groups of stitches from the previous row.
The central section is created by working a group of double crochets together, followed by chain spaces and single crochet stitches.
The basic rhythm is:
cluster → chain space → single crochet → chain space → cluster
Continue the sequence across the row.
As you work the decreases, make sure you pull each loop up to approximately the same height. Consistent loop height is important for producing evenly shaped starbursts.
Row 3 – Open the Starbursts
Turn your work again.
This row works double crochets into the tops of the previous decrease clusters.
Work the appropriate group of double crochets into each cluster, with single crochet stitches between the starburst sections.
The fabric should now begin to resemble the starburst design clearly.
The rounded groups spread outward from the center, creating the characteristic burst-like appearance.
Row 4 – Complete the Motif
Turn your work.
Work another series of decrease clusters across the row.
The decreases pull the stitches back together and create the next set of starburst centers.
Continue across the row, maintaining the same spacing between the clusters.
At the end of the row, complete the edge stitches carefully so that the sides remain straight.
Row 5 – Return Row
The fifth row returns to the open structure of the stitch.
Work the double crochet groups into the centers of the previous clusters and use single crochet stitches to connect the sections.
Once this row is complete, the first complete Starburst repeat is visible.
The stitch is then repeated from the appropriate repeat row.
The four-row repeat structure is a characteristic feature of this Starburst variation.
Color Changes for a Beautiful Blanket
One of the best features of the Starburst Stitch is how well it works with stripes.
For a blanket inspired by the photograph, try this sequence:
Row 1: Light blue
Row 2: Light blue
Row 3: White
Row 4: White
Row 5: Dark blue
Row 6: Dark blue
Then repeat the color sequence.
Changing colors every two rows creates clean horizontal bands while allowing the texture to remain the main feature.
You can also experiment with:
- Blue + white
- Pink + white
- Sage + cream
- Lavender + white
- Gray + cream
- Navy + pale blue
- Rainbow colors
- Three shades of one color
For a baby blanket, soft pastel colors look especially beautiful.
How to Keep Your Edges Straight
Textured stitches involving decreases and multiple stitches can sometimes make blanket edges uneven.
Here are a few tips:
Count your stitches
After every row, quickly check that your stitch count remains consistent.
Don’t pull the clusters too tightly
The loops should have enough height to allow the next row to be worked comfortably.
Mark the first and last stitches
Using stitch markers at the edges can make it easier to identify where each row begins and ends.
Maintain consistent tension
Try to keep your yarn tension similar throughout the entire project.
How to Make a Starburst Baby Blanket
To turn this stitch into a baby blanket, choose your desired width and create a foundation chain using the appropriate multiple.
A small baby blanket could be approximately:
30–36 inches wide
A larger baby or toddler blanket could be approximately:
36–45 inches wide
Work the Starburst repeat until the blanket reaches your preferred length.
Finish with several rows of single crochet for a simple border.
For an especially polished finish, add:
- One round of single crochet
- One round of half double crochet
- One decorative shell or picot round
A simple white border would look beautiful around a blue-and-white Starburst blanket.
Starburst Stitch Tips for Beginners
The first few rows can look confusing.
Don’t judge the stitch before completing at least two or three repeats.
The important thing is to understand the movement:
Build the stitches → decrease into the center → open the cluster → decrease again.
Once you recognize that rhythm, the pattern becomes much easier to follow.
If you are new to decrease stitches, practice the dc2tog and dc4tog techniques on a small scrap of yarn before attempting the larger clusters.
What Can You Make With the Starburst Stitch?
This versatile stitch can be used for many crochet projects.
Blankets
This is probably the most popular application because the stitch creates a thick, cozy fabric.
Baby Blankets
Use soft acrylic or baby yarn in pastel colors for a beautiful nursery blanket.
Scarves
The dense texture creates a warm winter scarf.
Cowls
Work the stitch in the round or make a rectangle and seam the ends together.
Pillow Covers
The raised texture creates an attractive decorative cushion.
Throws
Use several coordinating colors for a larger living-room throw.
Baby Accessories
The stitch can also be incorporated into stroller blankets, loveys, and small nursery accessories.
Troubleshooting
My starbursts don’t look even.
Check your tension and make sure each loop in your decrease cluster is pulled to approximately the same height.
My blanket is getting narrower.
You may be accidentally skipping an extra stitch at the edges. Carefully count the stitches in each repeat.
My fabric is too stiff.
Try a larger crochet hook or a softer yarn.
My edges are wavy.
Check your stitch count and make sure the beginning and ending stitches are worked correctly.
The pattern looks complicated.
Practice one repeat on a small swatch first. Once you understand the four-row rhythm, the stitch becomes much more intuitive.
Crochet Starburst Stitch Video Tutorial
If you prefer learning by watching someone demonstrate each stitch, a video tutorial can make the decrease clusters much easier to understand.
A particularly useful tutorial is The Crochet Crowd’s “Crochet Starburst Stitch,” which demonstrates the beginning chain and rows step by step. The video includes chapters for the foundation, Rows 1–5, and a final review of the stitchwork.
You can also watch a step-by-step Starburst Stitch tutorial from yokieB Crochet & Knit, which specifically demonstrates the double-crochet-together technique used in this stitch.
Final Thoughts
The Crochet Starburst Stitch is a wonderful choice when you want a blanket with plenty of texture without using complicated colorwork.
The repeating bursts create a soft, dimensional surface, while alternating colors can transform a simple stitch into a striking striped design. The blue, white, and darker blue combination shown in the sample is particularly lovely for a baby blanket, but the stitch looks equally beautiful in neutral, pastel, or bold color palettes.
Start with a small swatch, practice the decrease clusters, and once you are comfortable with the rhythm, turn the stitch into your next cozy blanket, scarf, or home décor project.
Happy crocheting! 🧶💙


Is there anyway to see the pattern done with the right hand as I am a right handed crocheter and can do basic stitches and I am a basic crocheter and am not good at reading and following patterns. On the other hand I am an experienced knitter if this helps any.