

 soofha
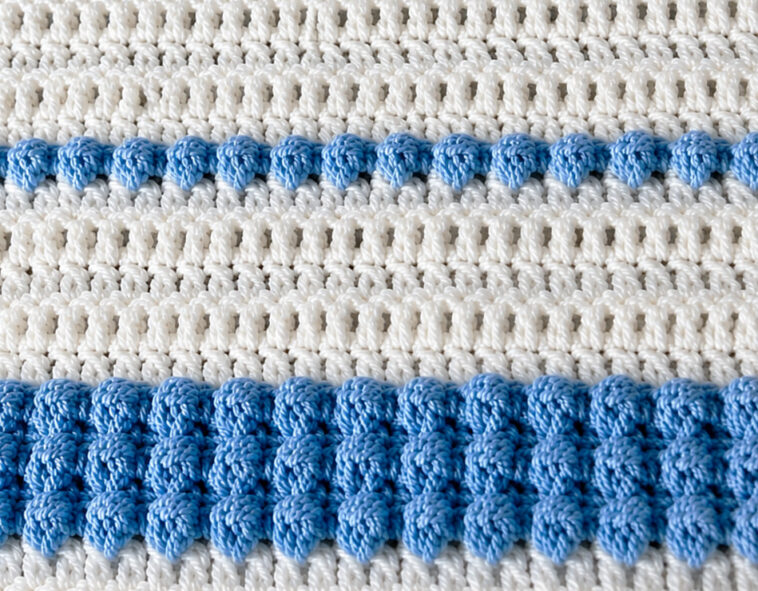
If you love crochet blankets with beautiful texture, simple color changes, and a cozy handmade look, this Bobble Stripe Crochet Blanket is a wonderful project to add to your collection. The combination of a soft white background with raised blue bobble stripes creates a classic design that works beautifully for a baby blanket, lap blanket, sofa throw, or everyday home décor.
The bobbles add a three-dimensional texture without making the blanket overly complicated, while the surrounding rows of simple stitches keep the overall design balanced and easy to crochet.
This pattern is written in US crochet terminology and uses basic stitches together with the bobble stitch. It is a great project for crocheters who have already mastered the basic stitches and want to practice creating textured patterns.
For visual learners, a YouTube tutorial can be especially helpful when learning how to form the bobbles and change colors cleanly. There are also established Bobble Stripe Blanket tutorials available on YouTube, including a detailed two-part tutorial from Bella Coco Crochet.
Why You’ll Love This Bobble Stripe Blanket
There is something especially satisfying about crocheting bobbles. Each little raised cluster pops forward from the surface of the blanket, creating a soft, dimensional texture.
This blanket combines:
- A soft neutral background
- Contrasting blue bobble stripes
- Simple rows between textured sections
- Easy color changes
- A repetitive stitch pattern
- A modern but timeless appearance
- A customizable width and length
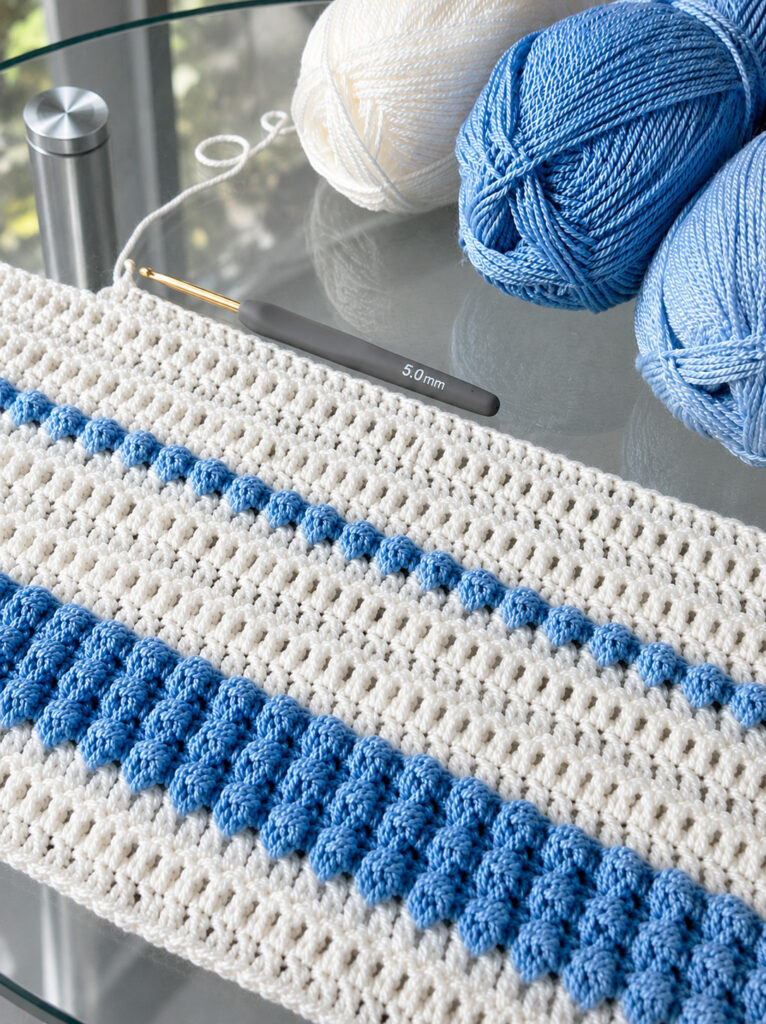
The blue-and-white combination shown in the inspiration image gives the blanket a fresh coastal feel, but you can easily replace the blue with pink, sage green, lavender, mustard, terracotta, gray, or any other color you love.
Bobble Stripe Crochet Blanket Pattern
Skill Level
Easy to Intermediate
You should be comfortable with:
- Chain stitch
- Single crochet
- Half double crochet
- Double crochet
- Working into stitches
- Changing yarn colors
- Basic yarn finishing
The bobble stitch is the only technique that may require a little practice.
Finished Blanket Size
The sample design can be adjusted to practically any size.
A good starting size for a throw or baby blanket is approximately:
36–40 inches wide × 48–55 inches long
For a baby blanket, you can make it smaller by reducing the number of foundation chains and rows.
For a larger sofa blanket, simply continue repeating the stripe sequence until you reach your desired length.
Materials You’ll Need
Yarn
For a medium-sized blanket, use approximately:
- Color A: White or cream – approximately 900–1,200 yards
- Color B: Medium blue – approximately 350–500 yards
Use a soft worsted-weight (#4) or similar yarn for a cozy blanket.
Acrylic yarn is particularly practical because it is:
- Soft
- Affordable
- Easy to wash
- Available in many colors
- Suitable for everyday blankets
You can also use a cotton-acrylic blend if you prefer a slightly more structured fabric.
Crochet Hook
Use a:
5.0 mm crochet hook
The 5 mm hook shown with the inspiration blanket is a good starting point.
If your stitches are very tight, try a 5.5 mm hook. If your fabric is too loose, try a 4.5 mm hook.
Other Supplies
You will also need:
- Scissors
- Yarn needle
- Stitch markers
- Measuring tape
Crochet Abbreviations
This pattern uses US crochet terminology.
| Abbreviation | Meaning |
|---|---|
| ch | Chain |
| sc | Single crochet |
| hdc | Half double crochet |
| dc | Double crochet |
| st | Stitch |
| sts | Stitches |
| sl st | Slip stitch |
| yo | Yarn over |
| rep | Repeat |
| sk | Skip |
| BLO | Back loop only |
How to Make the Bobble Stitch
The bobble is the star of this blanket.
For this pattern, you can make a 5-double-crochet bobble.
5-DC Bobble
- Yarn over.
- Insert your hook into the indicated stitch.
- Yarn over and pull up a loop.
- Yarn over and pull through 2 loops.
- Do not finish the double crochet.
- Repeat these steps in the same stitch until you have five partially completed double crochets.
- You should have several loops on your hook.
- Yarn over and pull through all remaining loops.
- Continue with the next stitch.
The bobble should puff toward the opposite side of your work.
Helpful Tip
If your bobbles are not popping out enough, gently push each completed bobble toward the front of the blanket with your fingers.
Keeping your tension consistent will also help all of the bobbles look approximately the same size.
Foundation Chain
For a blanket approximately 36–40 inches wide:
Chain 121.
You can modify the width by adding or removing chains, but keep your starting chain at an odd number if following the sample arrangement.
Before beginning the full blanket, make a small swatch to check your tension.
Bobble Stripe Crochet Blanket Instructions
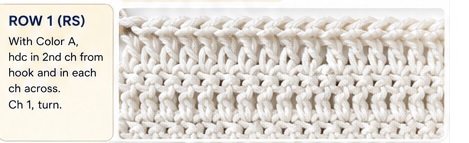
Row 1 – Foundation Row
With Color A, chain 121.
Work 1 hdc in the second chain from the hook.
Continue working 1 hdc in each chain across.
You should have approximately 120 stitches.
Chain 1 and turn.
Row 2
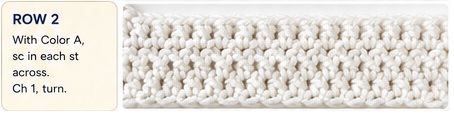
With Color A:
Work 1 sc in every stitch across.
Chain 1 and turn.
This simple row creates a stable surface before introducing the textured stripe.
Row 3
Continue with Color A.
Work 1 hdc in every stitch across.
Chain 1 and turn.
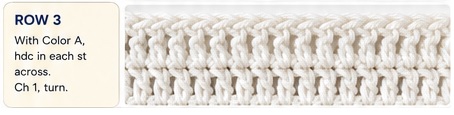
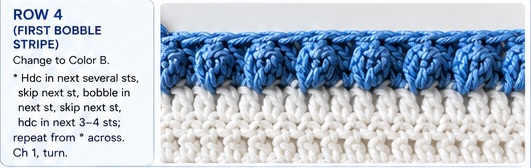
Row 4 – First Bobble Stripe
Change to Color B.
Work hdc across the first several stitches.
At the designated bobble position, work one bobble.
Continue alternating sections of hdc stitches and bobbles across the row.
A simple repeat is:
hdc across, bobble, hdc across, bobble
Keep the bobbles evenly spaced across the blanket.
Finish the row with hdc stitches.
Chain 1 and turn.
Row 5
With Color B:
Work 1 hdc in each stitch across.
When working into a bobble, insert your hook into the top of the bobble as you would a normal stitch.
Chain 1 and turn.
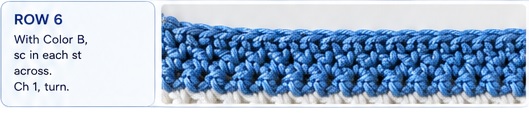
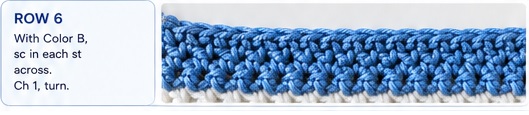
Row 6
Continue with Color B.
Work 1 sc across.
Chain 1 and turn.
This creates a clean transition between the textured stripe and the next section.
Row 7
Change back to Color A.
Work 1 hdc in every stitch across.
Chain 1 and turn.
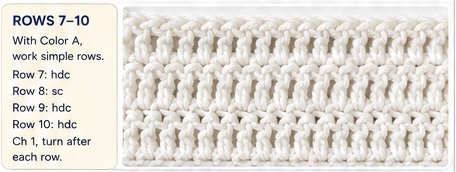
Rows 8–10
Continue working simple hdc rows in Color A.
Work:
- Row 8: hdc across
- Row 9: sc across
- Row 10: hdc across
Chain 1 and turn after each row.
The white section creates visual breathing room around the blue bobble stripe.
Second Bobble Stripe
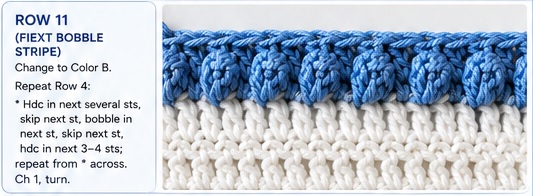
Row 11
Change to Color B.
Work hdc across the first section.
Place bobbles between evenly spaced groups of hdc stitches.
Continue across the entire row.
Try to position the bobbles so that they line up with the bobbles from the previous blue stripe.
This creates the classic vertical bobble-stripe appearance.
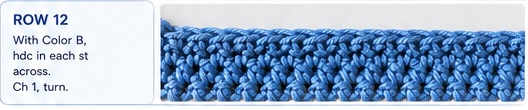
Row 12
With Color B:
Work hdc across.
Make sure the top of every bobble is treated as one stitch.
Chain 1 and turn.
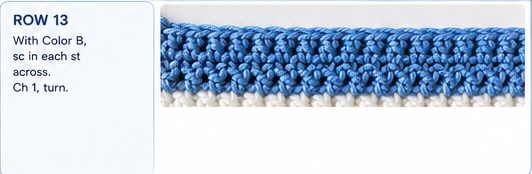
Row 13
With Color B:
Work sc across.
Chain 1 and turn.
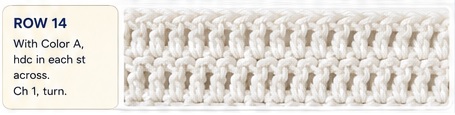
Row 14
Change to Color A.
Work hdc across.
Continue the Stripe Repeat
Repeat the following sequence throughout the blanket:
Color A Section
- Hdc row
- Sc row
- Hdc row
- Hdc row
Color B Bobble Section
- Bobble stripe row
- Hdc row
- Sc row
Then return to Color A.
Continue repeating until your blanket reaches the desired length.
For a standard throw, approximately 12–15 stripe sections should create a beautiful finished blanket, depending on your yarn weight and tension.
How to Change Colors Neatly
Color changes are particularly important in a striped blanket.
To make your color changes cleaner, change colors during the final pull-through of the previous stitch.
When you have two loops remaining on your hook:
- Drop the old color.
- Pick up the new color.
- Pull the new color through the final loops.
- Continue crocheting with the new color.
Do not cut your yarn after every row unless necessary.
Instead, carry the unused yarn loosely up the side when practical, or cut it when the color will not be used for several rows.
Creating the Border
Once you have reached your desired blanket length, fasten off the main colors and weave in your ends.
A simple border works beautifully with this textured design.
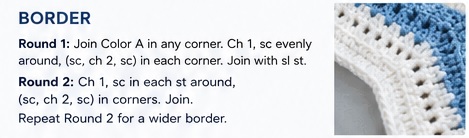
Border Round 1
Join Color A in any corner.
Chain 1.
Work single crochet evenly around the entire blanket.
At each corner, work:
sc, ch 2, sc
Continue around the blanket.
Join with a slip stitch.
Border Round 2
Chain 1.
Work sc in every stitch around.
At each corner, work:
sc, ch 2, sc
Join with a slip stitch.
Repeat this round one or two more times if you want a wider border.
Optional Bobble Border
For an extra playful finish, you can add bobbles around the outside edge.
Space your bobbles evenly along the border rather than placing one in every stitch.
This creates a subtle decorative edge without overpowering the main blanket.
For a sophisticated look, keep the border white.
For a stronger contrast, use the same blue yarn as the bobble stripes.
Finishing Your Blanket
When the final round is complete, fasten off.
Use a yarn needle to weave all loose ends securely into the back of the blanket.
Because bobble blankets can receive a lot of handling, weave your ends through several stitches in different directions before trimming the excess yarn.
Blocking the Blanket
Blocking is optional, but it can make your finished blanket look more polished.
Lightly dampen the blanket and lay it flat on a clean surface.
Gently stretch the edges until the blanket reaches your desired shape.
Allow it to dry completely before moving it.
Do not aggressively stretch the bobbles because you want to preserve their raised texture.
Choosing Your Colors
The blue-and-white combination in the inspiration photo creates a fresh and calming appearance.
Here are some other color combinations you could try:
Classic Blue & White
- White
- Sky blue
- Medium blue
Perfect for a coastal-inspired blanket.
Soft Baby Girl
- Cream
- Blush pink
- Dusty rose
Baby Boy
- White
- Powder blue
- Denim blue
Modern Neutral
- Ivory
- Taupe
- Warm gray
Botanical
- Cream
- Sage
- Forest green
Autumn
- Cream
- Rust
- Mustard
Monochrome
- White
- Light gray
- Charcoal
The bobble texture looks beautiful even when made in only two colors.
Tips for Perfect Bobbles
1. Don’t crochet the bobbles too tightly
If you pull every loop extremely tight, the bobble can become difficult to complete.
Keep a relaxed tension.
2. Check the back of your work
Bobble stitches naturally create texture on one side.
Turn your work regularly and check that the bobbles are appearing on the side you want.
3. Count your stitches
Textured rows can make it easy to accidentally skip a stitch.
Count your stitches after every bobble row.
4. Use stitch markers
Place a marker in the first and last stitch of each row if you have difficulty maintaining straight edges.
5. Make a gauge swatch
Your yarn, hook, and tension will affect the finished size.
A small swatch can save you from discovering later that your blanket is much larger or smaller than expected.
How to Customize the Blanket Size
One of the best things about this design is that you can make it your own.
For a baby blanket, reduce the foundation chain.
For a lap blanket, use a medium-width foundation chain and fewer repeats.
For a large sofa throw, increase the foundation chain and continue the stripe sequence for more rows.
For a bed-size blanket, increase both the width and number of stripe repeats.
Always make sure your foundation chain fits the stitch-repeat requirements of your chosen bobble arrangement.
Bobble Stripe Blanket Video Tutorial
If you prefer to learn visually, watching a video can make the bobble technique and color changes much easier to understand.
A detailed Bobble Stripe Blanket video tutorial by Bella Coco Crochet is available on YouTube. The tutorial is divided into two parts and demonstrates the foundation, color changes, bobble row, and subsequent rows.
The written instructions and video format can be used together as a learning reference. Bella Coco’s published pattern also notes that the blanket can be adapted in size and that the bobble row requires careful attention when changing the stitch multiple.
Important: The written pattern in this article is an original variation designed around the blue-and-white bobble-stripe look shown in the inspiration image. The linked video is provided as an additional visual learning resource and is not presented as the source of this written pattern.
Part 1
Part 2
Frequently Asked Questions
Is the Bobble Stripe Crochet Blanket good for beginners?
Yes. If you already know how to crochet basic stitches such as single crochet and half double crochet, this is a good next-level project. The bobble stitch requires a little practice, but once you understand the technique it becomes repetitive.
What yarn is best for a bobble blanket?
A soft worsted-weight acrylic yarn is an excellent choice. It is affordable, washable, durable, and available in many colors.
Can I make this blanket with chunky yarn?
Yes. You can use chunky yarn, but you will need to change the hook size and make a gauge swatch first. Chunkier yarn will produce larger bobbles and a heavier blanket.
Can I use only one color?
Absolutely. A single-color bobble blanket can look elegant and sophisticated. White, cream, sage, gray, or navy would all work beautifully.
How do I make the bobbles stand out more?
Use contrasting yarn colors and maintain even tension. You can also gently push each completed bobble toward the front of your work.
Can I make a baby blanket?
Yes. This pattern is easily adapted for a baby blanket. Choose soft, washable yarn and use a smaller foundation chain.
How much yarn will I need?
The amount depends on the finished size, yarn weight, hook size, and your individual tension. For a medium throw, approximately 1,250–1,700 total yards is a reasonable starting estimate, but making a gauge swatch is the best way to calculate your requirements.
Final Thoughts
The Bobble Stripe Crochet Blanket is a beautiful combination of simplicity and texture. The smooth white sections allow the raised blue bobbles to become the focal point, while the repeating stripe arrangement makes the blanket enjoyable to crochet.
Whether you make it as a baby shower gift, a cozy sofa throw, or a decorative blanket for your home, this pattern gives you plenty of opportunities to experiment with color and size.
Try the classic blue-and-white palette from the inspiration image, or create your own combination using your favorite shades.
Grab your 5 mm crochet hook, choose two beautiful colors, and start creating your own cozy Bobble Stripe Crochet Blanket!
Happy crocheting! 🧶💙

