

 soofha
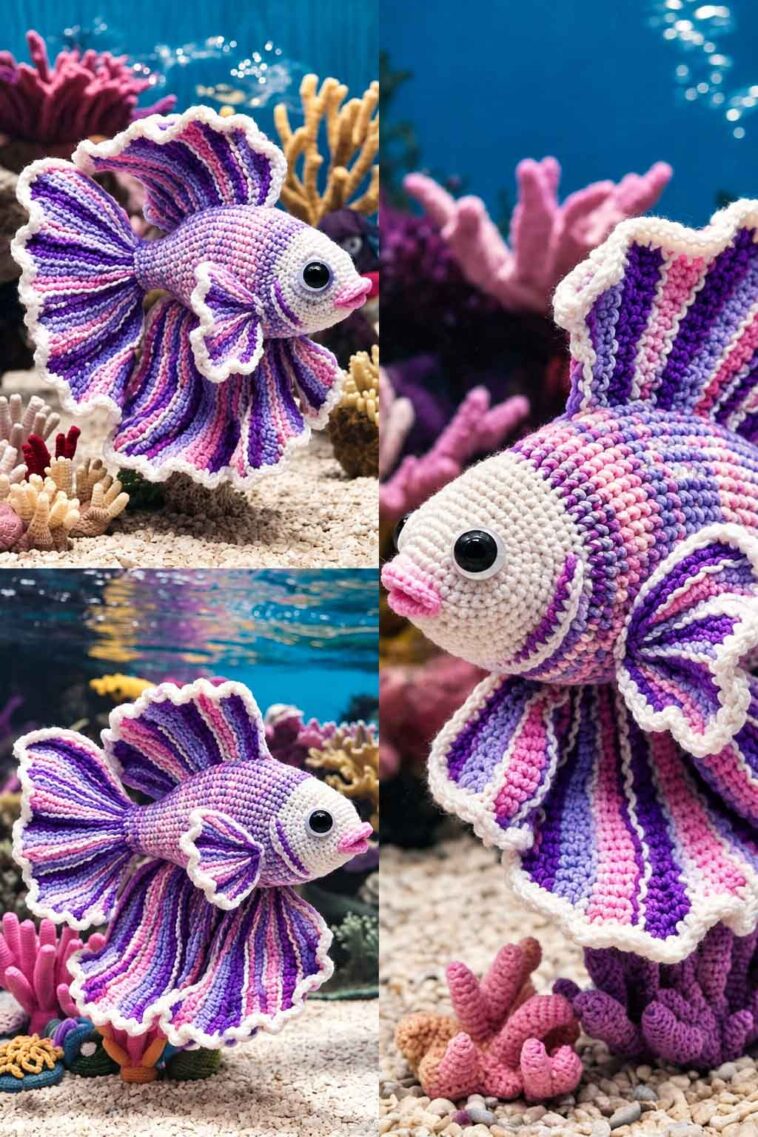
If you love colorful crochet projects, this little betta fish is such a fun one to make. Betta fish are known for their gorgeous colors and long, flowing fins, so they translate beautifully into crochet. With a few different yarn colors and some simple shaping, you can create your own tiny fish to display, gift, or add to an amigurumi collection.
This crochet betta fish measures about 4 inches (10 cm) from the tip of the nose to the end of the tail. The body is crocheted in the round, while the fins are made separately and sewn into place at the end.
The project is best suited to crocheters who are comfortable with basic amigurumi techniques, including single crochet, increasing, decreasing, working in the round, and sewing crochet pieces together.
And, of course, you don’t have to stick with the colors listed below. Betta fish come in so many beautiful shades, so this is a great little project for using up colorful scraps of yarn.
Finished Size
The finished fish is approximately 4 inches (10 cm) from nose to tail, although the exact size can vary depending on your yarn, hook size, and crochet tension.
Skill Level
Intermediate
You should be comfortable with:
- Working in the round
- Single crochet
- Increasing and decreasing
- Basic crochet shaping
- Sewing small crochet pieces together
Materials You’ll Need
- 3-ply milk cotton yarn in red, blue, and yellow
- 3.0 mm crochet hook
- 5 mm safety eyes, or small black beads
- Fiberfill stuffing
- Tapestry needle
- Scissors
Crochet Abbreviations
This pattern uses US crochet terminology.
- MR – Magic Ring
- ch – Chain
- sc – Single Crochet
- inc – Increase (2 sc in the same stitch)
- dec – Decrease (sc 2 stitches together)
- sl st – Slip Stitch
- BLO – Back Loop Only
- R – Round/Row
Crochet Betta Fish Pattern
Head and Body – Make 1
The head and body are crocheted as one piece. You’ll begin at the nose and gradually shape the fish as you work toward the tail.
Start with red yarn.
R1: MR, 4 sc [4]
R2: Inc in each stitch around (4 times) [8]
R3: (sc, inc) x 4 [12]
R4–R5: Sc around [12]
At this point, insert the safety eyes between Rounds 4 and 5. Once the eyes are securely in place, begin adding a small amount of fiberfill stuffing.
Change Colors
Switch between blue and yellow yarn for Rounds 6–13 to create the colorful body.
R6–R8: Sc around [12]
R9: (4 sc, dec) x 2 [10]
R10: Sc around [10]
R11: (3 sc, dec) x 2 [8]
R12: (2 sc, dec) x 2 [6]
R13: Fold the piece in half and crochet 3 sc through both sides to close [3]
Fasten off and leave a long yarn tail. You’ll use this tail later when attaching the fins.
Tail Fin – Make 1
For the tail, use red yarn. This fin is worked back and forth, with the BLO stitches helping create a slightly ridged texture.
R1: Ch 15
R2: Starting in the 3rd ch, work 6 dc, 3 hdc, 2 sc, 2 sl st
Ch 1, turn
R3: BLO – 2 sl st, 2 sc, 3 hdc, 6 dc
Ch 2, turn
R4: Starting in the 3rd ch, BLO – 6 dc, 3 hdc, 2 sc, 2 sl st
Ch 1, turn
R5–R10: Repeat R3 and R4 alternately.
Fasten off and weave in the yarn ends.
Top Fin – Fin 1
The top fin gives the fish that characteristic flowing betta-fish look.
R1: Ch 11
R2: 6 hdc, 2 sc, 2 sl st
Ch 1, turn
R3: BLO – 2 sl st, 2 sc, 6 hdc
Repeat Rows 2 and 3 until you have 7 rows in total.
Fasten off and weave in the ends.
Bottom Fin – Fin 2
Now it’s time to make the smaller fin that will sit underneath the fish.
R1: Ch 5
R2: 4 hdc, starting in the 2nd ch
Ch 1, turn
R3: BLO – 4 hdc
Ch 2, turn
R4: BLO – 4 hdc, 1 sc
Ch 1, turn
R5: BLO – 2 sc, 3 hdc
Ch 2, turn
R6: BLO – 4 hdc, 1 sc, 1 sl st
Ch 1, turn
R7: BLO – 1 sl st, 1 sc, 4 dc
Fasten off and weave in the ends.
Side Fins – Make 2
The side fins are very quick to make.
R1: MR, 4 sc
Slip stitch to the first sc and fasten off.
Leave a long yarn tail so you can sew each fin onto the body. If you’re making the fish as a decoration and prefer a quicker assembly, you can also use a small amount of fabric glue.
Putting the Betta Fish Together
Once all of your pieces are finished, it’s time for the fun part—assembling your fish.
1. Attach the Tail
Position the tail fin at the back of the body. Use the long yarn tail and a tapestry needle to sew it securely into place.
Take your time here and make sure the tail is centered so the fish sits nicely when finished.
2. Add the Top Fin
Place Fin 1 along the upper part of the body, approximately between Rounds 8 and 11.
Sew it securely to the body, making sure the fin has enough room to fan outward.
3. Attach the Bottom Fin
Position Fin 2 underneath the fish, between approximately Rounds 6 and 9.
Sew it firmly into place using the yarn tail.
4. Add the Side Fins
Attach one side fin to each side of the body between Rounds 5 and 6.
You can sew them on with the remaining yarn tails or use a small amount of fabric glue if you prefer.
5. Finish Your Fish
Once everything is attached, weave in any remaining loose ends.
Finally, gently shape the fins with your fingers. Spread them slightly and bend them into a natural, flowing position. This small step makes a big difference and gives the finished betta fish much more character.
Tips for Making Your Crochet Betta Fish
Don’t worry about making your fish exactly the same colors as the sample. Betta fish are famous for their bright and unusual color combinations, so this is a perfect project for experimenting.
You could try:
- Blue and white
- Purple and pink
- Red and orange
- Turquoise and yellow
- Black and metallic shades
- Several colors for a rainbow effect
You can also make several fish in different color combinations and display them together. A group of these tiny crochet fish would look especially cute in a handmade amigurumi aquarium, nursery decoration, or ocean-themed display.
If you’re giving the fish to a child, remember that safety eyes and small beads can be choking hazards. For young children, embroidered eyes are a safer alternative.
Final Thoughts
This crochet betta fish is one of those small projects that doesn’t take a huge amount of time but still has plenty of personality. The body is fairly simple, and once you’ve made the fins, the whole fish comes together surprisingly quickly.
The flowing fins are what really make this little project special. Play around with different yarn colors and don’t be afraid to give each fish its own personality.
Whether you make one as a small handmade gift, add it to your amigurumi collection, or create an entire school of colorful crochet fish, this pattern is a fun way to bring a little underwater charm to your crochet projects.

