

 soofha
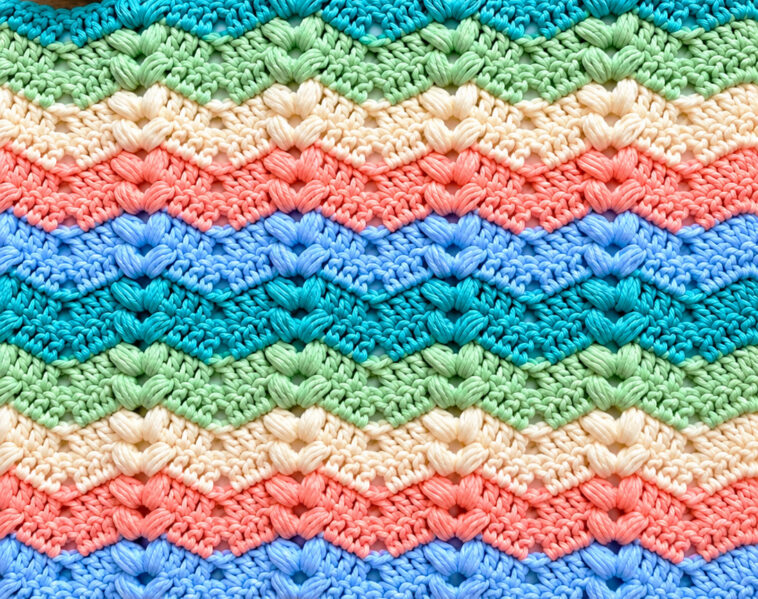
Hello, crochet friends! Welcome back to Soofha. If you love crochet stitches that have plenty of texture and a little bit of movement, I think you’re really going to enjoy today’s pattern.
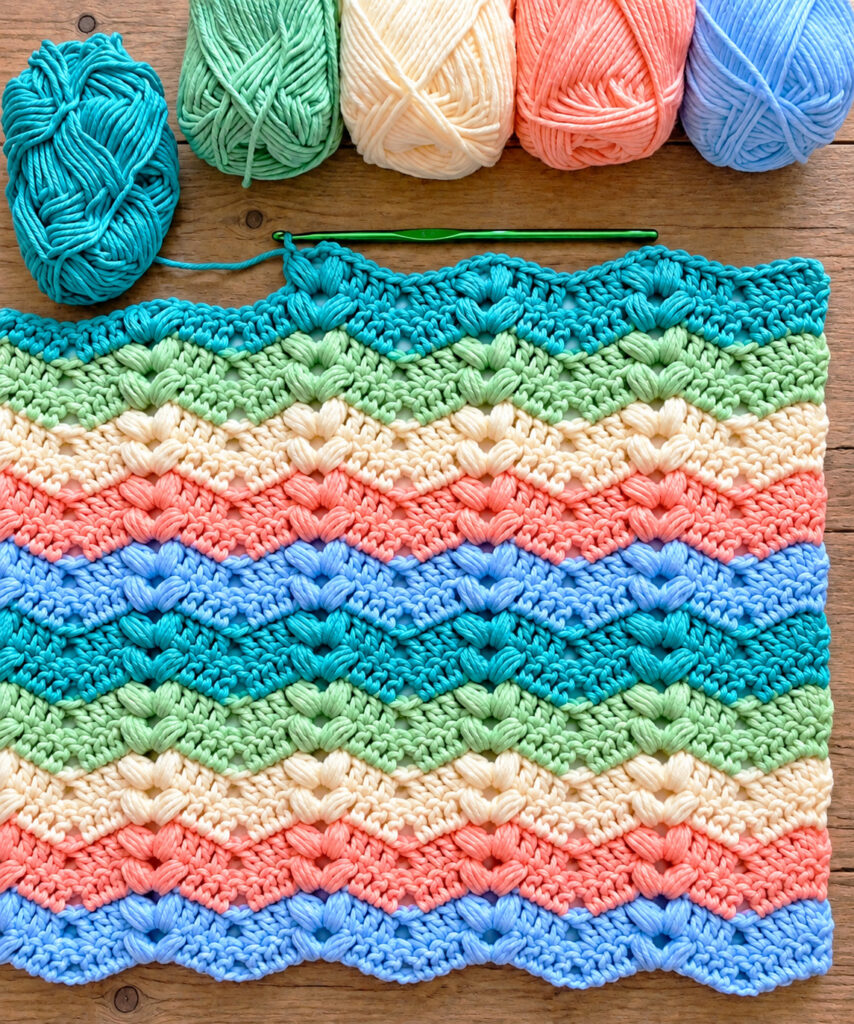
The Puff Ripple Stitch Crochet Pattern combines two things that look wonderful together: the gentle waves of a classic ripple stitch and soft, raised puff stitches that sit along the peaks. The result is a beautifully textured fabric that looks complicated at first glance but becomes surprisingly easy once you get into the rhythm.
I especially love how the puff stitches stand out against the ripple. They give the fabric a little extra dimension without making it feel too heavy or stiff. It’s the kind of stitch that makes you want to keep working “just one more row” to see the pattern develop.
And don’t worry if you’re still fairly new to crochet. Once you understand where the valleys, double crochet sections, and puff peaks are placed, the repeat becomes much easier to recognize. After a few rows, you may find yourself following the shapes in the fabric rather than constantly checking the written instructions.
What Can You Make With the Puff Ripple Stitch?
This stitch is quite versatile, so you aren’t limited to making blankets.
It would be lovely for:
- Baby blankets
- Crochet throws
- Scarves
- Shawls
- Cushion covers
- Bed runners
- Lap blankets
- Baby accessories
- Decorative crochet panels
For a blanket or another large project, I recommend making a small swatch first. Your yarn weight, hook size, and personal tension can all affect the finished measurements.
Choosing Your Colors
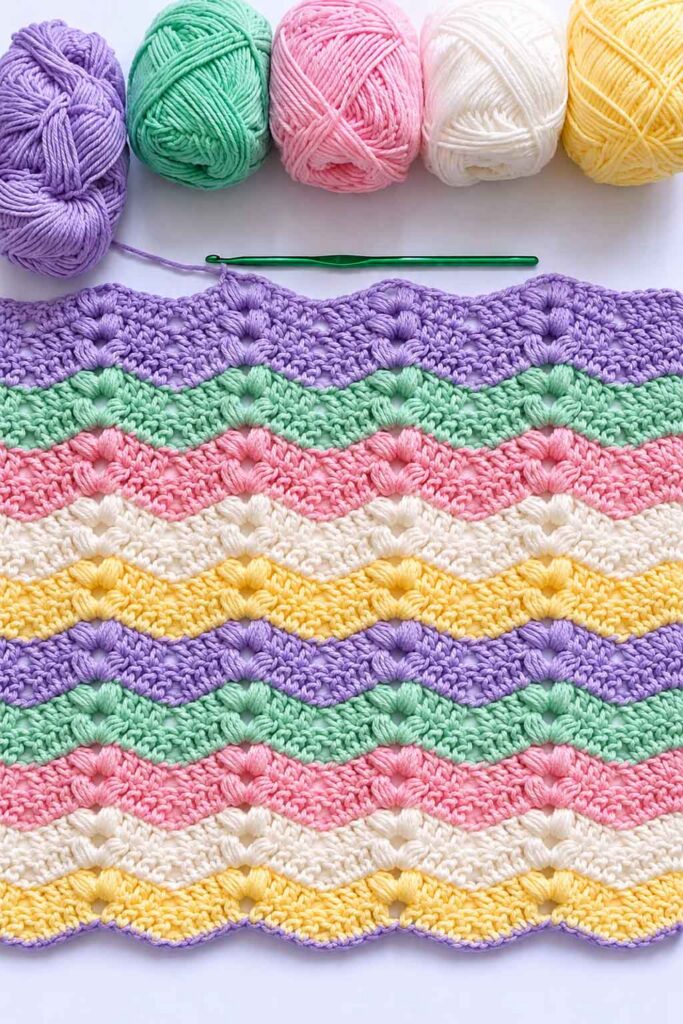
This stitch gives you plenty of room to play with color.
Working the entire project in one shade creates a soft, textured look and lets the puff stitches really stand out. If you prefer something more colorful, try alternating two or three shades.
You could change colors every row, every couple of rows, or create wider stripes. I particularly like changing colors every 2–4 rows because it gives the ripple enough room to show while still making the puff sections noticeable.
There’s really no wrong choice here. Soft neutrals will give you a calm, classic look, while brighter shades can make the waves feel cheerful and playful.
Puff Ripple Stitch Crochet Pattern
This pattern uses US crochet terminology.
Materials
- Medium/worsted weight yarn
- 5 mm crochet hook
- Scissors
- Yarn needle
- Stitch markers, optional
You can certainly experiment with different yarn weights. Just remember to choose a crochet hook that works well with your chosen yarn.
Crochet Abbreviations
- ch – chain
- dc – double crochet
- st/sts – stitch/stitches
- sp – space
- Puff St – puff stitch
- rep – repeat
- FO – fasten off
How to Crochet the Puff Stitch
The puff stitches in this pattern are worked into a ch-2 space, rather than directly into a stitch.
Here’s how to make one:
- Yarn over and insert your hook into the indicated ch-2 space.
- Yarn over and pull up a loop.
- You now have 3 loops on your hook.
- Repeat the following three more times: yarn over, insert your hook into the same space, yarn over, and pull up a loop.
- After the fourth insertion, you should have 9 loops on your hook.
- Yarn over and pull through all 9 loops.
- Chain 1 to close the puff.
That ch-1 is part of the puff stitch and does not count as a separate stitch.
A Helpful Puff Stitch Tip
Try to pull each loop up to approximately the height of your double crochet stitches.
If your loops are too short, pulling the hook through all nine loops can be frustrating. Keeping the loops loose and even makes the puff much easier to form.
Starting Chain
The pattern is worked over a multiple of:
12 + 3 chains
The extra 3 chains are used for the turning chain at the beginning.
For a practice swatch, chain:
51 chains
That gives you 48 + 3 chains and creates enough width to see several complete ripple sections.
Before You Begin
There are a couple of details worth knowing before starting.
The turning chain in Row 1 counts as a double crochet.
From Row 2 onward, the ch-1 turning chain does not count as a stitch.
The ch-2 spaces form the tops of the ripple peaks. This is where the new puff stitches are made.
There is one detail that is especially important from Row 3 onward:
Do not crochet into the puff stitches from the previous row.
Those puff stitches are decorative. The new puff pair is worked into the ch-2 space between the previous pair of puff stitches.
Keeping this detail in mind will help prevent your stitch count from slowly increasing.
Row 1 – Foundation Ripple Row
Chain a multiple of 12 + 3.
For the sample:
Ch 51.
Work 1 dc in the 4th chain from the hook.
The three skipped chains count as your first double crochet.
Then work:
1 dc in each of the next 4 chains.
Now repeat the following sequence:
Skip the next 2 chains, 1 dc in each of the next 5 chains, ch 2, 1 dc in each of the next 5 chains.
Continue this repeat across the row.
When 7 chains remain:
- Skip the next 2 chains.
- Work 1 dc in each of the next 3 chains.
- Work 2 dc in the next chain.
- Work 1 dc in the final chain.
Turn.
What Row 1 Should Look Like
You should already be able to see the beginning of the ripple.
The skipped chains create the valleys, while the ch-2 spaces create the peaks.
There aren’t any puff stitches yet. They will be added in the next row.
Row 2 – Adding the First Puff Stitches
Ch 1.
Remember, this ch-1 does not count as a stitch.
Work:
- 1 dc in the first dc
- 2 dc in the next dc
- 1 dc in each of the next 3 dc
Now repeat:
- Skip the next 2 dc.
- Work 1 dc in each of the next 4 dc.
- In the next ch-2 space, work Puff St, ch 2, Puff St.
- Work 1 dc in each of the next 4 dc.
Continue the repeat across the row.
When 7 structural stitches remain:
- Skip the next 2 dc.
- Work 1 dc in each of the next 3 dc.
- Work 2 dc in the next dc.
- Work 1 dc in the top of the beginning turning chain from Row 1.
Turn.
You should now start to see the puff details sitting along the tops of the waves.
Row 3 – Establishing the Puff Ripple
This is the row where it becomes particularly important to pay attention to the previous puff stitches.
Ch 1.
Work:
- 1 dc in the first stitch
- 2 dc in the next stitch
- 1 dc in each of the next 3 dc
Now repeat:
- Skip the next 2 dc.
- Work 1 dc in each of the next 4 dc.
You will reach the first puff stitch from the previous row.
Skip the first Puff St and its closing ch-1.
Find the ch-2 space between the two puff stitches.
In that space, work:
Puff St, ch 2, Puff St
Now skip the second Puff St and its closing ch-1.
Work 1 dc in each of the next 4 dc.
Repeat the sequence across the row.
At the end:
- Skip the next 2 dc.
- Work 1 dc in each of the next 3 dc.
- Work 2 dc in the next dc.
- Work 1 dc in the final stitch.
Turn.
Row 4 and Every Row After
From this point forward, simply:
Repeat Row 3.
Continue repeating the established row until your project reaches the length you want.
The puff stitches will stack above one another, creating attractive vertical columns of texture along the ripple peaks.
How to Tell If You’re Following the Pattern Correctly
After several rows, the design should have three very noticeable features.
1. The Valleys
You should see regular points where two double crochet stitches are skipped.
2. The Peaks
Each peak contains a central ch-2 space.
3. The Puff Pairs
Two puff stitches sit on either side of each ch-2 space.
As you continue crocheting, these puff stitches should line up vertically.
If your puff stitches start drifting sideways, take a close look at the previous row. There is a good chance that you accidentally crocheted into a previous puff instead of skipping it and working into the ch-2 space.
Easy Practice Swatch
If you’d like to practice before starting a larger project, make a small sample.
Ch 51.
Then work:
- Row 1 – Foundation Ripple Row
- Row 2 – First Puff Ripple Row
- Rows 3–12 – Repeat the Established Puff Ripple Row
After about 12 rows, you should have enough fabric to see how the ripple and puff texture work together.
It’s also a useful way to check your tension before committing to a blanket.
Making the Crochet Project Wider
To make the project wider, use the following formula:
12 × number of repeats + 3
Here are a few examples:
| Ripple Repeats | Starting Chain |
|---|---|
| 4 repeats | 51 chains |
| 5 repeats | 63 chains |
| 6 repeats | 75 chains |
| 8 repeats | 99 chains |
| 10 repeats | 123 chains |
These numbers give you the correct starting-chain multiple for this version of the stitch.
For a blanket, however, I strongly recommend making a swatch first. The same starting chain can produce noticeably different measurements depending on the yarn, hook, and your crochet tension.
Changing Colors
There are so many pretty ways to use color with this stitch.
For a clean color change, work the final double crochet of the row with your current color. When you have two loops remaining on your hook, use the new color to complete the final yarn-over and pull through the loops.
Turn your work and continue with the new shade.
You can change colors:
- Every row
- Every 2 rows
- Every 3 rows
- Every 4 rows
- Between larger sections
If you’re making a blanket, changing colors every few rows is an easy way to create stripes while still allowing the ripple and puff texture to remain the main feature.
Keeping Your Edges Straight
Ripple patterns can sometimes be a little tricky around the edges, especially when you’re first learning them.
One simple trick is to place a stitch marker in the first actual stitch and the last actual stitch of each row.
This makes it much easier to see where your row begins and ends.
Also remember:
After Row 1, the ch-1 turning chain does not count as a stitch.
Keeping track of those edge stitches will save you from having to unravel several rows later because the blanket has slowly become narrower or wider.
What If My Fabric Is Getting Narrower?
If your project gradually becomes smaller, check these common mistakes:
- Did you accidentally skip the first stitch after turning?
- Did you forget one of the 2-dc increases near the edge?
- Did you skip more than 2 dc at a valley?
- Did you accidentally leave out one of the 4-dc sections beside a peak?
Compare your current row with the previous complete row before continuing.
With ripple patterns, losing just one stitch can make the shape noticeably different after several rows.
What If My Fabric Is Getting Wider?
If your project is slowly getting wider, the most likely culprit is working into the previous puff stitches.
Remember that from Row 3 onward, the old puff stitches are not structural stitches.
Skip them.
Your new puff pair belongs in the ch-2 space between them.
This keeps the puff columns aligned and prevents extra stitches from being added to the row.
Why Does My Ripple Look Too Flat?
Don’t worry if the first few rows don’t look especially dramatic.
The ripple becomes much easier to see after several rows have been worked.
If the fabric still looks unusually flat after five or six rows, check that you are consistently:
- Skipping 2 dc at every valley
- Working the required increases near the edges
- Maintaining the same number of double crochet stitches in each section
Your crochet tension can also make a difference. Very tight stitches may make the waves less noticeable.
What If My Puff Stitches Are Too Tight?
Puff stitches need a little breathing room.
When drawing up each loop, pull it slightly higher rather than keeping it very short. This gives you enough space to pull your hook through all of the loops at the end.
You can also relax your tension slightly when making the puff.
If you’re struggling with the stitch, don’t immediately assume you’re doing something wrong. Sometimes simply using a slightly larger hook or loosening your tension makes a huge difference.
Project Ideas for the Puff Ripple Stitch
Once you have the stitch repeat down, there are lots of ways to use it.
Baby Blankets
The combination of soft waves and puff texture is especially sweet for baby blankets. Choose gentle shades for a classic nursery look or use brighter colors for something cheerful.
Crochet Throws
For a larger throw, try working in a few coordinating colors. The ripple creates movement across the blanket while the puff stitches add just enough texture.
Scarves and Shawls
The stitch also works beautifully for accessories. Just keep in mind that the puff stitches create additional texture, so choosing a yarn with a pleasant drape can help keep the finished piece comfortable to wear.
Cushion Covers
A smaller project such as a cushion cover is a great way to practice the stitch without committing to a large blanket.
Bed Runners
The horizontal movement of the ripple makes this stitch particularly attractive for long decorative pieces such as bed runners.
Puff Ripple Stitch Crochet Pattern
Do You Need a Border?
Not necessarily!
One of my favorite things about ripple patterns is that the top and bottom edges already have plenty of character.
You can simply leave the natural wavy edge as it is.
If you’d prefer a more finished look, a simple single crochet border around the sides can help tidy the edges without competing with the texture.
For a larger blanket, make sure the fabric is laying flat before adding the border. Blocking can help relax the stitches and make the edges easier to work around.
Finishing Your Puff Ripple Crochet Project
When you’ve completed your final row, fasten off and cut your yarn, leaving a tail long enough to weave in comfortably.
Thread the tail onto a yarn needle and weave it securely through the back of the fabric.
Repeat with any remaining yarn ends.
Once everything is woven in, gently smooth the fabric with your hands and arrange the peaks and valleys.
If your yarn allows it, light blocking can help relax the stitches and make the ripple pattern even more defined.
A Simple Way to Remember the Repeat
If you’re a beginner, don’t try to memorize the entire pattern at once.
Instead, look at the fabric and think of the stitch as a repeating sequence:
Valley → double crochet section → puff peak → double crochet section → valley
That’s really the heart of the design.
Once you can recognize those sections, you’ll find that you don’t need to constantly count every stitch. Your work itself starts to tell you where the next part of the pattern belongs.
Final Thoughts
The Puff Ripple Stitch Crochet Pattern is one of those designs that looks impressive without requiring an overly complicated stitch sequence.
The flowing ripple gives the fabric its movement, while the puff stitches add those little raised details that make the finished piece feel special.
It would be beautiful in a soft baby blanket, but don’t stop there. Try it with a chunky throw, a colorful scarf, a decorative cushion, or even a small practice piece just to experiment with different yarns and color combinations.
And if your first few rows don’t look perfect, keep going. Ripple stitches often become much easier to understand once you’ve worked several repeats. Give yourself a little time to get comfortable with the increases, valleys, and puff placement.
Most importantly, have fun with it. Crochet is just as much about experimenting and enjoying the process as it is about following a pattern perfectly.
We hope you enjoy making this Puff Ripple Stitch and finding your own favorite color combination for it.
Thank you for spending some time with us here at Soofha. If you enjoyed this pattern, take a look around the blog for more crochet stitches, blanket ideas, and beginner-friendly projects. There are always more handmade creations waiting for you!
Happy crocheting! 🧶💕

