

 soofha
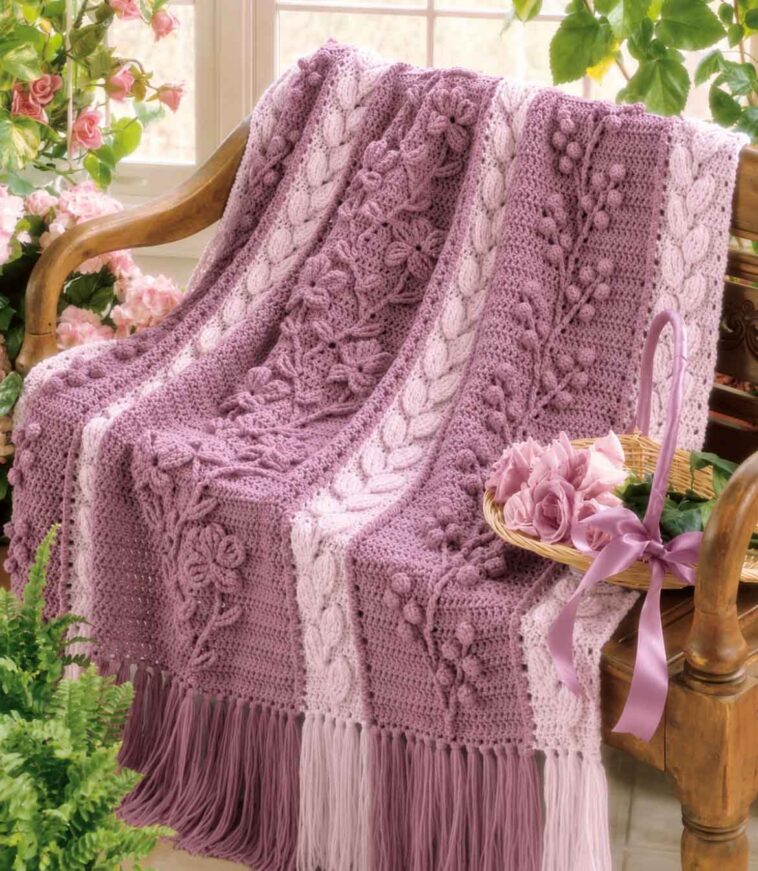
If you love crochet blankets with plenty of texture and a little old-fashioned charm, the Floral Cascade Crochet Afghan is one you’ll want to add to your project list. The finished blanket has the look of a flower garden worked entirely in yarn, with raised blossoms, winding stems, leafy vines, and little berry-like details throughout.
The original color combination of soft pink and white gives the afghan a romantic, delicate feel, but you could easily change the colors to suit your home or the person you’re making it for.
One thing that makes this pattern different from a typical crocheted blanket is the way it is put together. Instead of working one enormous piece from one side to the other, the afghan is made from seven separate vertical panels. Each panel has its own design, and once they are finished, they are joined together with decorative reverse single crochet.
This construction may sound a little unusual at first, but it makes a large blanket much easier to manage while you’re crocheting.
The finished afghan measures approximately 54 x 67 inches, making it a generous size for a bed, sofa, or cozy reading chair.
A Blanket Full of Texture
The first thing you notice about the Floral Cascade afghan is the texture.
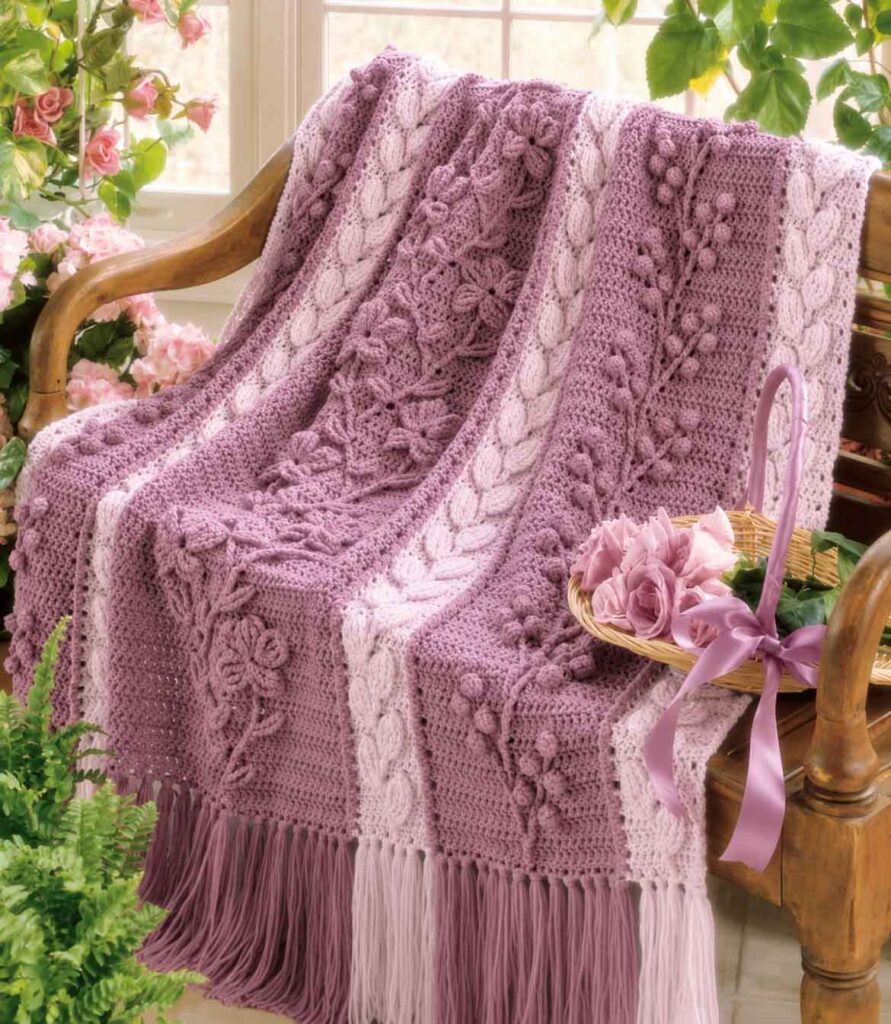
The flowers aren’t simply flat motifs worked into the fabric. They actually stand out from the surface, giving the blanket a wonderfully dimensional appearance. Raised leaves climb through the white panels, while popcorn stitches create the little berries in the pink sections.
Post stitches are used to build the stems and give different parts of the design extra depth. The flowers and leaves are then worked over several rows, creating the sculpted look that makes this blanket so special.
The pink and white sections also work beautifully together. The pink panels draw your eye toward the flowers and berries, while the white leaf panels provide a little breathing room between the larger motifs.
It’s the kind of blanket where you can keep discovering little details the longer you look at it.
Project Details
- Finished size: Approximately 54 x 67 inches
- Yarn weight: Worsted weight
- Hook: J/10 (6.00 mm), or size needed to obtain gauge
- Construction: Seven separately crocheted vertical panels
- Joining: Reverse single crochet
- Terminology: US crochet terms
- Skill level: Advanced
- Finishing: Coordinating fringe along both short edges
Because the blanket is divided into individual panels, you don’t have to keep the entire 54-inch width sitting in your lap while you work. Each section can be completed separately and then assembled at the end.
Materials You’ll Need
The original pattern calls for Red Heart worsted-weight yarn, with each 8-ounce skein containing approximately 452 yards.
| Color | Amount | Approximate Yardage |
|---|---|---|
| Pink | 6 skeins | 2,712 yards |
| White | 4 skeins | 1,808 yards |
You’ll also need:
- J/10 (6.00 mm) crochet hook
- Removable stitch markers
- Yarn needle
- Scissors
- Measuring tape
- Blocking mats and rust-resistant pins, if desired
If you’re substituting another worsted-weight yarn, pay attention to the total yardage, not just the number of skeins. Skein sizes can vary quite a bit between brands.
Gauge and Panel Measurements
The stated gauge is:
11 double crochet stitches and 7 rows = 4 inches
The individual panels are approximately:
- Leaf panel: 4¾ inches wide
- Berry panel: 9¾ inches wide
- Center flower panel: 15½ inches wide
Gauge is worth checking before you get too far into this project. Since the seven panels need to fit together properly, significant differences in length or width can make assembly difficult later.
Make a reasonably sized gauge swatch before starting the panels. If your stitches are too loose or too tight, change your hook size rather than trying to compensate throughout the entire blanket.
Crochet Abbreviations
The pattern uses standard US crochet terminology, including:
- ch: chain
- dc: double crochet
- sc: single crochet
- sl st: slip stitch
- st: stitch
- YO: yarn over
- BPtr: back post treble crochet
- FPtr: front post treble crochet
There are also several special stitches used to create the flowers, petals, leaves, and popcorn berries. The complete instructions for those stitches are included in the downloadable PDF.
If some of the special stitches are new to you, don’t worry about trying to memorize everything before you begin. Keep the instructions nearby and work through them slowly.
How the Floral Cascade Afghan Goes Together
The seven panels are arranged in a balanced pattern, with the widest flower panel in the center:
- White leaf panel
- Pink berry panel
- White leaf panel
- Pink center flower panel
- White leaf panel
- Pink berry panel
- White leaf panel
This arrangement gives the blanket a nice sense of symmetry. The large floral panel remains the star of the show, while the berry and leaf panels frame it on either side.
The Center Flower Panel
The center flower panel is the largest section, measuring approximately 15½ inches wide.
It is worked in pink and features a cascading arrangement of dimensional flowers, petals, stems, and smaller leaves.
The panel begins with a foundation chain and is worked for 117 rows. Stitch markers are useful here because they help identify the placement of the different flower and petal elements.
Some of the petal stitches are worked around stitches from previous rows rather than simply into the next stitch. That is what gives the flowers their raised, three-dimensional appearance.
If you’ve never worked this type of crochet before, it can be helpful to practice one flower or petal on a small scrap piece first. Once you understand how the stitches are positioned, the rest of the panel becomes much easier to follow.
The Pink Berry Panels
There are two pink berry panels, each approximately 9¾ inches wide.
These sections use popcorn stitches to create the raised berry shapes. Front and back post treble stitches form the stems and help give the panel its winding, almost vine-like appearance.
The popcorn stitches alternate depending on which side of the work you’re on. This positioning is important because it keeps the berries raised on the correct side when the blanket is finished.
Although these panels have plenty of texture, their smaller motifs keep them from overwhelming the large flowers in the center.
The White Leaf Panels
Four white leaf panels are used in the finished afghan. Each one measures approximately 4¾ inches wide.
The panels feature repeating raised leaves created with tall stitches, multiple yarn overs, and stitches worked around posts from previous rows.
The technique may seem a little awkward the first time you try it. That’s perfectly normal. Once you’ve completed a few leaves, you’ll start to recognize the sequence and the stitches will become much more comfortable.
The white yarn also makes these panels especially effective. They separate the pink sections and help the raised leaves stand out clearly.
Working the Special Stitches
This is definitely a pattern for crocheters who are comfortable reading detailed instructions and working stitches in unusual places.
You’ll be using post stitches, tall stitches, popcorn stitches, and several special combinations to create the dimensional motifs.
Front and Back Post Treble Crochet
Front post and back post treble crochet are used throughout the panels to create the raised stems.
Rather than inserting your hook through the top of the stitch as you normally would, you work around the vertical post of the stitch.
Depending on whether you work around the front or back, the stitch pushes forward or backward. This simple change creates much of the relief that gives the Floral Cascade its distinctive texture.
Popcorn Stitches
The berries are made using popcorn stitches.
Several double crochet stitches are worked into the same location and then closed together to create a rounded, raised bump.
Both front and back popcorn variations are used so that the berries appear on the appropriate side of the panel.
Dimensional Leaves and Petals
The flowers and leaves use groups of tall stitches worked around the same stitch or post. These stitches are gathered together at the top to create fan-like shapes that sit above the surface of the blanket.
One helpful tip is to keep your yarn overs relaxed. If you pull everything too tightly, it can become surprisingly difficult to work your hook through all the loops.
Joining the Seven Panels
Once all seven panels are finished, it’s time to turn them into one blanket.
The panels are joined with the wrong sides together using reverse single crochet. The stitches are worked through both panels from left to right.
Reverse single crochet is also known as crab stitch. Instead of creating a flat or nearly invisible seam, it produces a slightly raised, cord-like edge.
For this particular blanket, that’s a lovely finishing touch because the seams become part of the overall texture rather than something you need to hide.
Start with the center flower panel and attach a white leaf panel to either side. From there, continue outward with the pink berry panels and the remaining white leaf panels.
Before you start joining everything together, lay the panels out on a large, flat surface. Check that the bottom edges line up and that every motif is facing the right direction.
Taking a few minutes to check the arrangement now can save a lot of frustration later.
Adding the Side Trim
Once the seven panels have been joined, reverse single crochet is worked along both long edges of the afghan.
This creates a neat raised border and ties in beautifully with the seams between the panels.
It’s a relatively simple finishing step, but it makes the completed blanket look much more polished.
Finishing With Fringe
The final detail is the fringe along both short edges.
The original instructions use five strands of matching yarn for each fringe group, with each strand measuring approximately 18 inches before attachment.
The color can follow the panel arrangement, using pink beneath the pink sections and white beneath the white sections. This carries the striped color scheme all the way to the ends of the blanket.
For easier cutting, wrap your yarn around a piece of cardboard before cutting multiple strands. Once the fringe has been attached, use sharp scissors to even out the ends.
There’s no need to rush this step. Take your time and trim little by little so you don’t accidentally make the fringe shorter than intended.
Floral Cascade Crochet Afghan PDF Pattern
The complete Floral Cascade PDF includes the detailed instructions you’ll need to make the blanket, including the special flower, leaf, and berry stitches.
You’ll also find:
- Row-by-row instructions for the leaf panels
- Row-by-row instructions for the berry panels
- Instructions for the center flower panel
- Special stitch explanations
- Panel assembly instructions
- Reverse single crochet joining
- Side trim instructions
- Fringe instructions
Having the full pattern beside you is especially helpful for this project because there are several different stitch combinations and motif placements to keep track of.
Final Thoughts
The Floral Cascade Afghan isn’t one of those blankets you’ll finish in a couple of evenings. It takes time, concentration, and some crochet experience, but that’s also part of its appeal.
Each panel gives you a manageable section to work on, and there’s something satisfying about watching the flowers, leaves, and berries gradually take shape.
Then comes the best part: laying all seven finished panels out together and seeing the design come to life.
The combination of dimensional flowers, raised leaves, popcorn berries, textured seams, and coordinating fringe gives this afghan a beautiful heirloom quality. It would make a lovely addition to your own home, but it would also be a wonderful handmade gift for someone special.
If you enjoy crochet projects that are a little more involved and give you something interesting to work on row after row, the Floral Cascade is definitely worth trying. The finished blanket has the kind of detailed, handcrafted appearance that makes all those hours with a crochet hook feel worthwhile.

