

 soofha
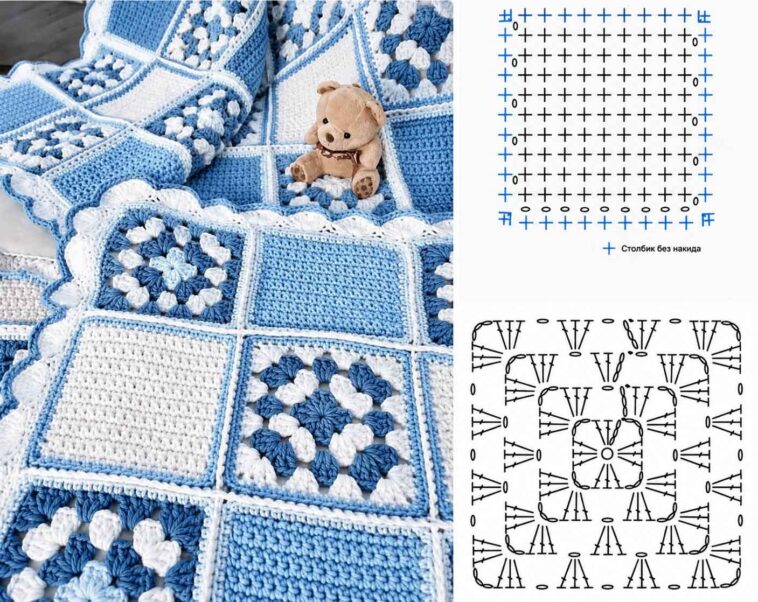
There’s something about a classic crochet blanket that never really goes out of style. It can look beautiful draped over the back of a sofa, folded at the end of a bed, or simply tucked away for those chilly evenings when you want something warm and cozy.
I really love blankets made from individual squares because they give you so much freedom. You can play around with colors, mix different textures, and work on a few squares at a time instead of having to manage one large project from beginning to end.
This classic crochet blanket combines simple solid squares with traditional granny-style squares. The original sample uses soft pink, cream, and white, creating a gentle, timeless look, but there are so many ways you could change the colors to suit your own home.
The pattern is worked in separate squares, which are joined together before adding a simple decorative border. If you have some crochet experience, this is a lovely project to settle into, and it also gives you plenty of practice with basic stitches and granny-square construction.
Materials
You will need:
- H/5 mm crochet hook
- Worsted weight yarn
- Tapestry needle
- Scissors
- Stitch markers, if desired
Yarn Used in the Samples
Sample 1 – Cover Photo
The original cover sample was made using Bernat Cottontots, which has since been discontinued. If you would like to recreate a similar look, Wavy by Knitca may be a possible substitute. You can also use a yarn comparison website such as YarnSub to find a similar weight and fiber blend.
Sample 2
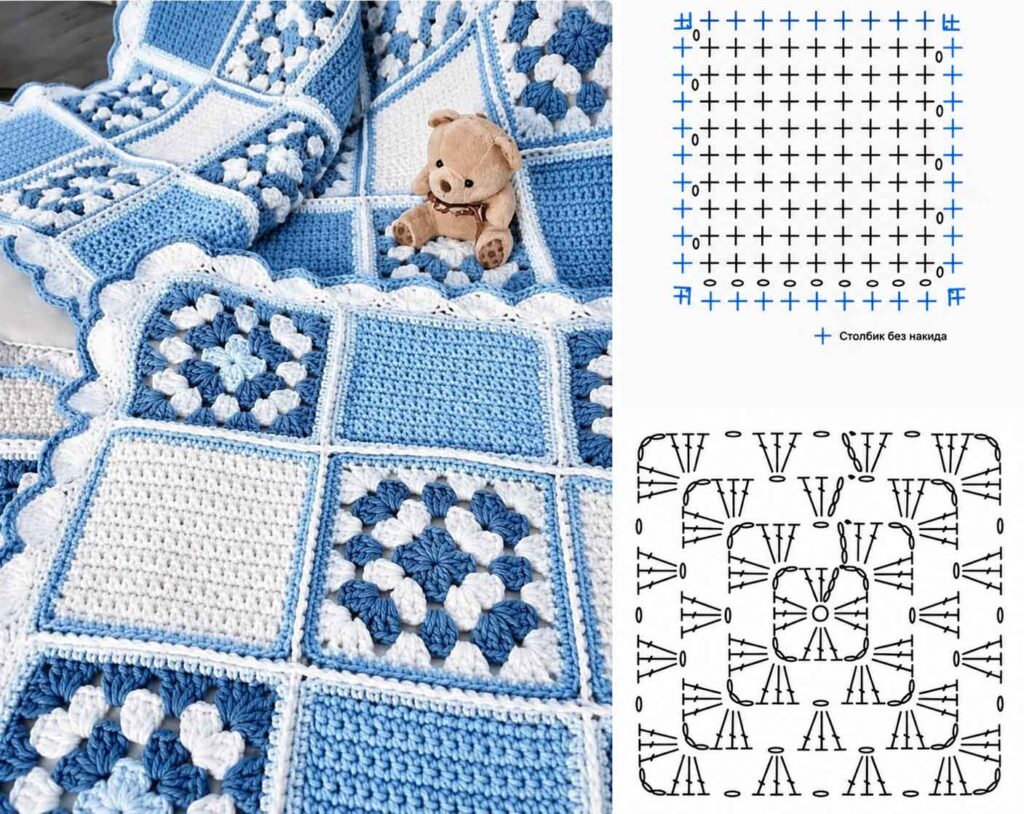
The second sample shown beneath the chart uses Caron Simply Soft in the following colors:
- MC: Soft Pink
- B: Off White
- C: White
Feel free to substitute your favorite worsted-weight yarn. Just keep in mind that changing the yarn weight or hook size can change the finished measurements.
Gauge
14 single crochet stitches and 16 rows = 4 inches (10 cm)
Gauge isn’t especially important for this blanket, but there is one thing you do want to pay attention to: all of your squares should finish at approximately the same size.
If some squares are noticeably smaller or larger than the others, joining them can become difficult and the finished blanket may not lie flat.
Finished Size
Approximately 31 inches square
Your finished measurements may vary depending on your yarn, tension, hook size, and blocking.
Skill Level
Intermediate
The individual stitches are fairly simple, but you’ll need to be comfortable keeping an even tension, changing colors, making granny-style squares, and joining several pieces together.
Stitches Used
Chain (ch)
Yarn over and pull the yarn through the loop on your hook.
Slip Stitch (sl st)
Insert the hook into the indicated stitch, yarn over, pull the yarn through the stitch and directly through the loop already on your hook.
Single Crochet (sc)
Insert the hook into the stitch, yarn over and pull up a loop. You should have two loops on your hook. Yarn over again and pull through both loops.
Double Crochet (dc)
Yarn over, insert the hook into the stitch or space, and pull up a loop. You will have three loops on the hook. Yarn over and pull through two loops, then yarn over once more and pull through the remaining two loops.
Before You Begin
This blanket is made by crocheting several different types of squares and then arranging them into the desired layout.
Once all the squares are finished, they are joined together to form the blanket. A decorative border is then worked around the outside edge.
One of the nicest things about this type of blanket is that you can make the squares gradually. If you don’t have time to crochet the whole blanket in one sitting, simply make a few squares whenever you have a spare moment and assemble everything later.
Keep your finished squares together as you work so they don’t get mixed up.
Square A – Make 9
Using MC (pink).
Foundation
Chain 22.
Row 1
Single crochet in the second chain from the hook and in each chain across.
Turn.
Rows 2–23
Chain 1, then single crochet in each stitch across.
Turn after each row.
At the end of Row 23, fasten off and weave in the yarn end securely.
Repeat until you have 9 Square A pieces.
Square B – Make 4
Using Color B (cream).
Foundation
Chain 22.
Row 1
Single crochet in the second chain from the hook and in every chain across.
Turn.
Rows 2–23
Chain 1 and single crochet across the row.
Turn.
After Row 23, fasten off and weave in the ends.
Make a total of 4 Square B pieces.
Square C – Make 6
This square has a traditional granny-square construction with alternating colors.
Using Color B, chain 5 and join with a slip stitch to form a ring.
Chain 3.
Round 1
Work 2 double crochet into the center of the ring, then chain 2.
Work 3 double crochet into the ring, chain 2.
Repeat from * to * two more times.
Join with a slip stitch to the top of the beginning chain-3.
Fasten off.
Join MC with a slip stitch in the next chain-2 corner space.
Round 2
Chain 3.
Work 2 dc, ch 2, 3 dc in the same corner space.
Chain 1.
In the next corner, work 3 dc, ch 2, 3 dc, then chain 1.
Repeat around the square.
Join with a slip stitch to the top of the beginning chain-3.
Fasten off.
Join Color B in the next corner space.
Round 3
Chain 3.
Work 2 dc, ch 2, 3 dc in the corner space.
Chain 1.
Work 3 dc in the next space, then chain 1.
In the next corner, work 3 dc, ch 2, 3 dc, followed by chain 1.
Continue working around the square in the same manner.
Finish by working 3 dc in the final space, followed by chain 1.
Join with a slip stitch.
Fasten off and join MC in the next corner.
Round 4
Chain 3.
Work 2 dc, ch 2, 3 dc in the corner.
Chain 1.
Work 3 dc in each space along the side, placing a chain 1 between each group.
When you reach the next corner, work 3 dc, ch 2, 3 dc, followed by chain 1.
Continue around the entire square.
Join with a slip stitch and fasten off.
Round 5
Join Color B and repeat the instructions from Round 4.
When the round is complete, fasten off and weave in all loose ends.
Make 6 Square C pieces.
Square D – Make 6
Square D follows the same basic construction as Square C, but the color sequence is reversed.
Work the rounds in this order:
- Round 1: MC
- Round 2: Color B
- Round 3: MC
- Round 4: Color B
- Round 5: MC
Use the same stitch instructions given for Square C.
Once the fifth round is finished, fasten off and carefully weave in the ends.
Make 6 Square D pieces.
Joining the Squares
Once all of your squares are finished, lay them out on a flat surface and arrange them according to your placement grid.
Take a little time with this step. Moving the squares around before joining them makes it much easier to balance the colors and patterns across the blanket.
You can join the squares by sewing them together with a tapestry needle, or you can crochet them together.
For a more noticeable finish, try joining the squares with single crochet on the right side. This creates a raised ridge between the individual squares and adds another little bit of texture to the finished blanket.
Whichever joining method you choose, try to keep your tension consistent. Pulling the joining stitches too tightly can cause the blanket to pucker.
Adding the Border
Once all the squares have been joined, it’s time to finish the outside edge.
Using Color C (white), join the yarn with a slip stitch near any corner.
Round 1
Chain 1.
Work 424 single crochet stitches evenly around the entire blanket, making 3 single crochet stitches in each corner.
Try to space the stitches evenly along the sides. If necessary, slightly adjust the spacing so the edge remains flat rather than wavy.
Join with a slip stitch to the first single crochet.
Round 2
Skip the next stitch.
Work 5 double crochet stitches in the next stitch.
Skip the following stitch and slip stitch into the next stitch.
Repeat this pattern around the entire blanket:
Skip 1, 5 dc in next stitch, skip 1, slip stitch in next stitch.
When you reach the beginning, fasten off and weave in all remaining ends.
Finishing the Blanket
Before calling your blanket finished, take a few minutes to check all of the joins and loose yarn tails.
Blocking is especially helpful with a square blanket. It can straighten the individual squares, even out small differences in size, and give the entire piece a much neater appearance.
You don’t necessarily need to block every crochet blanket, but with a project made from multiple squares, it can make a noticeable difference.
Once everything is secure, your classic crochet blanket is ready to use.
A Few Helpful Tips
Block before joining. If your squares aren’t quite the same size, blocking them can help bring everything into better alignment.
Don’t worry if your blanket isn’t exactly 31 inches. Crochet tension varies from person to person. A slightly different finished size is completely normal.
Keep your color changes consistent. When making several squares of the same type, following the same color sequence will give the finished blanket a more balanced appearance.
Weave in ends as you go. It may seem tempting to leave all the finishing until the very end, but dealing with a pile of yarn tails can become a chore. Taking care of them as you finish each square makes assembly much easier.
Have fun with the colors. The original pink, cream, and white combination has a soft, traditional feel, but this pattern would look just as lovely in blues, greens, earthy neutrals, or even brighter shades.
Make It Your Own
The beauty of a classic square blanket is that you don’t have to follow the original colors exactly. The pattern gives you a foundation, but the color choices are completely yours.
Try choosing three shades from the same color family for a subtle look, or go for contrasting colors if you want each square to stand out.
You could even make a few extra squares and experiment with different arrangements before deciding on the final layout.
However you choose to make it, this is the kind of crochet project that becomes more special with every square. Take your time, enjoy the process, and don’t worry about making everything absolutely perfect.
After all, the little handmade details are what give a crochet blanket its character.
Happy crocheting!

