

 soofha
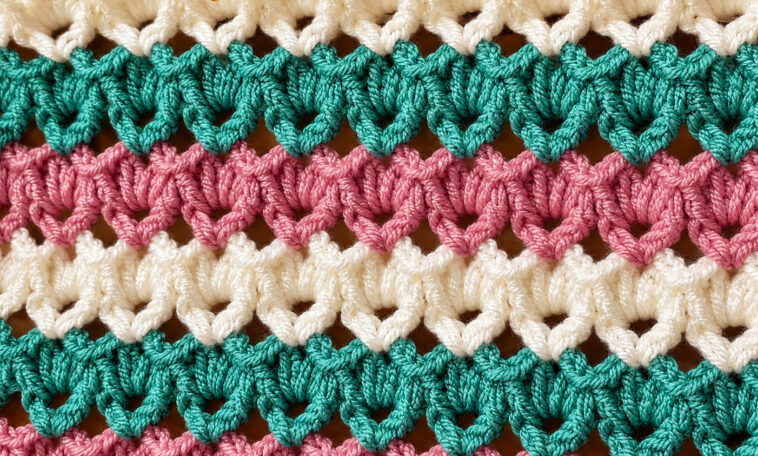
Looking for a beautiful and beginner-friendly crochet baby blanket pattern? This Textured Shell Stitch Baby Blanket is a wonderful project to add to your crochet collection. The stitch creates a soft, raised texture that gives the blanket a cozy handmade appearance while still allowing the fabric to remain comfortable and breathable.
The repeating shell design is easy to learn and becomes wonderfully relaxing once you get into the rhythm. By alternating yarn colors, you can create a playful and modern blanket that is perfect for a nursery, baby shower gift, or handmade keepsake.
Whether you are making your first baby blanket or simply want an enjoyable weekend crochet project, this pattern is simple enough to follow and attractive enough to make a special gift.
Why You’ll Love This Pattern
- Beginner-friendly: Uses basic crochet stitches and a simple repeating sequence.
- Easy to memorize: Once you understand the shell placement, the pattern becomes very repetitive.
- Beautiful texture: Raised shell stitches add dimension and softness to the finished blanket.
- Perfect for gifting: A handmade baby blanket makes a thoughtful baby shower or newborn gift.
- Easy to customize: Change the yarn colors or adjust the size to suit your project.
Materials You’ll Need
Before getting started, gather the following supplies:
- Soft baby-friendly yarn in your preferred colors
- Crochet hook suitable for your yarn
- Scissors
- Yarn needle for weaving in ends
- Measuring tape
For a baby blanket, choose a soft yarn that is comfortable against delicate skin. Washable yarn can also be a practical choice for a blanket that will be used frequently.
Crochet Abbreviations
Here are the basic abbreviations used in this tutorial:
- ch – chain
- sc – single crochet
- dc – double crochet
- st – stitch
- sk – skip
- rep – repeat
Textured Shell Stitch Baby Blanket Instructions
Step 1: Create the Foundation Chain
Begin by making a foundation chain of 92 stitches.
You can also adjust the width of your blanket by making any number of chains that follows the pattern repeat of 3 + 2.
For example:
- 92 chains
- 95 chains
- 98 chains
- 101 chains
Continue increasing by three chains until you reach your desired blanket width.
Try to keep your foundation chain loose and even. A tight foundation chain can make the bottom edge of your blanket narrower than the rest of the project.
Step 2: Work Row 1 – Base Shell Row
Single crochet into the second chain from your hook.
Skip the next two chains, then work 5 double crochets into the next chain. These five double crochets form your first shell.
Skip the next two chains and work a single crochet into the following chain.
Continue repeating this sequence across the foundation chain:
Skip 2 chains, 5 dc in the next chain, skip 2 chains, sc in the next chain.
Repeat until you reach the end of the row.
Turn your work.
You should now see the beginnings of the shell pattern forming across the row.
Step 3: Work Row 2 – Offset Shell Row
Chain 3. This chain counts as the first double crochet.
Work 2 additional double crochets into the same stitch.
Now begin the repeating pattern:
Sc in the center of the next shell, then work 5 dc into the next sc.
Continue repeating this sequence across the row.
When you reach the final stitch, finish with 3 double crochets in the last stitch.
Turn your work.
This row shifts the shells slightly and creates the characteristic textured appearance of the blanket.
Step 4: Work Row 3 – Repeat the Shell Pattern
Chain 1.
Work a single crochet into the first stitch.
Then begin the repeating sequence:
5 dc in the next sc, then sc in the center of the next shell.
Repeat this pattern across the entire row.
Continue working the shell groups and single crochet stitches in the established pattern.
Turn your work at the end of the row.
At this point, you should clearly see the repeating textured shell design developing.
Step 5: Continue the Pattern
Continue alternating Rows 2 and 3 until your blanket reaches your preferred length.
The beauty of this pattern is that you do not need to memorize a complicated stitch sequence. After a few rows, the placement of the shells becomes easy to recognize.
Keep checking your stitch placement as you work, especially during the first few repeats. Once the pattern is established, the rest of the blanket should progress smoothly.
Changing Colors
For an extra colorful baby blanket, consider changing yarn colors every few rows.
You could create:
- Soft pastel stripes
- Two-color alternating rows
- Rainbow-inspired stripes
- Neutral shades for a modern nursery
- Pink, blue, cream, or lavender combinations
- A simple white and beige design
When changing colors, make sure to secure the yarn neatly and weave in the ends with a yarn needle when finished.
Tips for Crocheting the Perfect Baby Blanket
Keep Your Tension Consistent
Try to maintain the same tension throughout the project. Consistent tension will help your shells remain even and prevent the blanket from becoming wider or narrower as you crochet.
Count Your Shells
If your blanket begins to look uneven, check the number and placement of your shells. Missing a single crochet or accidentally adding an extra shell can affect the following row.
Use Soft Yarn
Because this is a baby blanket, choose a yarn that feels soft and comfortable. Avoid scratchy fibers that may be uncomfortable against sensitive skin.
Don’t Crochet Too Tightly
A relaxed tension will help create a softer, more flexible blanket. It also makes the shell texture easier to see.
Make a Small Swatch First
If you are unsure about your yarn and hook combination, crochet a small sample before beginning the full blanket. This allows you to check the texture, drape, and approximate size.
How to Customize the Blanket Size
One of the advantages of this pattern is that it can easily be adapted.
For a smaller receiving blanket, start with a shorter foundation chain. For a larger blanket, simply increase the foundation chain while maintaining the required multiple of 3 + 2.
You can also continue adding rows to make the blanket longer.
This makes the pattern suitable for:
- Small newborn blankets
- Stroller blankets
- Crib blankets
- Toddler blankets
- Lap blankets
- Larger throws
Finishing Your Crochet Baby Blanket
Once your blanket has reached the desired length, fasten off your yarn and leave a small tail.
Use a yarn needle to carefully weave the loose ends into the back of the blanket. Trim any excess yarn after the ends have been securely woven in.
For a more finished appearance, you can add a simple crochet border around the blanket. A single crochet border is an easy option for beginners and can help create a neat, defined edge.
Care Instructions
Always follow the washing instructions recommended for your specific yarn.
If you are making the blanket as a gift, it can be helpful to include the yarn-care information with the finished project. Choosing machine-washable yarn is often convenient for baby blankets because they may need frequent washing.
Final Thoughts
This Textured Shell Stitch Baby Blanket is a lovely combination of simplicity, texture, and timeless crochet style. The repeating shell pattern creates a cozy surface without requiring complicated techniques, making it an enjoyable project for both newer and experienced crocheters.
Experiment with different yarn colors to create a blanket that matches a baby’s nursery or the personality of the recipient. Whether you choose delicate pastels, classic neutrals, or cheerful contrasting shades, the finished blanket is sure to become a treasured handmade piece.
Free Video Tutorial
Prefer to learn by watching? Follow along with a free video tutorial to see how the textured shell stitch is worked row by row. Watching the stitch placement can be especially helpful when learning where to work the shells and single crochet stitches.
Grab your favorite yarn and crochet hook, and enjoy creating this soft and beautiful baby blanket!

