

 soofha
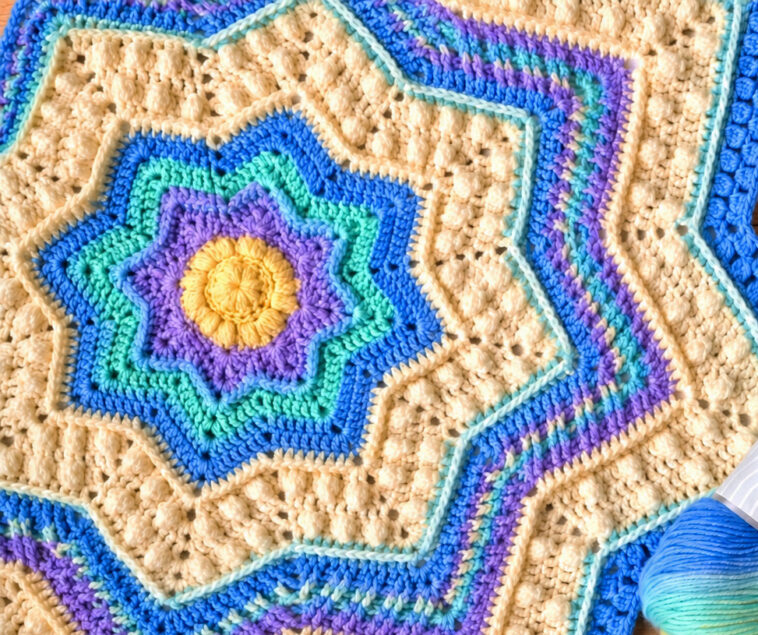
Welcome to Soofha! Today we’re sharing a beautiful crochet project that is perfect for welcoming a little one into the world: the Star Crochet Baby Blanket.
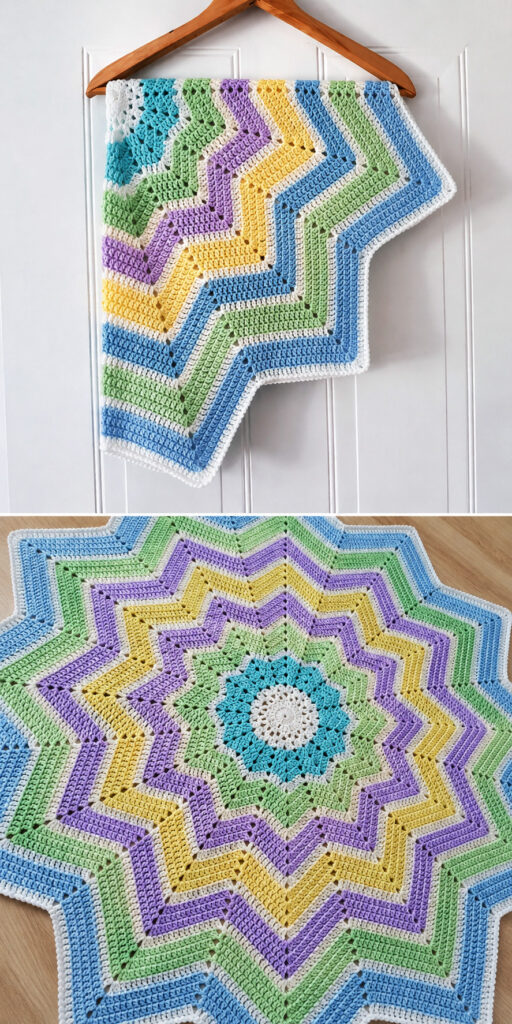
This charming 12-point star blanket combines a soft, airy texture with a classic ripple design. Its star-shaped silhouette makes it especially eye-catching, while the simple repeating pattern makes it much easier to crochet than it may first appear.
Whether you’re making a handmade baby shower gift, preparing something special for a nursery, or simply looking for a relaxing crochet project, this blanket is a wonderful choice. You can also customize it with your favorite colors to create a completely unique finished piece.
Why You’ll Love This Crochet Star Blanket
There is something particularly special about crocheting a blanket for a baby. Every stitch is made with care, creating a handmade keepsake that can be treasured for years.
The 12-point design creates beautiful peaks and valleys throughout the blanket. As the rounds grow, the star shape becomes increasingly defined, giving the finished blanket a lovely decorative appearance.
Despite its intricate-looking design, the construction is quite manageable. The first few rounds establish the foundation and create the chain spaces that form the points. After that, you’ll work a repeating sequence of rounds while continuing the increases and decreases that maintain the star shape.
Once you understand how the peaks and valleys are formed, the pattern becomes wonderfully rhythmic.
Skill Level
Easy
This pattern uses basic crochet stitches and repetitive rounds. Beginners who are comfortable with double crochet, single crochet, chain stitches, and slip stitches should be able to follow the instructions with patience.
Finished Size
Approximately 43 inches (109 cm) across at the widest point.
The finished size can vary slightly depending on your yarn, hook size, and individual crochet tension.
Materials
- 2 balls of Lion Brand Mandala Baby, Art. #526
- Color: Honey Dukes
- H-8 (5 mm) crochet hook
- Stitch markers
- Large-eyed blunt needle
You can substitute another lightweight baby-friendly yarn if desired. If you change the yarn, remember that the final dimensions and amount of yarn required may also change.
Gauge
Rounds 1–4 should measure approximately 4 inches (10 cm) in diameter.
Always make a gauge swatch before beginning if you want your finished blanket to closely match the stated dimensions.
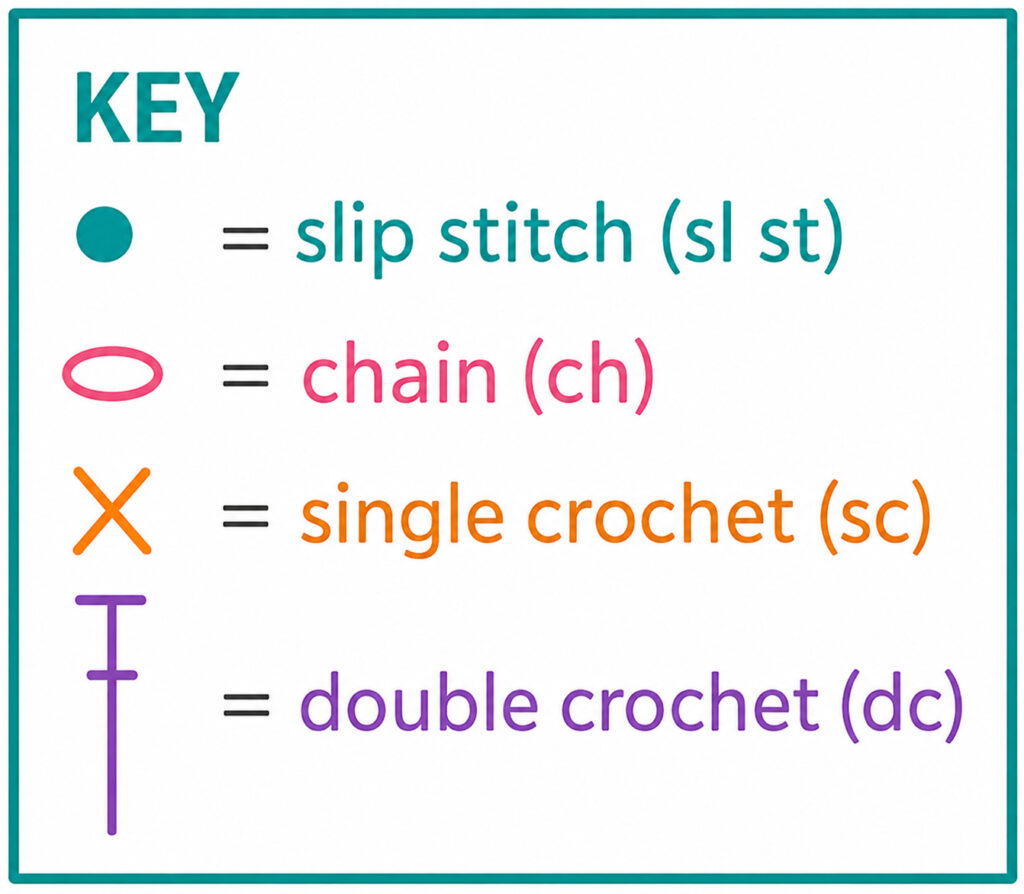
Abbreviations – US Crochet Terms
- beg – beginning
- ch – chain
- ch-sp – chain space
- dc – double crochet
- rem – remaining
- rep – repeat
- rnd – round
- RS – right side
- sc – single crochet
- sk – skip
- sl st – slip stitch
- st(s) – stitch(es)
How to Make a Shell Stitch
For this pattern, a shell is created in a designated chain-2 space.
Shell: 2 dc, ch 2, 2 dc in the indicated space.
When beginning a shell at the start of a round, the pattern may use a beginning chain to represent the first double crochet.
Pattern Notes
- The blanket is worked in continuous rounds while keeping the right side facing.
- The design is based on a ripple pattern.
- The star points are created by alternating peaks and valleys.
- Peaks are formed by working shell stitches into the chain-2 spaces of previous shells.
- Valleys are created by skipping stitches between the peaks.
- Stitch markers are introduced from Round 6 to make the valley locations easier to identify.
- You can omit the markers if you are comfortable recognizing the pattern as it develops.
- The star shape may not be immediately obvious during the first few rounds, so don’t worry if your project looks unusual at the beginning.
12-Point Star Baby Blanket Pattern
Foundation
Chain 5 and join with a slip stitch in the first chain to form a ring.
Round 1 – Right Side
Chain 3, which counts as the first double crochet.
Work 11 additional double crochets into the center of the ring.
Join with a slip stitch to the top of the beginning chain-3.
You should have 12 double crochets.
Round 2
Chain 4, which counts as 1 double crochet and 1 chain.
Work 1 double crochet in the next stitch.
Chain 1, double crochet in the next stitch.
Repeat from * around the entire round.
Chain 1 and join with a slip stitch in the third chain of the beginning chain-4.
At the end of the round, you should have 12 double crochets and 12 chain-1 spaces.
Round 3
Slip stitch into the first chain-1 space.
Chain 5, which counts as 1 double crochet and chain 2.
Work 1 double crochet into the same chain-1 space.
In each remaining chain-1 space, work:
dc, ch 2, dc
Continue around the blanket and join with a slip stitch in the third chain of the beginning chain-5.
You should now have 24 double crochets and 12 chain-2 spaces.
Round 4
Slip stitch into the first chain-2 space.
Work a shell in the same space.
Continue working one shell into every chain-2 space around the blanket.
Join with a slip stitch to the top of the beginning chain-3.
You should have 12 shells, containing a total of 48 double crochets and 12 chain-2 spaces.
Round 5
Slip stitch into the next double crochet.
Chain 3, counting as a double crochet.
Work a shell into the chain-2 space of the first shell from the previous round.
Work 1 double crochet in the next stitch.
Then repeat:
Skip the next 2 stitches, double crochet in the next stitch, work a shell into the chain-2 space of the next shell, then double crochet in the next stitch.
Continue around.
Join with a slip stitch to the top of the beginning chain-3.
You should have 12 shells and 24 double crochets, for a total of 72 double crochet stitches and 12 chain-2 spaces.
Round 6
Slip stitch into the next double crochet.
Chain 3, counting as a double crochet.
Work 1 double crochet in the next stitch.
Work a shell in the chain-2 space of the first shell.
Work 1 double crochet in each of the next 2 stitches.
Place a stitch marker in the last double crochet made.
Repeat:
Skip the next 2 stitches. Work 1 double crochet in each of the next 2 stitches. Work a shell in the chain-2 space of the next shell. Work 1 double crochet in each of the next 2 stitches. Place a marker in the last double crochet.
Repeat around the blanket.
Join with a slip stitch to the top of the beginning chain-3.
You should have 12 shells and 48 double crochets, for a total of 96 double crochets and 12 chain-2 spaces.
Round 7
Slip stitch across the next 2 double crochets.
Chain 3, counting as a double crochet.
Work a double crochet in each stitch until you reach the chain-2 space of the first shell.
Work a shell in that chain-2 space.
Continue working double crochets until you are one stitch before the first marked double crochet.
Then:
Skip the next 4 stitches and move the stitch marker to the last double crochet made. Continue working double crochets until you reach the chain-2 space of the next shell. Work a shell in the chain-2 space, then continue with double crochets until you are one stitch before the next marked double crochet.
Repeat around, moving each marker as instructed.
Join with a slip stitch to the top of the beginning chain-3.
Rounds 8 and 9
Slip stitch into the next double crochet.
Chain 3, counting as a double crochet.
Continue working double crochets until you reach the chain-2 space of the first shell.
Work a shell into that chain-2 space.
Continue working double crochets until you reach the first marked double crochet.
Skip the marked double crochet and the following double crochet.
Move the stitch marker to the last double crochet worked.
Continue working double crochets until you reach the next shell’s chain-2 space.
Work a shell into that space.
Continue with double crochets until you reach the next marked double crochet.
Repeat this sequence around the entire blanket, moving each stitch marker as you go.
Finish by joining with a slip stitch to the top of the beginning chain-3.
By Round 9, you will have 12 shells and 96 double crochets, giving you 144 double crochets and 12 chain-2 spaces in total.
There will be approximately 6 double crochets along each of the 24 edges between the shell peaks and the skipped-stitch valleys.
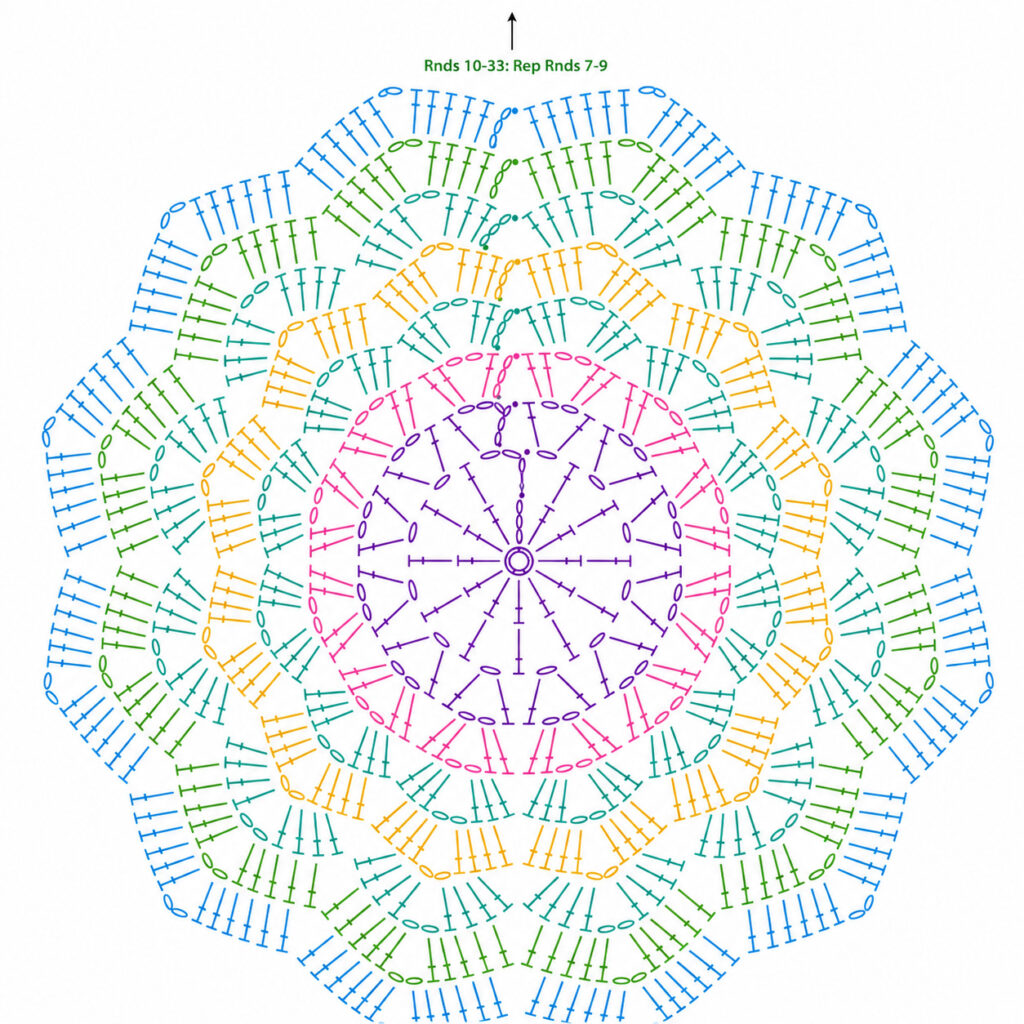
Rounds 10–33
Repeat Rounds 7–9 eight additional times.
Continue following the established peak-and-valley sequence carefully. As the blanket grows, the distinctive 12-point star shape will become much easier to see.
By Round 33, you should have:
- 12 shell stitches
- 528 double crochet stitches
- Approximately 22 double crochets along each of the 24 edges
Take your time as the blanket gets larger and periodically lay it flat to check that the points are forming evenly.
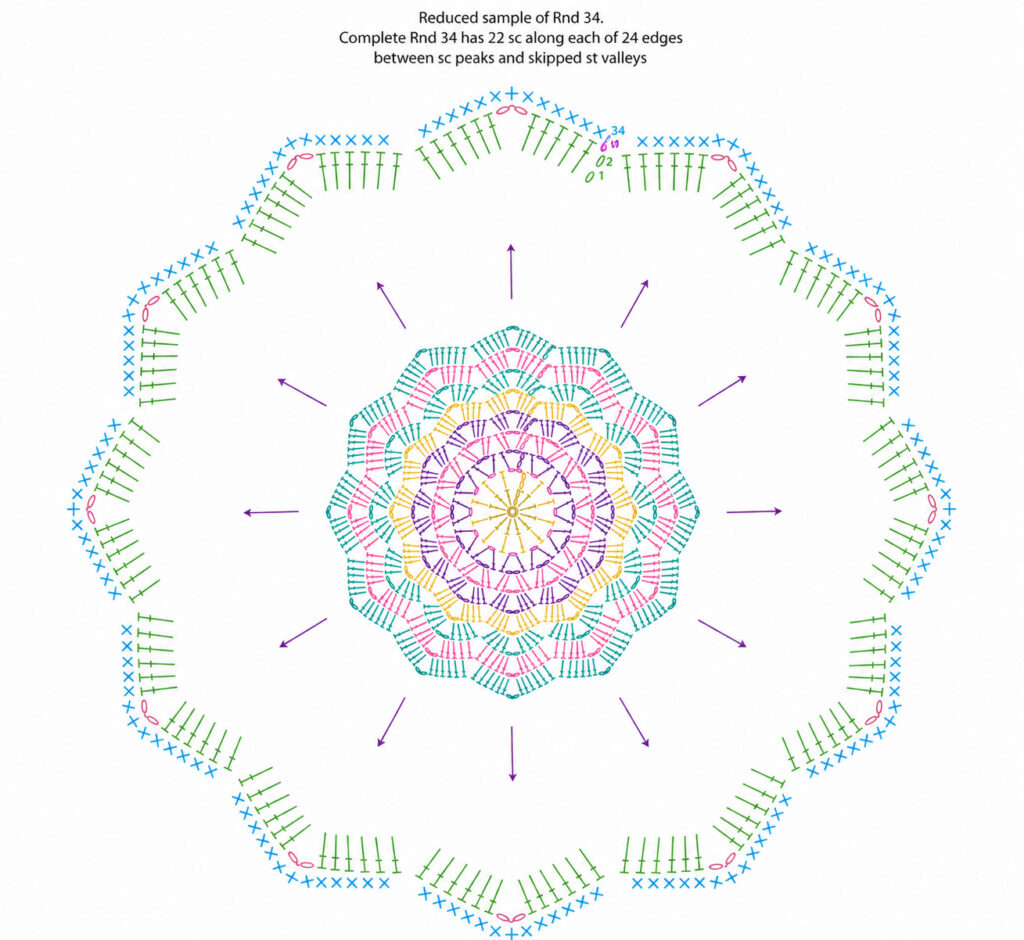
Round 34 – Final Border
Slip stitch, then chain 1.
Work 1 single crochet in the next double crochet.
Continue working single crochet in each stitch until you reach the chain-2 space of the first shell.
Work 3 single crochets in the chain-2 space.
Continue working single crochet stitches until you reach the marked double crochet.
Then repeat:
Skip the marked double crochet and the next double crochet. Remove the marker. Work single crochet in each stitch until you reach the chain-2 space of the next shell. Work 3 single crochets in that chain-2 space. Continue working single crochet until you reach the next marked double crochet.
Repeat around the blanket.
Remove the final stitch marker and join with a slip stitch to the first single crochet.
You should have approximately 540 single crochet stitches, with the three-single-crochet groups forming the tips of the 12 star points.
Fasten off.
PDF DOWNLOAD

STAR BABY BLANKET PDF

CHART
Finishing Your Star Blanket
Once the final round is complete, gently spread the blanket out and check the shape.
Use a large-eyed blunt needle to weave all yarn tails securely into the wrong side of the blanket. Trim any excess yarn after the ends have been woven in.
For a neat finish, you can lightly block the blanket according to the requirements of your yarn.
Tips for Making the Perfect Star Blanket
Keep Your Tension Consistent
Consistent tension is especially important with a star-shaped blanket. If your stitches become significantly tighter or looser from one round to another, the points may not form evenly.
Use Stitch Markers
The markers are extremely helpful when working the valley sections. They make it easier to identify exactly where stitches need to be skipped.
Lay Your Blanket Flat
Every few rounds, place your blanket on a flat surface and check the shape. This makes it easier to catch tension or stitch-count problems before they become difficult to correct.
Experiment With Color
One of the best things about this pattern is how easily it can be customized.
Try:
- Soft pastel shades for a traditional baby blanket
- Neutral cream, beige, and taupe for a modern nursery
- Blue and white for a classic look
- Pink, peach, and lavender for a delicate palette
- Rainbow colors for a cheerful statement blanket
- Two alternating colors for a bold graphic effect
A self-striping or gradient yarn can also create beautiful color changes without requiring you to change yarn manually.
Is This Blanket Good for Beginners?
Yes! Although the finished blanket looks complicated, the actual construction is based on repeated crochet techniques.
The most important part is understanding where the peaks and valleys occur. Once you become comfortable with the shell sections and skipped stitches, the repeating rounds become much easier to memorize.
If you are new to crochet, work slowly and count your stitches regularly. There is no need to rush—crochet is meant to be enjoyed.
A Lovely Handmade Baby Shower Gift
A handmade baby blanket is more than just something warm and practical. It is a thoughtful gift made stitch by stitch with love.
The unusual 12-point star shape makes this blanket stand out from traditional rectangular baby blankets. It can be used for cuddling, nursery decoration, stroller outings, or as a beautiful keepsake for the child’s early years.
Final Thoughts
The 12-Point Star Crochet Baby Blanket is a wonderful project for crocheters who want to create something both practical and beautiful. Its combination of repeating shells, gentle ripples, peaks, and valleys creates a distinctive star-shaped design that is sure to attract attention.
Don’t be intimidated by the number of rounds. Once the foundation is established, the pattern becomes repetitive and enjoyable. Choose your favorite baby-friendly yarn, grab your crochet hook, and settle into a relaxing crochet session.
We hope you enjoy making this beautiful star blanket as much as we enjoyed sharing it with you.
If you love the pattern, don’t forget to share it with your fellow crochet enthusiasts so they can create their own handmade star blankets too.
Happy crocheting, and we’ll see you again soon at Soofha! ❤️🧶

