

 soofha
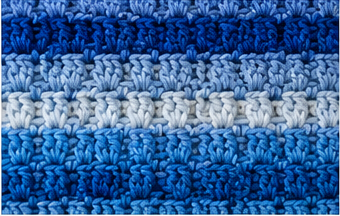
If you love blankets with rich texture, soothing colour changes, and a cosy handmade feel, this Blue Ocean Textured Crochet Blanket is a beautiful project to try. Inspired by the layered blue-and-white blanket in the photo, this design combines simple crochet rows with raised clusters to create a thick, tactile fabric.
The colour palette moves between deep ocean blue, bright blue, sky blue, icy blue, and soft white. Instead of making every stripe exactly the same width, changing colours at slightly different intervals gives the blanket a relaxed handcrafted appearance.
This pattern is written in US crochet terminology and can easily be adjusted for a baby blanket, lap blanket, throw, or larger bed blanket.
Pattern Overview
Skill level: Easy to intermediate
Terminology: US crochet terms
Construction: Worked flat in rows
Suggested yarn: Worsted/Aran weight, #4
Hook: 5 mm–5.5 mm
Pattern repeat: Multiple of 4 + 2
Main technique: Textured cluster stitch
Border: Simple single crochet edging
Approximate Finished Sizes
| Blanket | Width | Length |
|---|---|---|
| Baby | 76 cm / 30 in | 91 cm / 36 in |
| Toddler | 91 cm / 36 in | 107 cm / 42 in |
| Lap blanket | 102 cm / 40 in | 122 cm / 48 in |
| Throw | 127 cm / 50 in | 152 cm / 60 in |
These measurements are only suggestions. Because the stitch repeat is simple, you can make the blanket almost any size.
Materials
For a medium throw blanket, you will need approximately 1,500–2,000 g of worsted/Aran weight yarn, depending on yarn thickness, tension, finished size, and how dense you make the textured sections.
Choose five colours for a result similar to the photograph:
Colour A – Deep Ocean Blue
A rich royal or cobalt blue.
Colour B – Bright Blue
A clear medium blue.
Colour C – Sky Blue
A fresh light blue.
Colour D – Ice Blue
A very pale blue.
Colour E – Soft White
Cream, ivory, or clean white.
You will also need a 5 mm or 5.5 mm crochet hook, scissors, yarn needle, and stitch markers if desired.
If you crochet tightly, try the larger hook. If your stitches are naturally loose, the smaller hook may produce a more structured fabric.
Crochet Abbreviations
ch – chain
sc – single crochet
dc – double crochet
st – stitch
sts – stitches
sp – space
sk – skip
rep – repeat
RS – right side
WS – wrong side
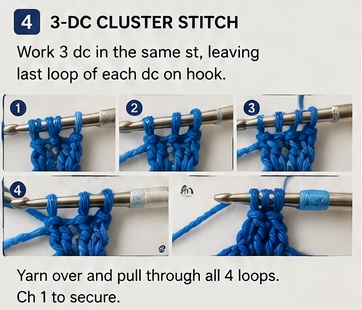
Special Stitch: 3-DC Cluster
The raised clusters give this blanket its characteristic texture.
To make a 3-dc cluster:
Yarn over, insert hook into the indicated stitch, yarn over and pull up a loop. Yarn over and pull through 2 loops, leaving the final 2 loops on your hook.
Yarn over and insert the hook into the same stitch again. Pull up a loop, yarn over and pull through 2 loops.
Repeat once more in the same stitch.
You should now have four loops remaining on your hook.
Yarn over and pull through all four loops.
3-dc cluster completed.
Do not make these clusters excessively tight. Keeping the final pull-through relaxed helps the raised texture remain soft.
Gauge
Gauge is not critical for this blanket because you can continue until you reach your preferred dimensions.
A useful starting gauge is approximately:
14–16 stitches × 12–14 rows = 10 cm / 4 inches
Gauge will vary considerably according to yarn, hook size, and personal tension.
If you’re making the blanket for a specific bed, sofa, cot, or gift size, make a small swatch first.
Starting Chain
The pattern uses a foundation chain of:
Multiple of 4 + 2 chains
For example:
122 chains gives a smaller baby-sized starting point.
142 chains works well for a wider baby/toddler blanket.
162–182 chains can work for a lap blanket.
For a large throw, continue adding groups of four chains until the chain reaches your desired width, then add two additional chains.
Remember that the finished blanket will gain a little extra width once the border is added.
Blue Ocean Textured Blanket Pattern
Foundation
Using Colour A – Deep Ocean Blue, chain your chosen multiple of 4 + 2.
For this example:
Ch 142.
Try to keep the foundation chain relaxed. A foundation that is too tight can cause the bottom edge of the blanket to curve inward.
If necessary, make the foundation chain using a hook 0.5 mm larger than the hook you plan to use for the rest of the blanket.
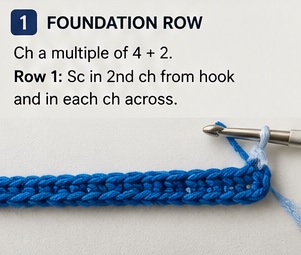
Row 1 – Foundation Row
Sc in the second ch from the hook.
Sc in each chain across.
Turn.
This simple row creates a stable foundation for the textured stitches.
Row 2 – Textured Cluster Row
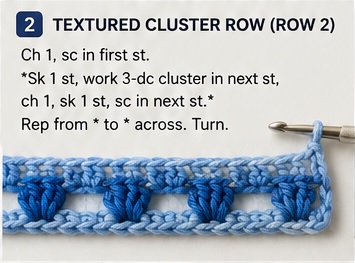
Ch 1 and turn.
Sc in the first st.
Skip the next st, work one 3-dc cluster into the following st, ch 1, skip the next st, sc in the following st.
Repeat from * to * across.
If your stitch count produces a slightly different ending, simply maintain the established spacing and finish with an sc at the edge.
Turn.
The blanket will already begin developing little raised sections.
Row 3 – Foundation/Rest Row
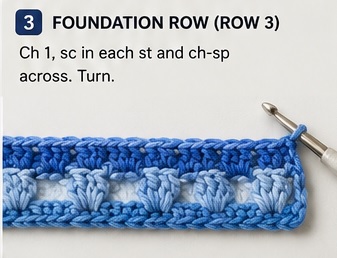
Ch 1 and turn.
Work sc evenly across the row.
When working over the textured sections, make sure you maintain an even stitch count rather than accidentally increasing around the cluster spaces.
Turn.
Row 4
Repeat Row 2.
Row 5
Repeat Row 3.
Main Pattern Repeat
Continue repeating:
Row 2 – Textured cluster row
followed by:
Row 3 – Single crochet row
Continue until your blanket reaches your desired length.
The alternating construction gives the fabric texture without making every row extremely bulky.
Creating the Blue Striped Effect
The blanket in the reference uses several closely related shades of blue rather than sharply separated blocks.
A good colour sequence is:
Deep Blue → Medium Blue → Sky Blue → White → Ice Blue → Bright Blue
Then reverse or rearrange the sequence.
Instead of repeating exactly the same sequence throughout the blanket, vary the stripe widths.
For example, you could work:
Rows 1–4: Deep Ocean Blue
Rows 5–8: Sky Blue
Rows 9–10: Soft White
Rows 11–16: Bright Blue
Rows 17–20: Ice Blue
Rows 21–24: Deep Blue
Rows 25–26: White
Rows 27–32: Medium Blue
Rows 33–36: Sky Blue
Then begin another variation.
This irregularity creates a much more organic appearance.
Alternative Colour Sequence
For an especially rich ocean-inspired blanket, try a repeating 20-row colour section.
Rows 1–4: Royal Blue
Rows 5–6: Pale Blue
Rows 7–10: Sky Blue
Rows 11–12: White
Rows 13–16: Medium Blue
Rows 17–18: Ice Blue
Rows 19–20: Royal Blue
Repeat while occasionally swapping two colours.
This gives the blanket rhythm while avoiding a perfectly repetitive striped appearance.
How to Change Colours Neatly
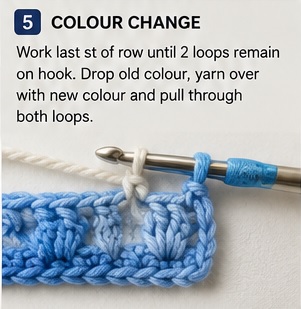
When you reach the final stitch before a colour change, begin the stitch normally but do not complete the final yarn-over.
When two loops remain on the hook, drop the old colour.
Place the new colour over your hook and pull it through the final two loops.
The new colour is now ready for the next row.
Turn and continue normally.
This technique creates a cleaner transition than finishing the stitch completely before attaching the next colour.
If you are changing colours every few rows, you can sometimes carry the unused yarn loosely along the edge. However, because this blanket uses several colours, fastening off and weaving in the ends usually gives a cleaner result.
Keeping the Blanket Edges Straight
Textured crochet patterns can sometimes develop uneven sides, particularly when the cluster rows are combined with plain rows.
Count your stitches regularly.
Place a stitch marker into the first and last stitch of each row if necessary.
Make sure you do not accidentally work an extra stitch into the turning chain unless the pattern specifically requires it.
After every 10–15 rows, lay the blanket flat and check the edges.
If the blanket gradually becomes wider or narrower, check your stitch count before continuing.
Correcting a mistake after two rows is much easier than discovering it after another 40 rows.
Adding More Texture
If you want an even more pronounced surface, you can modify the cluster.
Instead of a 3-dc cluster, work a 4-dc cluster.
The technique is identical, except you partially work four double crochets into the same stitch before pulling through all remaining loops.
A 4-dc cluster produces a fuller raised section and uses more yarn.
For a baby blanket, the 3-dc version is generally softer and lighter.
For a sofa throw or winter blanket, the larger cluster can create a wonderfully chunky texture.
Border
Once the blanket reaches your desired length, fasten off the final stripe and weave in any obvious loose ends.
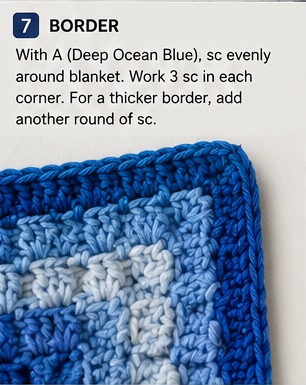
Attach Deep Ocean Blue to any corner.
Border Round 1
Ch 1.
Work sc evenly around the entire blanket.
Along the top and bottom edges, work approximately one sc into each stitch.
Along the sides, distribute your stitches evenly between the row ends.
At each corner, work:
3 sc in the corner stitch or space.
Continue around.
Join with a slip stitch to the first sc.
Border Round 2
Ch 1.
Sc in every stitch around.
Work 3 sc into the centre corner stitch at each corner.
Join with a slip stitch.
Fasten off.
This creates the clean blue outline visible around the blanket.
Optional Wider Border
If you prefer a more substantial frame, continue for another two or three rounds.
You could use:
Round 1: Deep blue
Round 2: Sky blue
Round 3: White
Round 4: Deep blue
Or keep every border round in the darkest shade for a stronger frame.
A darker border works especially well when the body contains many pale colours because it visually defines the blanket.
Yarn Suggestions
A soft, washable yarn is usually the best choice for this project.
For a baby blanket, look for yarn that is:
soft against the skin, machine washable, easy-care, durable, and not excessively fuzzy.
Acrylic is practical and widely available. Cotton creates a heavier blanket with excellent stitch definition, while acrylic-cotton blends offer a nice balance between softness and structure.
For a warmer winter throw, wool or a wool-blend yarn can create a beautifully cosy fabric.
Customising the Blanket
One advantage of this design is how easily it can be adapted.
Baby Boy Blanket
Use royal blue, denim blue, baby blue, white, and pale grey.
Coastal Blanket
Try navy, turquoise, seafoam, pale aqua, and cream.
Pastel Version
Use baby blue, lavender, mint, blush pink, and ivory.
Neutral Version
Try cream, oatmeal, beige, taupe, and warm grey.
Rainbow Version
Use a different colour every two textured rows and finish with a neutral border.
The same stitch pattern can look completely different simply by changing the palette.
Making a Larger Blanket
Because the pattern is based on a simple multiple, resizing is straightforward.
Make your starting chain until it reaches approximately the desired width while keeping the multiple of 4 + 2.
Then crochet the established pattern until the blanket reaches your preferred length.
For example, a generous sofa throw could measure approximately:
127 × 152 cm / 50 × 60 inches
A larger bed blanket might measure:
152 × 183 cm / 60 × 72 inches
The exact number of starting chains depends on your gauge, yarn, and hook, so measuring your foundation chain is more reliable than using one fixed chain count for every crocheter.
Tips for a Professional Finish
Keep your tension consistent throughout the project. If the clusters become tighter or looser as you crochet, the blanket can develop uneven sections.
When changing colours, leave yarn tails long enough to weave securely into the fabric.
Weave each tail back and forth through several stitches with a yarn needle.
Avoid simply cutting tails close to the fabric after making a knot, especially for a blanket that will be washed frequently.
Once finished, gently block the blanket according to the care instructions for your yarn.
Blocking helps straighten the edges, relax the textured stitches, and give the finished blanket a more polished appearance.
Washing and Care
Always follow the yarn manufacturer’s care instructions.
For washable acrylic yarn, a gentle machine wash is often suitable. Use cool or lukewarm water and a mild detergent.
Avoid excessive heat because some synthetic fibres can lose their texture when exposed to high temperatures.
Lay the blanket flat or tumble dry only if the yarn label specifically allows it.
Cotton blankets may become heavier when wet, so reshape them carefully while drying.
Why This Pattern Works So Well
The combination of simple single crochet rows and raised cluster rows creates a fabric that looks more complicated than it actually is.
The clusters catch the light and make each colour change more noticeable, while the plain rows stabilise the fabric.
Using several shades from the same colour family also makes the finished blanket feel coordinated even when the stripe sequence is irregular.
The design is repetitive enough for relaxing crochet sessions, but the colour changes keep the project interesting.
Quick Pattern Repeat
Once you’ve completed the foundation, the main construction is simply:
Row A: Sc and textured clusters across.
Row B: Sc evenly across.
Repeat Rows A–B, changing colours every 2–6 rows.
Continue until the blanket reaches the desired length, then finish with two rounds of single crochet in deep blue.
The finished blanket should have a soft, dimensional surface with layered blue, white, and icy-blue stripes, framed by a neat darker blue border.

