

 soofha
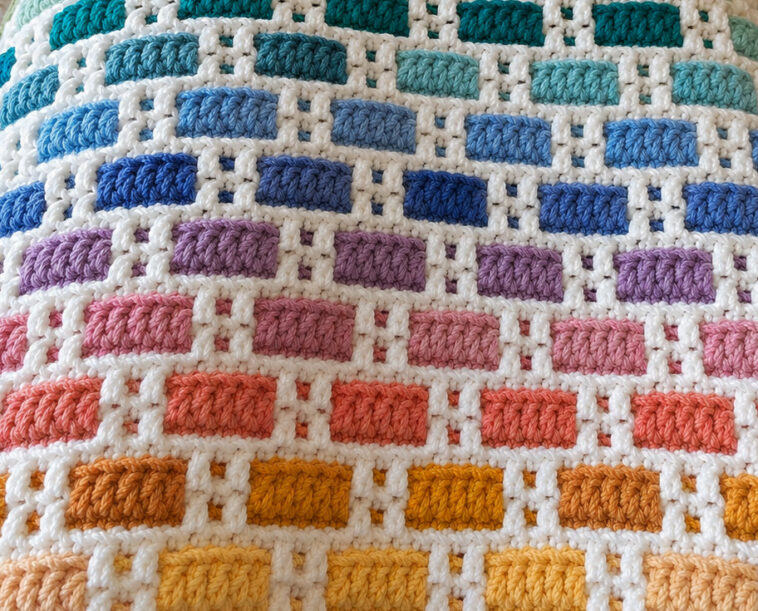
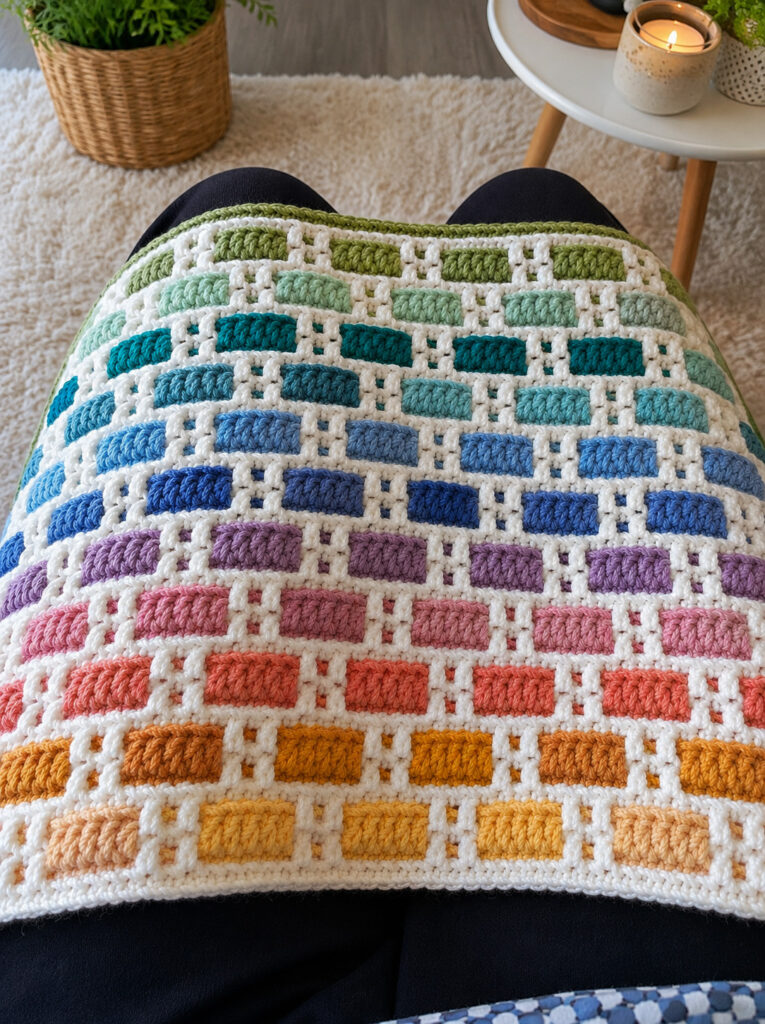
The Crochet Brick Stitch Blanket is a beautiful project for crocheters who love texture, clean geometric lines, and lots of color. The design looks like rows of colorful crochet bricks separated by a contrasting white or cream framework, creating the appearance of a cheerful woven brick wall.
The sample shown uses a soft rainbow palette that moves from greens and aqua through blues, purples, pinks, coral, orange, and golden yellow. You can easily customize the colors to match any room or season.
This blanket is also a wonderful stash-busting project because each colorful brick can be made from a small amount of yarn.
About the Brick Stitch
The main feature of this blanket is the rectangular blocks of solid crochet stitches. They are positioned between open spaces and contrasting stitches, which create the little “mortar” lines around each brick.
The stitch pattern is particularly effective when you use:
- One light color for the background
- Several contrasting colors for the bricks
- A consistent stitch height
- Simple repeating rows
The result is a blanket that looks complicated but is actually made with straightforward crochet techniques.
Finished Size
The pattern can be easily adjusted to make almost any size.
For a blanket similar to the one pictured, try approximately:
- Width: 40–45 inches
- Length: 55–65 inches
For a baby blanket, reduce the starting chain. For a larger throw, simply add more repeats.
Materials
- Worsted-weight yarn in approximately 8–12 colors
- White or cream worsted-weight yarn for the contrasting sections
- 5.0 mm crochet hook
- Yarn needle
- Scissors
- Measuring tape
The exact amount of yarn depends on the finished size and how many colors you use.
Crochet Abbreviations
US crochet terminology:
- ch – chain
- sc – single crochet
- hdc – half double crochet
- dc – double crochet
- sl st – slip stitch
- st/sts – stitch/stitches
- sk – skip
- rep – repeat
Gauge
Gauge is not especially critical for this blanket, but it is important to keep your tension reasonably consistent.
Make a small swatch before beginning. If your fabric feels too stiff, move up one hook size. If it feels too loose, move down one hook size.
Choosing Your Colors
The color arrangement is one of the most enjoyable parts of this pattern.
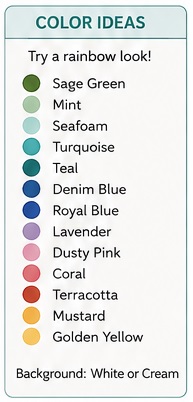
For a rainbow-inspired blanket like the sample, you could use:
- Sage green
- Soft olive
- Mint
- Seafoam
- Turquoise
- Teal
- Denim blue
- Sky blue
- Royal blue
- Lavender
- Dusty pink
- Rose
- Coral
- Terracotta
- Mustard
- Golden yellow
- Cream
Use white, ivory, or another neutral shade for the brick framework.
Tip for a More Modern Look
Instead of using many colors, choose four or five shades and repeat them throughout the blanket. For example:
Cream + sage + dusty blue + mauve + terracotta
This gives the same brick effect with a more coordinated palette.
Crochet Brick Stitch Blanket Pattern
This pattern is designed around repeating rows of solid rectangular blocks separated by contrasting spaces.
The exact number of repeats can be changed to make the blanket wider or narrower.
Foundation Chain
Chain a multiple of the chosen repeat plus the stitches required for your border.
For a practical starting point, chain approximately 121 stitches for a medium-width throw.
Adjust the chain length if you want a different finished width.
Row 1 – Foundation
With your background color, work sc across the foundation chain.
Ch 1 and turn.
Row 2 – Background Row
Sc across the entire row.
Ch 1 and turn.
This establishes a firm foundation for the brick design.
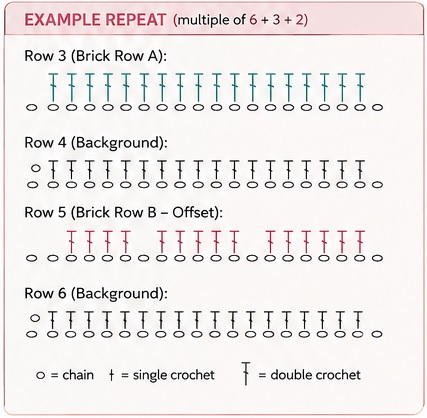
Row 3 – Beginning the Brick Sections
Choose your first brick color.
Work the background stitches until you reach the first brick position.
For each brick section, work a group of stitches in the brick color, followed by a small group of background stitches.
Continue this arrangement across the row.
The important feature is that the colored sections remain separated rather than forming one continuous stripe.
At the end of the row, fasten off the brick color and return to the background yarn where necessary.
Row 4 – Creating the Brick Framework
With the background color, work across the row.
Around each colored block, maintain the small gaps that visually separate one brick from another.
These contrasting stitches create the characteristic mortar effect.
Keep your tension even so that the brick sections remain rectangular instead of becoming too wide or narrow.
Row 5 – Offset the Bricks
The next colorful row should be offset from the previous brick row.
Instead of placing each brick directly above the brick underneath, shift the blocks so that they resemble traditional brickwork.
This alternating arrangement is what gives the blanket its distinctive appearance.
Work your chosen brick color into each designated block and use the background color between them.
Row 6 – Background
Return to the cream or white yarn.
Work the background stitches across the row, maintaining the spaces between the colored blocks.
Keep the edges straight.
Rows 7–10 – Repeat the Motif
Continue repeating the brick sequence.
The basic rhythm is:
Colorful brick row → background row → offset colorful brick row → background row
Repeat this sequence throughout the blanket.
Change your brick color whenever you want.
For a rainbow blanket, you can gradually transition through the color palette from green at the top to yellow and orange toward the bottom.
How to Make the Bricks Look Even
The most important part of this project is maintaining consistent tension.
Try to make every colored rectangle approximately the same width and height.
If one section becomes noticeably larger than the others, check your stitch count before continuing.
A useful trick is to count the stitches in the first few bricks and use that number consistently throughout the project.
Color Changes
There are several ways to handle the many color changes.
Option 1: Cut the Yarn
This gives the cleanest color arrangement.
When a brick section is finished:
- Complete the final stitch.
- Cut the yarn.
- Leave a tail for weaving.
- Attach the next color where needed.
- Continue crocheting.
This creates more ends but produces neat individual color blocks.
Option 2: Carry the Background Yarn
If the same background color is needed again very soon, you can carry it along the edge or behind the work.
Be careful not to carry yarn across large open sections because it may show through the spaces.
Option 3: Use Separate Small Balls
For a highly colorful blanket, using small balls or bobbins for individual brick sections can make color management easier.
This is particularly useful when several different colors appear within the same row.
Creating the Rainbow Arrangement
To reproduce the cheerful look of the pictured blanket, arrange your colors gradually.
A possible sequence is:
Green → Mint → Aqua → Teal → Blue → Royal Blue → Lavender → Pink → Coral → Orange → Mustard → Golden Yellow
You don’t have to follow this exact order.
The beauty of this blanket is that almost any combination works because the cream background separates the colors.
Straight Edges
After every few rows, lay your blanket flat and check the edges.
If the sides begin to ripple, you may be adding too many stitches.
If the blanket begins narrowing, you may be accidentally skipping stitches.
Counting the first and last stitches of every row is especially helpful.
Adding a Simple Border
Once the blanket reaches your desired length, finish with a clean contrasting border.
Border Round 1
With the background color, join the yarn at one corner.
Work sc evenly around the entire blanket.
At each corner, work:
sc, ch 2, sc
This creates a neat corner.
Join with a sl st.
Border Round 2
Ch 1.
Work sc around the blanket.
At each corner, work:
sc, ch 2, sc
Join with a slip stitch.
Repeat another round if you want a wider border.
For the blanket shown, a simple cream or white border keeps attention on the colorful brick pattern.
Finishing
When the blanket has reached the desired size:
- Fasten off.
- Cut the yarn.
- Thread the yarn needle.
- Weave all loose ends securely into the back of the blanket.
- Trim excess yarn.
- Gently block the blanket if necessary.
Blocking can help straighten the edges and make the brick shapes look more uniform.
Blocking Your Crochet Blanket
To block the finished blanket, lightly dampen it and lay it flat on a clean surface.
Gently stretch the blanket until the edges are straight and the individual blocks look even.
Do not pull aggressively. Crochet fabric can stretch considerably when wet.
Allow the blanket to dry completely before moving it.
Tips for Making the Perfect Crochet Brick Stitch Blanket
Keep the Background Color Consistent
A single neutral shade makes the colorful bricks stand out beautifully.
Don’t Worry About Using Exact Colors
This pattern is perfect for using leftover yarn. Similar shades can be mixed together to create a more handmade, eclectic appearance.
Make a Small Sample First
Before committing to a full blanket, crochet a small section. This lets you check the stitch arrangement, color balance, and overall texture.
Count Your Bricks
Keeping the same number of stitches in each block makes the finished blanket look polished.
Alternate the Brick Placement
Offsetting successive rows is what creates the classic brick-wall effect.
Ideas for Customizing the Pattern
Baby Blanket
Choose soft pastel shades such as:
- Pale pink
- Baby blue
- Mint
- Butter yellow
- Lavender
- Cream
A finished size of approximately 30 × 36 inches makes a lovely baby blanket.
Modern Throw
Try:
Cream + charcoal + sage + rust + dusty blue
This combination creates a sophisticated home-decor blanket.
Coastal Blanket
Use:
White + aqua + turquoise + seafoam + denim
The result has a fresh beach-inspired appearance.
Autumn Brick Blanket
Try:
Cream + mustard + rust + burnt orange + olive + brown
This palette is especially cozy for fall.
Frequently Asked Questions
Is the Crochet Brick Stitch Blanket suitable for beginners?
Yes. The overall design looks intricate, but it relies on basic crochet stitches. The biggest challenge is keeping track of the color changes and maintaining consistent stitch counts.
Can I make this blanket larger?
Absolutely. Increase the foundation chain for a wider blanket and continue the repeating rows until you reach your preferred length.
Can I use acrylic yarn?
Yes. Worsted-weight acrylic is an excellent choice because it is affordable, washable, durable, and available in many colors.
Can I use cotton yarn?
Yes, although cotton tends to produce a heavier blanket. It can be especially nice for smaller throws and summer blankets.
Do I have to use white for the background?
No. Cream, beige, gray, black, navy, or any contrasting color can be used.
Can I use leftover yarn?
Definitely. This is one of the best features of the design. The individual bricks are ideal for using small amounts of leftover yarn.
Final Thoughts
The Crochet Brick Stitch Blanket is a fun combination of texture, color, and simple geometric design. The contrasting background gives each colorful rectangle a defined shape, while the offset arrangement creates the familiar look of brickwork.
It is a great project for experimenting with color. You can create a bright rainbow blanket like the pictured design, choose a calm neutral palette, or use your favorite scraps for a completely unique version.
Whether you make a small baby blanket, a cozy sofa throw, or a large bed-sized blanket, the repeating brick motif makes this pattern satisfying to crochet row after row.
Save this Crochet Brick Stitch Blanket pattern for your next colorful crochet project and experiment with your own favorite color combinations!


This is a beautiful blanket, but the written pattern is far to general. What stitches are used? How many of each stitch per brick section? Are color changes within the row necessary or is this done more like overlay mosaic crochet?