

 soofha
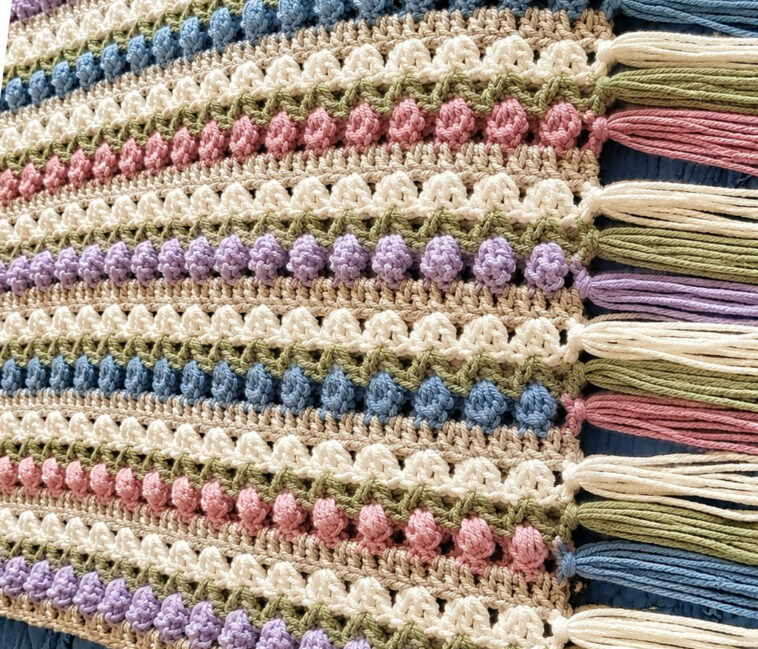
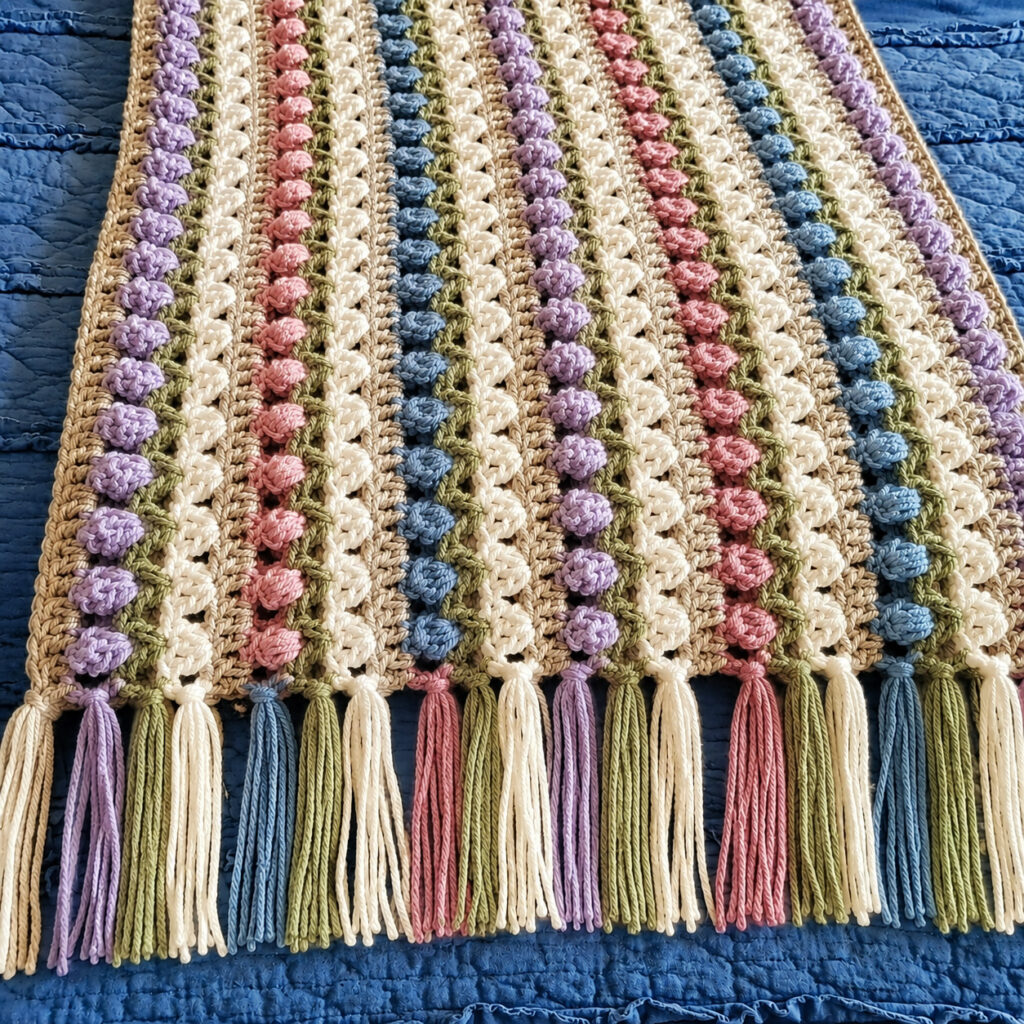
Bring a soft garden-inspired look to your bedroom with this beautiful Flower Shop Bed Runner Crochet Pattern. This design features rows of raised, textured flower-like stitches framed by delicate green stems and a neutral background. Pastel lavender, dusty pink, soft blue, sage green, cream, and beige create a vintage cottage-style color palette that looks especially beautiful against darker bedding.
The long vertical arrangement of the flowers makes this project ideal as a bed runner, table runner, dresser runner, or decorative throw.
Pattern note: The instructions below are an original construction guide inspired by the stitch appearance in the supplied photo. The image does not provide enough information to determine the exact original pattern, so this is not claimed to be the designer’s original written pattern.
Finished Design
The Flower Shop Bed Runner is constructed as a long rectangular crochet panel worked from one short end to the other. The textured flower motifs are arranged in vertical columns, giving the finished piece the appearance of a little flower garden.
The main body combines:
- Raised flower/puff motifs
- Green textured connecting stitches resembling stems
- Cream and beige background rows
- Repeating pastel flower colors
- Long decorative tassel fringe along the short end
The raised flowers give the runner a wonderfully tactile finish, while the neutral background prevents the pastel colors from becoming overwhelming.
Materials
Yarn
Choose a smooth worsted-weight or aran-weight yarn.
A similar palette to the photograph would be:
- Cream – main background
- Warm beige/taupe – secondary background
- Sage green – stems and leaves
- Soft lavender – flowers
- Dusty pink – flowers
- Muted blue – flowers
You can use approximately 6 colors, or simplify the design to 4 colors for a more coordinated bedroom accessory.
The exact amount of yarn depends on the finished dimensions, yarn weight, hook size, and tension.
Crochet Hook
Use the hook recommended for your yarn. For worsted/aran yarn, approximately 5.0 mm (H-8) is a good starting point.
Make a small swatch before beginning because the runner should have enough structure to lie flat.
Other Supplies
- Scissors
- Yarn needle
- Measuring tape
- Stitch markers
- Optional fringe comb or wide-tooth comb for preparing tassels
Crochet Abbreviations – US Terms
- ch – chain
- sc – single crochet
- hdc – half double crochet
- dc – double crochet
- sl st – slip stitch
- st/sts – stitch/stitches
- sk – skip
- rep – repeat
- yo – yarn over
- FO – fasten off
- beg – beginning
- puff – puff stitch
- pc – popcorn stitch
Special Textured Flower Stitch
The raised flowers in the photo have a three-dimensional appearance similar to puff or popcorn-style flower motifs.
For a beginner-friendly version, use the following puff flower:
Puff Flower:
- Yarn over and insert your hook into the indicated stitch or space.
- Pull up a loop.
- Repeat this several times in the same location until you have a full, fluffy group on the hook.
- Yarn over and pull through the loops to close the puff.
- Ch 1 to secure.
Do not pull the closing chain excessively tight. A relaxed stitch produces a fuller flower.
For an even more pronounced flower, substitute a popcorn stitch. A standard popcorn construction uses several double crochets worked into the same stitch before pulling the working loop through the first stitch of the group. This is a recognized method for producing raised crochet texture.
How to Make the Flower Shop Bed Runner
Step 1: Make a Foundation Chain
Decide how wide you want your runner to be.
For a sample runner approximately 16–18 inches wide, make a foundation chain using a stitch multiple that fits your chosen flower repeat.
A practical starting point is:
Ch 67
This is only a sample size. Adjust the foundation chain to your desired width while maintaining the repeat.
Remember that yarn thickness and personal tension can significantly change the finished width.
Step 2: Establish the Background
Work your first row in cream.
Sc across the foundation chain, keeping your tension relaxed and even.
Ch 1 and turn.
Continue with several rows of the background stitch before introducing the first flower columns.
For a subtle textured background, alternate rows of sc and hdc.
The purpose of the background is to create a firm surface from which the raised flowers can stand out.
Step 3: Create the Green Flower Stems
The green sections are what give this runner its garden-like appearance.
Work narrow vertical textured sections in sage green.
For each flower column, place the flower motifs along approximately the same vertical line.
A simple arrangement can be:
Green stem → flower → green stem → flower → green stem
Keep the spaces between columns consistent.
This creates the impression of flowers growing upward from the bottom of the runner.
Step 4: Add the First Flower
When you reach the position of the first flower, work the textured flower stitch into the designated stitch or space.
For example:
[Puff, ch 1]
Repeat the flower motif along the flower column according to the height of your runner.
After completing the flower, return to the background color.
The flower should sit slightly forward from the surrounding stitches.
Step 5: Alternate the Flower Colors
The pictured design looks especially attractive because the flowers are not all the same color.
Try this repeating sequence:
Lavender → Pink → Blue → Lavender → Pink → Blue
For the next flower column, shift the order:
Pink → Blue → Lavender → Pink → Blue → Lavender
This staggered arrangement prevents the runner from looking overly symmetrical.
Step 6: Work the Cream Background
Return to cream and continue the background stitches around the textured flower columns.
When working around raised stitches, avoid pulling your yarn tightly.
If the fabric starts to curl or contract, your tension is probably too tight.
The finished fabric should remain relatively flat.
Step 7: Add the Beige Texture
Introduce warm beige or taupe between selected flower columns.
The beige sections help separate the cream areas and make the pastel flowers more visible.
A possible repeat is:
Cream | Flower Column | Beige | Flower Column | Cream
Continue repeating this arrangement across the width.
Step 8: Repeat the Flower Columns
Continue working the same arrangement until the runner reaches your desired length.
For a standard bed runner, you might aim for approximately:
16–20 inches wide × 60–80 inches long
For a king-size bed, increase the width and length according to the dimensions of your mattress.
The most important measurement is the finished width across the bed rather than following a fixed stitch count.
Suggested Color Layout
For a look similar to the photograph, use this arrangement:
| Section | Suggested Color |
|---|---|
| Main background | Cream |
| Secondary background | Warm beige |
| Flower stems | Sage green |
| Flower 1 | Lavender |
| Flower 2 | Dusty pink |
| Flower 3 | Soft blue |
| Flower 4 | Lavender |
| Flower 5 | Dusty pink |
| Flower 6 | Soft blue |
| Fringe | Matching flower and background colors |
The combination of sage, cream, lavender, pink, and blue creates a soft English cottage garden effect.
Creating the Decorative Tassel Fringe
The long tassels are one of the most distinctive details of this bed runner.
You can make the fringe using the same colors found in the flower columns.
To Make One Tassel
- Cut several strands of yarn approximately 12–16 inches long.
- Fold the strands in half.
- Insert a crochet hook through the edge stitch.
- Pull the folded center through the stitch, creating a small loop.
- Pull the loose ends through the loop.
- Tighten gently.
- Repeat along the edge.
Trim all tassels to approximately the same length.
For a more colorful effect, combine:
- 2 cream strands
- 2 sage strands
- 2 lavender strands
or make each tassel entirely one color.
Tassel Placement
Attach one tassel to approximately every 2–4 stitches, depending on the density you prefer.
For the look shown in the photograph, use fairly dense fringe so the tassels form a full decorative border.
Finishing the Runner
When you reach the final row:
- Fasten off.
- Leave a yarn tail.
- Thread the tail onto a yarn needle.
- Weave it securely through the back of the stitches.
- Trim the excess.
- Check the entire runner for loose ends.
- Add the tassels.
- Gently straighten the flower motifs with your fingers.
Avoid pulling the flowers flat because the raised texture is an important part of the design.
Blocking
Blocking can dramatically improve the appearance of a long crochet runner.
Lightly dampen the finished piece and place it on a clean, flat surface.
Gently stretch the runner into a rectangle.
Pay particular attention to:
- Straight side edges
- Even width
- Straight flower columns
- Flat background sections
- Uniform fringe
Allow it to dry completely before moving it.
If your yarn is acrylic, use caution with heat and steam. A gentle wet block is generally the safer starting point.
How to Make the Flowers More Three-Dimensional
If you want flowers that stand out more prominently, increase the number of loops used to build each puff.
You can also:
- Use a slightly larger hook for the flower color.
- Avoid tightening the closing chain.
- Work the flower into a chain space rather than directly into a tight stitch.
- Use a slightly thicker yarn for the flower motifs.
The key is to create contrast between the flat background and the raised flowers.
Beginner Tips
Keep Your Tension Consistent
Textured stitches can use more yarn than ordinary stitches. If your puff stitches are too tight, the runner may become narrower in the flower sections.
Make a Swatch First
Before starting the entire runner, make a small sample containing:
- 2–3 flower motifs
- Several background rows
- One small section of the green stem pattern
Measure the sample before calculating the final foundation chain.
Count Your Flower Columns
Because this is a long project, it is easy to accidentally skip a flower.
Use stitch markers to identify each flower column.
Don’t Worry About Perfectly Identical Flowers
Slight differences in puff size are part of the handmade character of crochet. What matters most is maintaining a consistent overall pattern.
Video Tutorial – Textured Flower Stitch
For learning the raised flower technique, this Popcorn Flower Granny Square tutorial by Hooked by Robin is particularly useful. Although it is demonstrated as a granny square rather than a bed runner, it clearly shows how to create the raised popcorn flower texture and how the flower motif can be incorporated into larger blankets.
How to Crochet a Popcorn Flower Granny Square – Hooked by Robin on YouTube
Another useful option is Mi’s Handmade Hobbies’ Popcorn Stitch Flower Granny Square tutorial, which demonstrates the flower motif step by step.
Popcorn Stitch Flower Granny Square | Tutorial – YouTube
These tutorials can be used to learn the textured flower technique and then adapt the motif into the long vertical layout of the Flower Shop Bed Runner.
Ideas for Customizing Your Bed Runner
Soft Romantic Version
Use:
- Blush pink
- Dusty rose
- Cream
- Sage
- Light beige
This creates a delicate romantic bedroom accessory.
Blue Garden Version
Replace the pink and lavender with:
- Powder blue
- Denim blue
- Pale aqua
- Sage
- Cream
Neutral Farmhouse Version
Use:
- Ivory
- Oatmeal
- Taupe
- Olive
- Dusty beige
Keep the flower motifs in a single color for a sophisticated minimalist effect.
Bright Summer Version
For a more cheerful runner, combine:
- Coral
- Golden yellow
- Turquoise
- Leaf green
- White
The same textured flower construction works beautifully with brighter colors.
How to Use the Finished Runner
Although designed as a bed runner, this project can easily become several different home accessories.
Use it as:
- A bed-end runner
- A dresser scarf
- A console table runner
- A dining table centerpiece
- A decorative blanket
- A bench runner
- A nursery accent
- A guest-room decoration
The long shape makes it particularly versatile.
Final Thoughts
The Flower Shop Bed Runner combines simple crochet construction with eye-catching three-dimensional flower texture. The combination of soft pastel flowers, green stems, warm neutral stitches, and long tassels creates a cozy handmade look that works beautifully with cottage, vintage, farmhouse, and romantic bedroom décor.
The best part of this design is that you can easily change the colors without changing the basic construction. Make the flowers all one shade for a sophisticated look, alternate three colors for a cheerful garden effect, or use leftover yarn to create a colorful scrappy version.
Once you master the puff or popcorn flower motif, the same technique can be adapted to blankets, scarves, table runners, cushions, baby blankets, and other crochet home décor projects.

