

 soofha
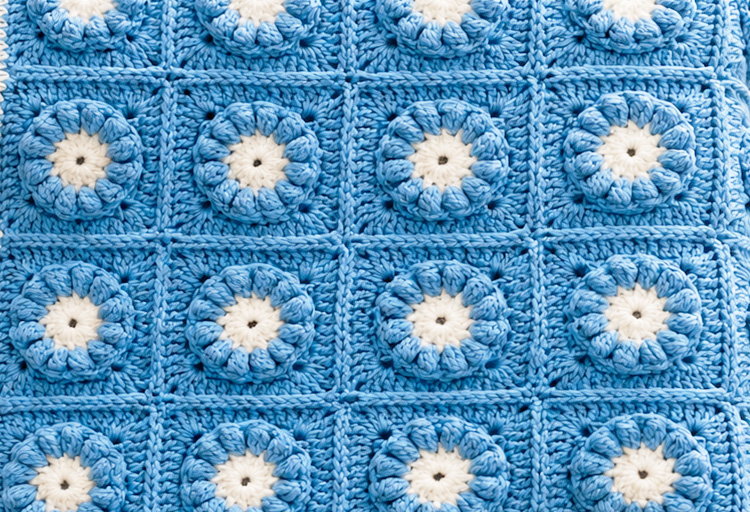
The Puff Flower Granny Square Blanket is a beautiful crochet project that combines classic granny-square construction with soft, dimensional puff-stitch flowers. With its cheerful floral centers, textured petals, and simple square construction, this blanket has a cozy handmade look that works beautifully for bedrooms, nurseries, reading corners, and living rooms.
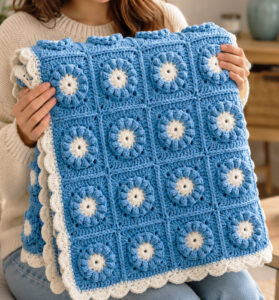
The design shown here uses a lovely combination of soft blue and creamy white, creating a fresh floral appearance without feeling overly complicated. Each square is worked separately and then joined together before a decorative scalloped border is added.
This pattern is also easy to customize. You can use pastel shades for a baby blanket, rich jewel tones for a modern throw, or vintage-inspired colors for a traditional crochet look.
Puff Flower Granny Square Blanket at a Glance
- Skill Level: Easy to Intermediate
- Project Type: Crochet blanket
- Construction: Individual granny squares joined together
- Main Stitch: Puff stitch
- Crochet Terms: US terminology
- Suggested Hook: 4.0 mm (G) crochet hook
- Suggested Yarn: Worsted-weight yarn (#4)
- Main Colors: Blue and cream/white
- Finished Size: Approximately 40 × 40 inches for a 4 × 4 arrangement
- Pattern Style: Floral, textured, cozy, vintage-inspired
The final size can easily be changed by making more or fewer squares.
Materials You Will Need
Yarn
For a blanket similar to the sample, choose a soft worsted-weight acrylic or acrylic/wool blend.
You will need:
- Color A – Cream/White: for flower centers and edging
- Color B – Blue: for flower petals and square background
- Approximately 1,500–2,000 yards total, depending on the finished size and tension
The exact amount will vary according to your yarn brand, hook size, gauge, and number of squares.
Crochet Hook
- 4.0 mm (G) crochet hook
- Optional smaller hook for weaving in ends
Other Supplies
- Yarn needle
- Scissors
- Stitch markers
- Measuring tape
- Blocking mats and pins, optional
Crochet Abbreviations
The pattern uses standard US crochet terminology.
| Abbreviation | Meaning |
|---|---|
| ch | Chain |
| sl st | Slip stitch |
| sc | Single crochet |
| hdc | Half double crochet |
| dc | Double crochet |
| st | Stitch |
| sts | Stitches |
| sp | Space |
| rep | Repeat |
| rnd | Round |
| puff | Puff stitch |
What Is a Puff Stitch?
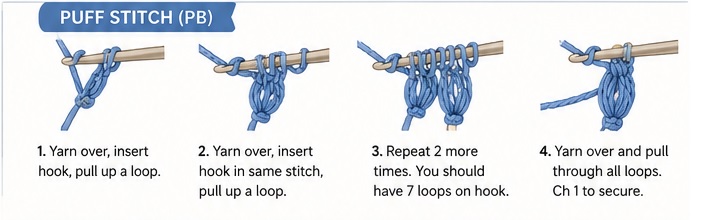
A puff stitch is a textured crochet stitch created by partially working several loops into the same stitch or space and then closing them together.
For this pattern, the puff stitch forms the rounded petals surrounding the flower center.
Basic Puff Stitch
- Yarn over and insert your hook into the indicated stitch or space.
- Pull up a loop to the height of the current stitch.
- Repeat this process several times in the same location.
- You should have several loops on your hook.
- Yarn over and pull through all the loops.
- Chain 1 to secure the puff.
Keep your tension relaxed while making the puff. If you crochet too tightly, it can become difficult to pull the yarn through all the loops.
How to Crochet the Puff Flower Granny Square
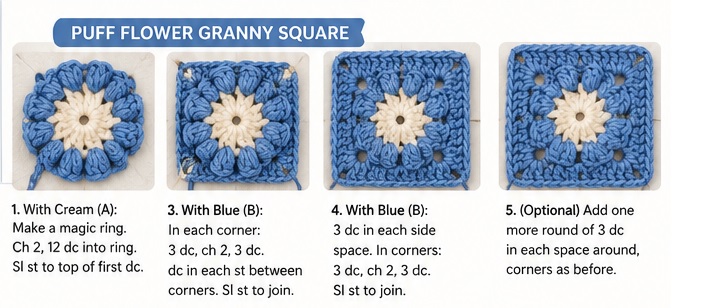
Each flower square is made in several rounds.
The center is worked in cream, followed by blue puff-stitch petals. Additional blue rounds transform the flower into a square.
Round 1 – Cream Flower Center
With Color A, make a magic ring.
Alternatively, chain 4 and join with a slip stitch to form a ring.
Work:
- Ch 2.
- Work 12 dc into the ring.
- Sl st to the top of the first dc.
Fasten off if changing colors.
You should have a small circular flower center.
Tip
Pull the magic ring tightly before weaving in the end. This closes the center and prevents an unwanted hole.
Round 2 – Puff Flower Petals
Join Color B in any stitch.
For each petal:
- Make a puff stitch in the indicated stitch.
- Ch 1.
Repeat around the flower.
You should end with a complete circle of raised blue petals surrounding the cream center.
Join with a slip stitch.
Fasten off or continue with the next round.
Puff Flower Tip
The petals look best when the puff stitches are full and rounded. Avoid pulling the closing loop too tightly.
Round 3 – Building the Square
Continue with Color B.
This round begins turning the circular flower into a square.
Work groups of stitches around the flower, creating four evenly spaced corners.
At each corner, work:
3 dc, ch 2, 3 dc
Between corners, work groups of double crochet stitches according to the spacing created by your flower round.
Join with a slip stitch.
Your project should now begin to resemble a small granny square.
Round 4 – Expanding the Granny Square
Continue in blue.
Work traditional granny-square clusters around the entire square.
In each corner space:
3 dc, ch 2, 3 dc
In each side space:
3 dc
Continue around the square and join with a slip stitch.
At this stage, the puff flower should sit prominently in the center of the square while the surrounding stitches create a textured blue frame.
Round 5 – Final Square Round
Work another round of granny-square clusters.
In each corner:
3 dc, ch 2, 3 dc
In each side space:
3 dc
Continue around the square.
Fasten off and weave in the ends.
Your finished square should have a clearly defined floral center and a neat square shape.
Suggested Square Size
For a blanket similar to the one shown, aim for approximately 9–10 inches per completed square.
You can make a small sample square first and measure it before producing all of your squares.
If your square is too small, add another granny-square round.
If your square is too large, use a smaller crochet hook or reduce the number of surrounding rounds.
How Many Squares Do You Need?
One of the easiest things about this pattern is that you can customize the blanket simply by changing the number of squares.
Small Baby Blanket
3 × 4 squares = 12 squares
Approximate size: 27 × 36 inches
Medium Throw
4 × 4 squares = 16 squares
Approximate size: 36 × 36 inches
Large Throw
4 × 5 squares = 20 squares
Approximate size: 36 × 45 inches
Larger Blanket
5 × 6 squares = 30 squares
Approximate size: 45 × 54 inches
Your final measurements will depend on the actual size of your squares.
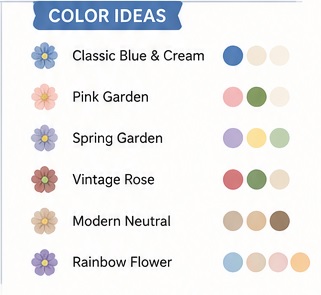
Color Ideas for Your Puff Flower Blanket
The blue and cream combination gives this blanket a clean, classic appearance, but there are countless ways to change the personality of the design.
Classic Blue & Cream
- Cream flower centers
- Medium blue petals
- Blue square background
- Cream edging
This combination closely captures the soft floral look of the inspiration design.
Pink Garden
- White centers
- Dusty pink petals
- Soft sage-green background
- Cream border
Spring Garden
- Yellow centers
- Lavender petals
- Soft green background
- White border
Vintage Rose
- Cream centers
- Rose-pink petals
- Burgundy or muted green background
- Antique cream edging
Modern Neutral
- Beige centers
- Taupe petals
- Warm gray background
- Ivory border
You can also make every flower a different color for a cheerful scrap-yarn blanket.
Joining the Granny Squares
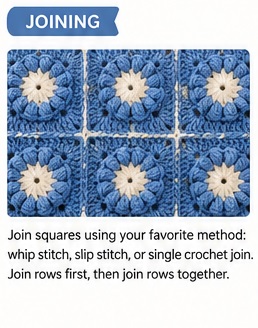
Once all of your squares are complete, arrange them on a flat surface before joining them.
This allows you to experiment with the color placement.
For the pictured style, arrange the squares in straight rows so that the flowers line up evenly.
Option 1 – Whip Stitch Join
Place two squares together with their wrong sides facing each other.
Using a yarn needle and matching yarn, sew through the corresponding stitches along the edge.
Continue across the entire seam.
This method creates a simple and flexible join.
Option 2 – Single Crochet Join
Place two squares together.
Using your chosen joining color, insert the hook through the corresponding stitches of both squares.
Work single crochet across the seam.
This produces a raised ridge between the squares and adds additional texture.
Option 3 – Slip Stitch Join
Place the squares together and work slip stitches through corresponding stitches.
This creates a relatively flat seam and is a good choice when you want the floral squares to remain the main focus.
Joining the Blanket Row by Row
A simple joining method is to connect the squares horizontally first.
For example, with a 4 × 4 blanket:
Row 1: Square 1 + Square 2 + Square 3 + Square 4
Row 2: Square 5 + Square 6 + Square 7 + Square 8
Row 3: Square 9 + Square 10 + Square 11 + Square 12
Row 4: Square 13 + Square 14 + Square 15 + Square 16
Join each row.
Then join the completed rows together.
This method makes it much easier to keep the blanket straight.
Crochet Border
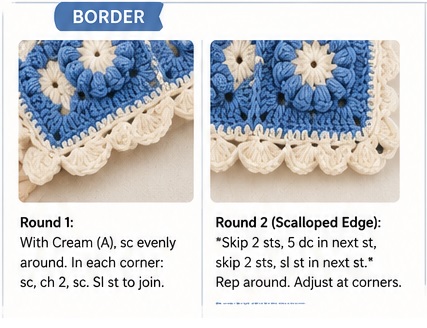
The cream border is what gives this blanket its polished, finished appearance.
After joining all of the squares, attach Color A – Cream at one corner.
Border Round 1
Work single crochet evenly around the entire blanket.
At each corner, work:
sc, ch 2, sc
This helps the corners remain square and prevents the blanket from curling.
Join with a slip stitch.
Decorative Scalloped Border
For a feminine finish similar to the pictured blanket, add a simple scalloped or shell-style edge.
Join cream yarn at a corner.
A simple version is:
Skip 2 stitches, work 5 dc in the next stitch, skip 2 stitches, sl st in the next stitch.
Repeat around the blanket.
At corners, adjust the spacing slightly so that the border lies flat.
The finished edge should create a series of soft, rounded scallops around the blanket.
Important
The number of stitches along your blanket edge may not divide perfectly for the scallop repeat.
That is completely normal.
Simply adjust the skipped stitches occasionally so the final border lies flat without pulling or ruffling excessively.
Blocking Your Crochet Squares
Blocking is optional, but it can make a noticeable difference with granny squares.
Before joining, lightly dampen each square and place it on a blocking mat.
Gently stretch the square until the corners are straight and the measurements are consistent.
Pin the corners in place and allow the square to dry completely.
Why Block the Squares?
Blocking can:
- Improve the shape
- Straighten uneven edges
- Make squares more uniform
- Improve the appearance of joins
- Help the finished blanket lie flatter
Avoid stretching aggressively, especially when working with acrylic yarn.
Tips for Perfect Puff Flower Squares
Keep Your Tension Consistent
The most important thing is consistency.
If some squares are noticeably larger than others, joining them can become difficult.
Make One Complete Sample First
Before making 16, 20, or 30 squares, finish one complete square with the border or joining method you plan to use.
Measure it.
This gives you a much better idea of the final blanket size.
Count Your Petals
Make sure every flower has the same number of puff petals.
A missing puff can make one flower look different from the others.
Secure Your Ends Carefully
Puff stitches and granny-square construction create many yarn tails.
Weave each end securely through several stitches before trimming.
Alternate Your Colors
If you’re making a multicolored blanket, photograph or sketch your square arrangement before joining.
This makes it much easier to recreate your preferred layout.
Common Crochet Problems and Solutions
Why Are My Puff Flowers Too Flat?
Your puff stitches may not have enough loops or may be closed too tightly.
Try pulling each loop up to the height of the surrounding stitches before closing the puff.
Why Is My Granny Square Curling?
Your tension may be too tight, or you may not have enough stitches in the round.
Try moving up half a hook size and check that each corner contains the required increase.
Why Is My Blanket Wavy?
A wavy blanket often means that too many stitches have been added.
Check your stitch count and make sure you aren’t accidentally working extra stitches between clusters.
Why Won’t My Corners Stay Square?
Make sure each corner contains a clear corner space, such as:
3 dc, ch 2, 3 dc
The chain-2 space creates the room needed for the next round to turn the corner.
How to Customize the Blanket
The pattern can easily be adapted to different sizes.
For a baby blanket, use fewer squares and soft pastel yarn.
For a lap blanket, make a rectangular arrangement such as 3 × 4 or 4 × 5 squares.
For a large bed blanket, continue adding rows and columns until you reach your desired dimensions.
You can also make each square larger by adding additional granny-square rounds around the puff flower.
Washing and Care
Always follow the care instructions for your particular yarn.
If using washable acrylic yarn, the completed blanket can generally be machine washed on a gentle cycle.
For best results:
- Wash with similar colors.
- Use cool or lukewarm water.
- Avoid harsh detergents.
- Do not wring the blanket.
- Reshape while damp.
- Lay flat to dry when possible.
Because the puff flowers create extra texture, laying the blanket flat can help preserve its shape.
Puff Flower Granny Square Blanket – Quick Pattern Summary
Flower Center:
Cream yarn + dc stitches
Flower Petals:
Blue yarn + puff stitches
Square Construction:
Blue granny-square rounds
Joining:
Whip stitch, slip stitch, or single crochet
Border:
Cream single crochet followed by a scalloped edge
Suggested Layout:
4 × 4 squares for a medium throw
Frequently Asked Questions
Is this Puff Flower Granny Square Blanket beginner-friendly?
Yes. If you already know how to make a basic granny square, the main new technique is the puff stitch. Beginners may want to practice a few puff stitches separately before starting the blanket.
Can I use a different yarn weight?
Yes. However, changing yarn weight will change the size and appearance of the squares. Make a gauge sample before committing to the full blanket.
Can I make the flowers different colors?
Absolutely. This is one of the best ways to personalize the pattern. Use one color for every flower or make each flower a different shade.
Do I have to block the squares?
No. Blocking is optional, but it is especially useful when your squares are slightly different sizes or the edges aren’t perfectly straight.
Can I make a larger blanket?
Yes. Simply increase the number of squares or add additional rounds to each square.
Can I use this pattern for a baby blanket?
Definitely. Choose soft washable yarn and gentle colors such as cream, pale blue, blush pink, lavender, mint, or butter yellow.
Final Thoughts
The Puff Flower Granny Square Blanket is a wonderful project for crocheters who love traditional motifs with a little extra texture. The combination of dimensional puff-stitch petals, classic granny-square construction, and a delicate scalloped border creates a blanket that looks intricate while still being made from manageable individual pieces.
The blue-and-cream color combination gives the blanket a fresh, cozy appearance, but don’t be afraid to experiment. A rainbow of flowers, soft pastels, earthy neutrals, or vintage shades can completely transform the finished design.
Make a few squares for a cushion or baby blanket, or continue building them into a large throw that can become a treasured handmade piece for years to come.
Save this Puff Flower Granny Square Blanket pattern to your crochet inspiration board and come back to it whenever you’re ready for your next cozy project!

