

 soofha
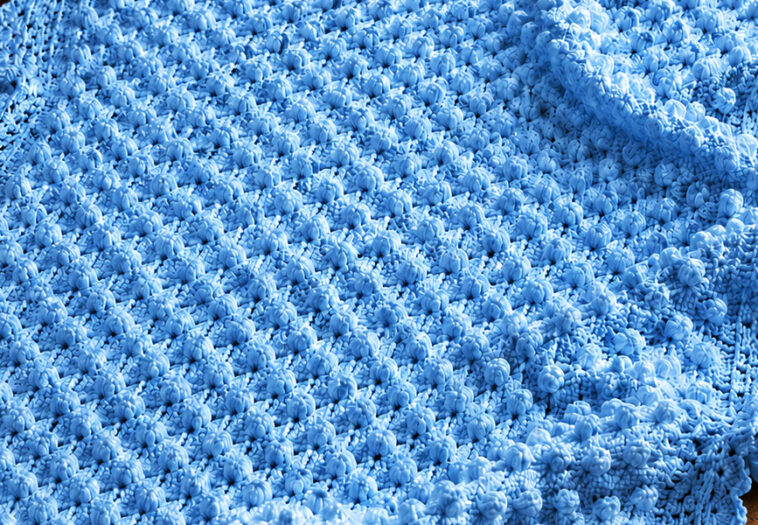
If you love crochet blankets with a soft, dimensional texture, the Textured Puff Stitch Crochet Blanket is a beautiful project to add to your handmade collection. This blanket features rows of closely worked puff stitches that create a wonderfully plush, almost floral-looking surface. The raised texture gives the finished blanket warmth and character while keeping the overall design simple enough to enjoy row after row.
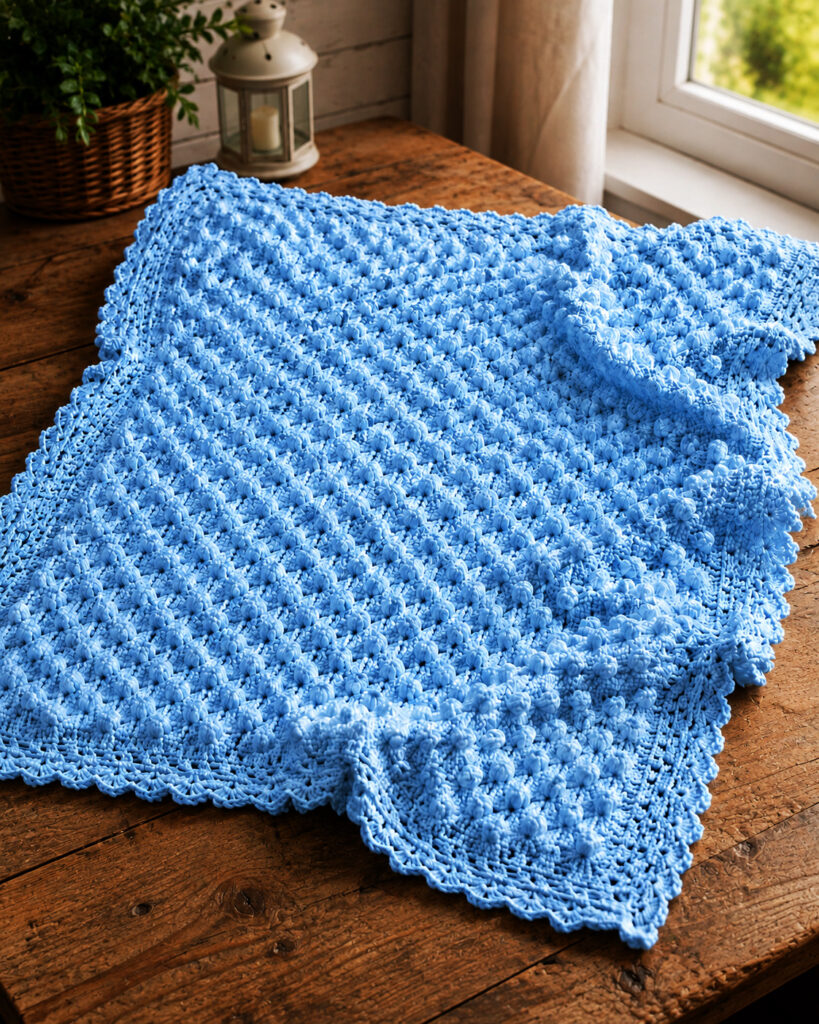
Worked in a soft light-blue yarn, this blanket has a calm, timeless appearance that would look lovely in a nursery, bedroom, reading corner, or cozy living room. You can also easily change the yarn color to match any home décor.
Why You’ll Love This Blanket
The textured puff stitch creates more than just visual interest—it gives the blanket a soft, cushioned feel.
Here are a few reasons to make it:
- Beautiful three-dimensional texture
- Cozy and warm without requiring a complicated colorwork technique
- Perfect for baby blankets, lap blankets, and throws
- Easy to customize in size
- Works beautifully in solid colors
- Great project for practicing puff stitches
- Makes a thoughtful handmade gift
- Attractive texture on both sides, although one side will show the puff definition more prominently
Materials
For a medium-size throw approximately 45 × 55 inches, you will need:
- Worsted-weight yarn, approximately 1,800–2,200 yards
- 5.0 mm crochet hook
- Yarn needle
- Scissors
- Stitch markers, optional
- Measuring tape
For the sample-style blanket, a soft light-blue shade gives the stitch pattern a delicate and relaxing appearance.
Yarn Choice
Choose a yarn with good stitch definition so the puff stitches remain visible.
Good options include:
- Acrylic
- Acrylic/wool blends
- Cotton/acrylic blends
- Soft washable wool blends
For a baby blanket, select yarn that is soft, washable, and comfortable against delicate skin.
Finished Size
The pattern below is written as a flexible blanket design rather than a fixed-size project.
A useful starting size is approximately:
45 × 55 inches (114 × 140 cm)
You can make the blanket smaller or larger by adjusting the starting chain.
The most important point is to keep your starting chain consistent with the stitch repeat.
Crochet Abbreviations
US crochet terminology:
- ch – chain
- sc – single crochet
- dc – double crochet
- sl st – slip stitch
- st – stitch
- sts – stitches
- yo – yarn over
- rep – repeat
- puff – puff stitch
- RS – right side
- WS – wrong side
Understanding the Puff Stitch
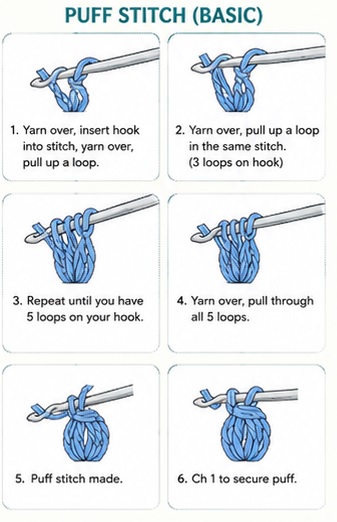
The puff stitch is made by working several partial double-crochet-style loops into the same stitch and then pulling them together at the top.
For this blanket, the puff should be full and rounded but not pulled excessively tight.
Basic Puff Stitch
- Yarn over and insert the hook into the indicated stitch.
- Yarn over and pull up a loop.
- Repeat the yarn-over and pull-up process several times in the same stitch.
- When you have the desired number of loops on your hook, yarn over.
- Pull through all the loops.
- Chain 1 to secure the puff.
The exact height of the puff can be adjusted according to your yarn and tension.
Tip: Keep your loops tall and loose. If you make them too short, the puff will look flat rather than rounded.
Textured Puff Stitch Blanket Pattern
Foundation Chain
Chain a number of stitches that gives you the desired blanket width and works with your chosen stitch repeat.
For an approximately 45-inch-wide blanket, you can begin with around 150 chains, depending on your yarn weight and tension.
Do not worry if your stitch count differs from this example. The easiest way to customize the blanket is to make a small swatch first and determine how many stitches you need for your preferred width.
Row 1
Work 1 sc in the second ch from the hook and in each chain across.
Turn.
Row 2
Chain 1.
Work 1 sc in the first stitch.
Work a puff stitch in the next stitch.
Continue across the row, alternating single crochet stitches and puff stitches.
Work 1 sc in the final stitch.
Turn.
Row 3
Chain 1.
Work 1 sc in each stitch across.
Turn.
Row 4
Chain 1.
Work 1 sc in the first stitch.
Work a puff stitch in the next stitch.
Continue the established pattern across the row.
Finish with a single crochet.
Turn.
Row 5
Chain 1.
Work 1 sc in each stitch across.
Turn.
Main Pattern Repeat
Continue repeating the textured sequence:
Puff Stitch Row:
Single crochet, puff stitch across the row, maintaining the established spacing.
Texture-Setting Row:
Single crochet across.
Repeat these two rows until the blanket reaches your desired length.
The alternating rows allow the puff stitches to sit neatly against the fabric while creating the dense, highly textured appearance shown in the finished blanket.
Important Tension Tip
Puff stitches consume more yarn than ordinary single crochet stitches. They also tend to pull the fabric inward.
If your blanket begins becoming narrower as you work, check your stitch count at the end of every few rows.
If necessary, use a slightly larger hook or loosen your tension.
Creating a Neat Edge
Once you have reached your desired blanket length, fasten off and weave in the yarn end.
Before adding the border, gently stretch the blanket into shape.
Do not aggressively block a highly textured puff-stitch blanket because excessive stretching can flatten the raised stitches.
Simple Crochet Border
A delicate border works especially well with this design because the center already contains plenty of texture.
Border Round 1
Join yarn in any corner.
Chain 1.
Work single crochet stitches evenly around the entire blanket.
At each corner, work:
sc, ch 2, sc
Continue around the blanket.
Join with a slip stitch to the first single crochet.
Border Round 2
Chain 1.
Work 1 sc in every stitch around.
At each corner, work:
sc, ch 2, sc
Join with a slip stitch.
Fasten off and weave in all ends.
For an appearance closer to the delicate edging shown in the inspiration photo, you can add another decorative round using small shell or picot stitches.
Optional Scalloped Border
For an especially feminine finish, try a simple scalloped edge.
After completing the basic border, work:
Skip 1 stitch, 5 dc in the next stitch, skip 1 stitch, sl st in the next stitch.
Repeat around the blanket.
At the corners, adjust the spacing slightly so the scallops lie flat.
This creates a pretty rounded edge that complements the small puff stitches in the body.
How to Make the Blanket Larger or Smaller
One of the best features of this pattern is how easy it is to customize.
Baby Blanket
Create a smaller foundation chain and work until the blanket measures approximately:
30 × 36 inches
Lap Blanket
Try approximately:
36 × 48 inches
Standard Throw
A comfortable throw size is approximately:
45 × 55 inches
Large Bed Blanket
Increase both the starting chain and the number of pattern repeats to create a larger blanket.
Always make a small swatch first because puff stitches can significantly change the amount of yarn required.
Color Ideas
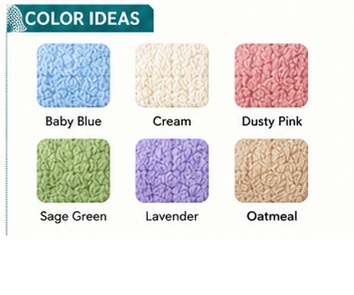
Although the sample looks beautiful in light blue, this stitch pattern works well in many shades.
Soft Baby Blue
A pale blue creates a peaceful, traditional baby blanket.
Cream
Cream gives the blanket a classic neutral appearance and makes the texture particularly noticeable.
Dusty Pink
A muted pink creates a romantic, feminine design.
Sage Green
Sage gives the blanket a modern natural look that works beautifully with farmhouse and Scandinavian-inspired interiors.
Lavender
Soft lavender emphasizes the floral character of the puff stitches.
Oatmeal
An oatmeal or warm beige shade makes a wonderful neutral throw for a living room or bedroom.
Multicolor Version
For a colorful blanket, change colors every few puff-stitch sections. You can use three to five coordinating shades for a soft striped effect.
Tips for Perfect Puff Stitches
Keep Your Loops Consistent
The most important technique is maintaining the same loop height throughout the blanket.
When pulling up loops, bring them to approximately the same height as the previous loops.
Don’t Work Too Tightly
Tight tension can make puff stitches difficult to close.
Keep your yarn relaxed and allow enough room on the hook.
Watch Your Stitch Count
Puff stitches can make it easy to accidentally skip a stitch.
Count your stitches periodically, particularly after completing each textured row.
Use Stitch Markers
If you have trouble recognizing the first or last stitch of each row, place a stitch marker in those stitches.
This is particularly helpful when working with highly textured yarn.
Make a Swatch
A small test square helps you determine:
- Your stitch gauge
- Your finished texture
- How much yarn you are likely to need
- Whether your hook size is comfortable
- Whether the fabric is too stiff or too loose
Troubleshooting
Why are my puff stitches flat?
Your loops may be too short or your tension may be too tight.
Try pulling each loop slightly taller before closing the puff.
Why is my blanket getting narrower?
Puff stitches naturally draw fabric together, but losing stitches can make the problem worse.
Count the stitches at the end of every row.
Why does my blanket feel stiff?
Try a larger hook or loosen your tension. You can also choose a softer yarn.
Why are my puff stitches uneven?
Try to pull every loop to approximately the same height.
Consistent tension makes a dramatic difference in the finished texture.
Why am I using so much yarn?
Puff stitches are yarn-intensive because several loops are built into each raised stitch.
This is completely normal. Always purchase extra yarn if you are making a large blanket.
Blocking and Finishing
When the blanket is complete, weave all yarn tails securely into the back of the fabric.
If needed, lightly dampen the blanket and gently shape it to the desired dimensions.
Allow it to dry completely.
Avoid aggressive blocking because the puff stitches should remain raised and dimensional.
Once dry, gently fluff the textured sections with your fingers.
Care Instructions
Care instructions depend on the yarn you choose.
For washable acrylic yarn:
- Machine wash gently according to the yarn label.
- Use mild detergent.
- Avoid excessive heat.
- Reshape while damp.
- Dry according to the manufacturer’s instructions.
For wool or specialty fibers, follow the specific care instructions listed on the yarn label.
Frequently Asked Questions
Is this puff stitch blanket suitable for beginners?
Yes. Once you understand how to make the puff stitch, the rest of the blanket uses a simple repeating structure.
The biggest challenge for beginners is maintaining consistent tension and keeping track of the stitches.
How much yarn does a puff stitch blanket use?
Puff stitches use considerably more yarn than basic stitches. A medium throw may require approximately 1,800–2,200 yards, but the exact amount depends on yarn weight, hook size, blanket dimensions, and individual tension.
Can I use chunky yarn?
Yes. Chunky yarn will create larger, more pronounced puff stitches and a heavier blanket.
You should adjust the hook size according to the yarn manufacturer’s recommendation.
Can I make this blanket with cotton yarn?
Absolutely. Cotton creates a more structured fabric and is especially useful for lightweight blankets.
A cotton blend may provide a softer drape.
Can I use different colors?
Yes. Solid colors showcase the texture beautifully, while stripes can create a more playful design.
Does the puff stitch use a lot of yarn?
Yes. Puff stitches are among the more yarn-consuming crochet stitches because multiple loops are created in each stitch.
For this reason, purchase enough yarn from the same dye lot whenever possible.
Final Thoughts
The Textured Puff Stitch Crochet Blanket is a wonderful project when you want a blanket that feels as special as it looks. Its rows of raised puff stitches create a soft, dimensional texture that catches the light beautifully, while the simple repeating construction makes it enjoyable to work on.
The light-blue version has a particularly gentle appearance, but don’t be afraid to experiment with cream, sage, dusty rose, lavender, or even a combination of colors.
Whether you are crocheting a baby blanket, a cozy lap throw, or a larger bed blanket, this textured stitch gives an ordinary crochet project an impressive handmade finish.
Grab your favorite yarn and hook, make a small swatch, and start creating your own beautifully textured puff stitch blanket.
Happy crocheting! 🧶

