

 soofha
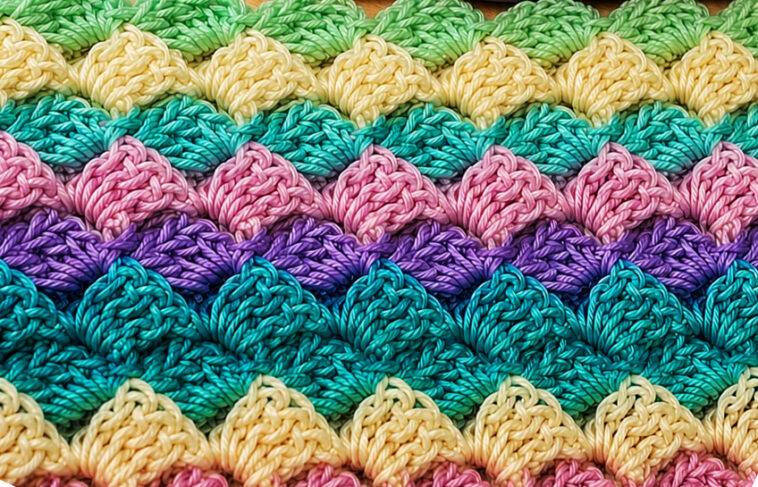
If you love crochet projects that are colorful, textured, and easy to customize, the C2C crochet technique is a wonderful pattern to add to your collection. C2C stands for Corner-to-Corner, a popular crochet method where the fabric is worked diagonally from one corner to the opposite corner.
The technique is especially beautiful when worked in multiple colors. You can create stripes, geometric designs, pixel-style pictures, modern baby blankets, scarves, cushions, and large afghans simply by changing colors at carefully chosen points.
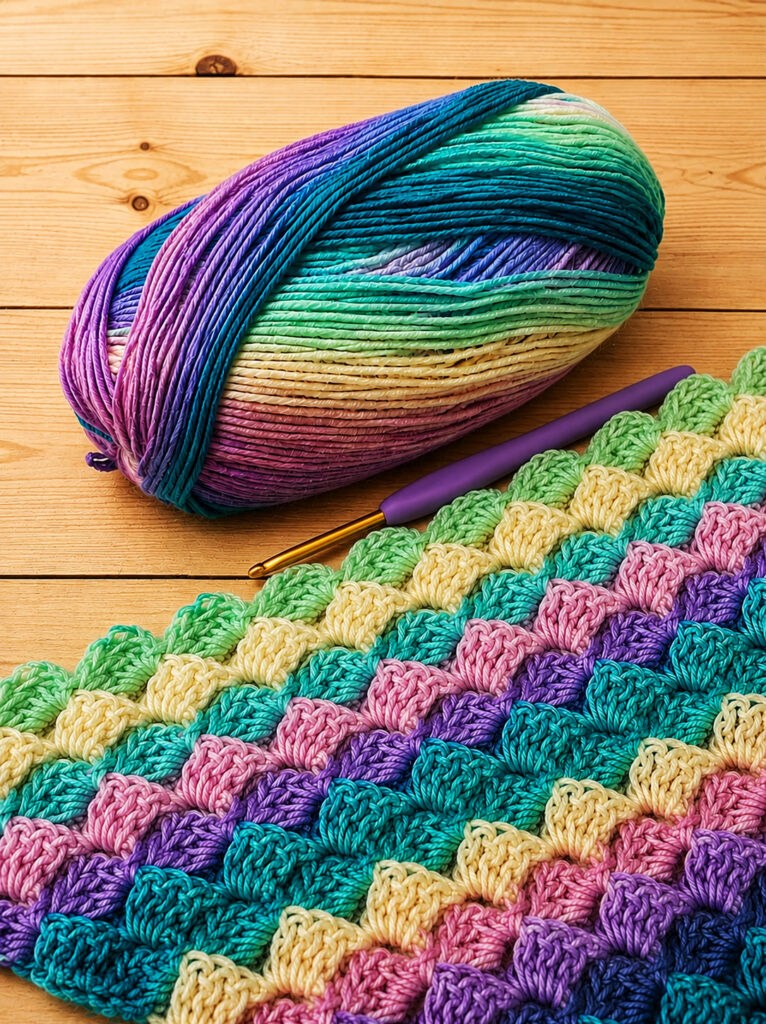
The blanket shown in the inspiration image combines soft pastel shades with vibrant turquoise, purple, pink, cream, and green tones. This type of palette works particularly well with C2C because each diagonal section allows the colors to stand out clearly.
What Is C2C Crochet?
Corner-to-Corner crochet is worked diagonally rather than in traditional horizontal rows.
Instead of starting with the full width of a blanket, you begin with a single small block at one corner. You then increase the number of blocks until reaching the desired width and length. After reaching the widest point, you decrease the number of blocks until only one block remains at the opposite corner.
A basic C2C project has three main stages:
- Increasing
- Working the middle section
- Decreasing
Increasing
Each C2C block is commonly made from a group of double crochet stitches and chains. The blocks connect to one another through chain spaces, creating the characteristic diagonal appearance.
C2C Crochet Pattern Details
Skill Level: Beginner to Intermediate
Technique: Corner-to-Corner crochet
Project Type: Blanket, throw, baby blanket, scarf, pillow, or home décor
Construction: Diagonal blocks
US Crochet Terminology: Used throughout
Gauge: Not essential for this technique
Finished Size: Customizable
Materials You Will Need
For a colorful C2C blanket, gather:
- Medium-weight worsted yarn
- Crochet hook appropriate for your yarn
- Scissors
- Yarn needle
- Stitch markers, optional
- Measuring tape
For a look similar to the inspiration image, consider combining:
- Mint green
- Soft cream
- Pale yellow
- Pink
- Lavender
- Purple
- Turquoise
- Teal
- Deep blue
You can use one color for a simple modern blanket or several colors for a cheerful rainbow-style design.
Crochet Abbreviations
The pattern uses standard US crochet abbreviations:
- ch – chain
- dc – double crochet
- sl st – slip stitch
- st – stitch
- sp – space
- rep – repeat
Understanding a C2C Block
A traditional C2C block is made using:
ch 3, 3 dc
The chain-3 generally counts as the first double crochet.
As the project grows, each new block is attached to the chain-3 space of a neighboring block.
This creates a diagonal grid of small squares.
How to Make the First C2C Block
Begin with your chosen yarn.
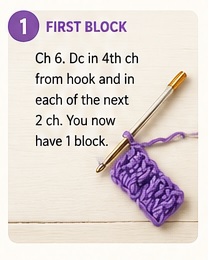
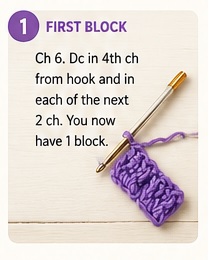
Ch 6.
Work 1 dc in the 4th ch from hook, then work 1 dc in each of the next 2 chains.
You now have your first C2C block.
This tiny block represents the first corner of your blanket.
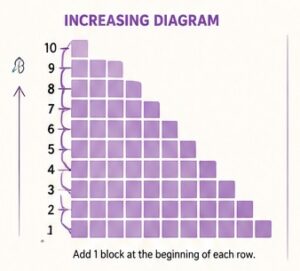
C2C Increasing Section
The increasing section gradually makes the project larger.
Row 1
Ch 6.
Dc in the 4th ch from hook and in each of the next 2 ch.
You have 1 block.
Row 2
Turn.
Ch 6.
Dc in the 4th ch from hook and in each of the next 2 ch.
Sl st into the ch-3 space of the previous block.
Ch 3.
Work 3 dc into the same ch-3 space.
You now have 2 blocks.
Row 3
Turn.
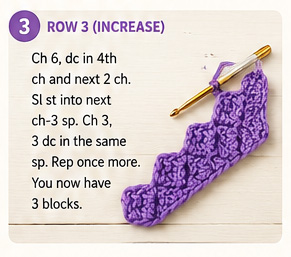
Ch 6.
Dc in the 4th ch from hook and in the next 2 ch.
Sl st into the ch-3 space of the next block.
Ch 3 and work 3 dc into the same space.
Repeat once more.
You now have 3 blocks.
Continue Increasing
Continue using the same construction.
At the beginning of each new row:
Ch 6, dc in 4th ch from hook and in next 2 ch.
Then connect each new block with a slip stitch into the ch-3 space of the previous block.
For every additional block:
Ch 3, 3 dc in the same ch-3 space.
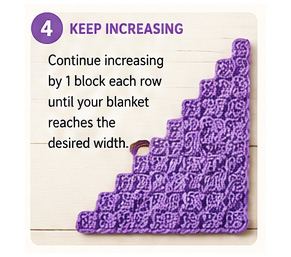
Continue increasing until your blanket reaches the desired width.
Easy C2C Formula
The increasing rows follow a simple numerical pattern:
1 block → 2 blocks → 3 blocks → 4 blocks → 5 blocks → 6 blocks → 7 blocks…
The number of blocks increases by one with every row.
For example:
- Row 1 = 1 block
- Row 2 = 2 blocks
- Row 3 = 3 blocks
- Row 4 = 4 blocks
- Row 5 = 5 blocks
- Row 6 = 6 blocks
- Row 7 = 7 blocks
- Row 8 = 8 blocks
- Row 9 = 9 blocks
- Row 10 = 10 blocks
Keep increasing until you reach the desired width.
Creating the Middle of the Blanket
If you want a square blanket, continue increasing until the project reaches approximately half of the desired dimensions.
For example, if you want a blanket approximately 40 × 40 inches, you can increase until the diagonal measurement and overall dimensions reach your intended midpoint.
Once the project reaches the desired width, stop increasing.
You can then begin the decreasing section.
For a rectangular blanket, the middle section can be adjusted so that the project grows longer before decreasing.
C2C Decreasing Section
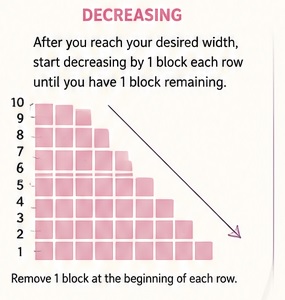
The decreasing section works in the opposite direction.
Instead of adding one new block at the beginning of each row, you remove one block.
At the beginning of the row:
Turn.
Slip stitch across the first 3 dc and into the ch-3 space.
Then:
Ch 3, 3 dc in the next ch-3 space.
Continue working across the row.
You will have one fewer block than in the previous row.
Repeat the decrease on every row.
Your block count will look like:
10 → 9 → 8 → 7 → 6 → 5 → 4 → 3 → 2 → 1
When only one block remains, fasten off.
How to Change Colors in C2C Crochet
One of the biggest advantages of C2C crochet is the ability to create beautiful color patterns.
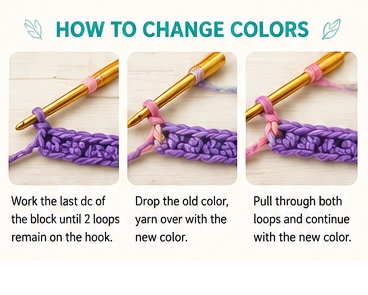
To change colors, complete the final stitch of the current block with the new color when appropriate.
A simple method is:
- Work the final double crochet until two loops remain on the hook.
- Drop the old color.
- Place the new yarn over the hook.
- Pull the new color through the remaining loops.
- Continue crocheting with the new shade.
Keep unused yarn neatly controlled along the edge when possible, or weave in ends as you go.
Color Arrangement Idea
For a pastel-inspired C2C blanket, try this sequence:
Row 1: Lavender
Row 2: Lavender + pink
Row 3: Pink + cream
Row 4: Cream + pale yellow
Row 5: Mint + cream
Row 6: Mint + turquoise
Row 7: Turquoise + teal
Row 8: Teal + purple
Row 9: Purple + pink
Row 10: Pink + lavender
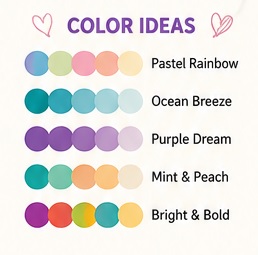
You do not need to follow these colors exactly. C2C is ideal for experimenting with your own combination.
Diagram
Creating Diagonal Stripes
To create diagonal stripes, work several rows in one color before changing to another.
For example:
- 5 rows turquoise
- 5 rows lavender
- 5 rows pink
- 5 rows cream
- 5 rows mint
- Repeat
Because C2C is constructed diagonally, the stripes will naturally follow the diagonal direction of the fabric.
This is one of the easiest ways to achieve a modern geometric look without using a complicated chart.
Creating a Rainbow C2C Blanket
For a rainbow-inspired blanket, arrange your colors in this order:
- Pink
- Coral
- Golden yellow
- Mint
- Green
- Turquoise
- Blue
- Lavender
- Purple
You can repeat the sequence throughout the project or mirror the colors when beginning the decrease section.
For a softer appearance, substitute pastel shades for bright colors.
C2C Blanket Size Guide
Because C2C patterns are highly customizable, you can make practically any size.
Small Baby Blanket
Approximately 30 × 30 inches
Use a lightweight yarn and stop increasing once the blanket reaches your desired dimensions.
Standard Baby Blanket
Approximately 36 × 40 inches
This size works beautifully with soft pastel yarn.
Lap Blanket
Approximately 40 × 50 inches
Choose a medium-weight yarn for a warm but manageable project.
Throw Blanket
Approximately 50 × 60 inches
Use several coordinated colors to emphasize the diagonal construction.
Large Bed Blanket
Increase the number of C2C blocks substantially and continue until the desired dimensions are reached.
Remember that yarn quantities depend on yarn weight, hook size, stitch tension, color changes, and finished dimensions.
How to Keep Your C2C Edges Straight
A common beginner concern is uneven edges.
To create neat edges:
- Count your blocks regularly.
- Make sure every block contains the same number of double crochet stitches.
- Keep your chain-3 spaces consistent.
- Avoid accidentally skipping a block.
- Check the block count after each increase.
- Check the block count again during decreases.
A useful trick is to place a stitch marker at the beginning of an important section, particularly when working large projects.
How to Make the Blanket More Textured
Traditional C2C has a recognizable square-block texture. You can make the finished piece even more interesting by experimenting with yarn.
Try:
- Bouclé yarn for a soft textured surface
- Cotton yarn for a lightweight blanket
- Acrylic yarn for easy-care projects
- Color-changing yarn for effortless stripes
- Two strands held together for extra thickness
A textured or multicolored yarn can create an especially eye-catching result.
Adding a Border
A border can give your C2C blanket a polished finish.
Before adding your border, weave in loose ends and gently block the blanket if necessary.
A simple border can be made using single crochet.
Round 1
Join yarn in any corner.
Ch 1.
Work single crochet evenly around the blanket.
At each corner, work:
sc, ch 2, sc
Continue around the entire blanket.
Join with a slip stitch.
Round 2
Ch 1.
Work sc in each stitch around.
At each corner space, work:
sc, ch 2, sc
Join with a slip stitch.
Fasten off and weave in the ends.
For a more decorative finish, you could add a shell border, picot edging, scalloped border, or simple reverse single crochet.
Tips for a Beautiful C2C Blanket
1. Choose a Coordinated Palette
You do not need dozens of colors. Four to eight shades that work well together can create a sophisticated design.
2. Keep Your Tension Consistent
Consistent tension helps every C2C block maintain a similar size.
3. Don’t Pull Your Slip Stitches Too Tightly
Tight slip stitches can make the blanket difficult to work into and may cause the fabric to become stiff.
4. Weave in Ends as You Go
When working many colors, the number of yarn tails can become overwhelming. Weaving them in periodically makes finishing much easier.
5. Use a Color Chart
For a complex design, draw your color arrangement on graph paper before crocheting.
Each square can represent one C2C block.
6. Take Progress Photos
C2C designs can look confusing while the blanket is still small. Photographing your progress makes it easier to see the overall color arrangement.
C2C Crochet Ideas
Once you understand the basic technique, you can use it for much more than blankets.
Try making:
- Baby blankets
- Sofa throws
- Cushion covers
- Scarves
- Shawls
- Table runners
- Wall hangings
- Tote bags
- Christmas decorations
- Personalized name blankets
- Pixel-art crochet
- Geometric afghans
C2C is particularly useful for graphgan designs, where each C2C block represents one square on a chart.
Beginner-Friendly C2C Project
If this is your first C2C project, start with a small square.
Choose three or four colors and make approximately 20–30 increasing rows before beginning your decreases.
This gives you enough practice to understand:
- How the blocks connect
- How the diagonal direction develops
- How to increase
- How to decrease
- How to change colors
- How to manage yarn tails
Once you are comfortable, you can move on to a larger blanket.
Troubleshooting Common Problems
My blanket is curling.
A small amount of curling can happen during crocheting and often improves as the project grows. Check your tension and make sure you are not working your stitches too tightly.
My edges are uneven.
Check your block count. Missing one slip stitch or accidentally adding an extra block can quickly change the shape.
My blocks look too large.
Try a smaller hook or loosen your tension less. Always consider the yarn manufacturer’s recommended hook size as a starting point.
My blanket looks stiff.
Your tension may be too tight. Try a slightly larger hook and avoid pulling slip stitches tightly.
I have too many loose ends.
With multicolor C2C projects, this is normal. Weave in ends as you go rather than leaving all finishing work until the end.
Why C2C Crochet Is So Popular
C2C crochet offers a great combination of simplicity and creativity.
The basic block construction is easy to learn, but the possibilities are nearly endless. Once you understand the increase and decrease structure, you can create an enormous range of patterns.
It is also an excellent technique for using up leftover yarn. Small amounts of coordinating yarn can become colorful stripes, geometric designs, or miniature pixel-art motifs.
The diagonal construction gives even simple color combinations a distinctive appearance.
Final Thoughts
This C2C crochet pattern is a versatile foundation for creating colorful handmade blankets and many other crochet projects. The basic technique is straightforward: increase your blocks, work across the desired width, and then decrease back toward the final corner.
The beautiful combination of turquoise, lavender, pink, cream, mint, and purple shown in the inspiration image is perfect for a cheerful modern crochet blanket, but you can easily customize the palette to match any room or occasion.
Once you master the basic C2C block, experiment with stripes, gradients, rainbow combinations, graphgans, and personalized designs. Whether you’re making a baby blanket for a gift or a large throw for your own home, C2C crochet gives you plenty of room to be creative.
Happy crocheting!

