

 soofha
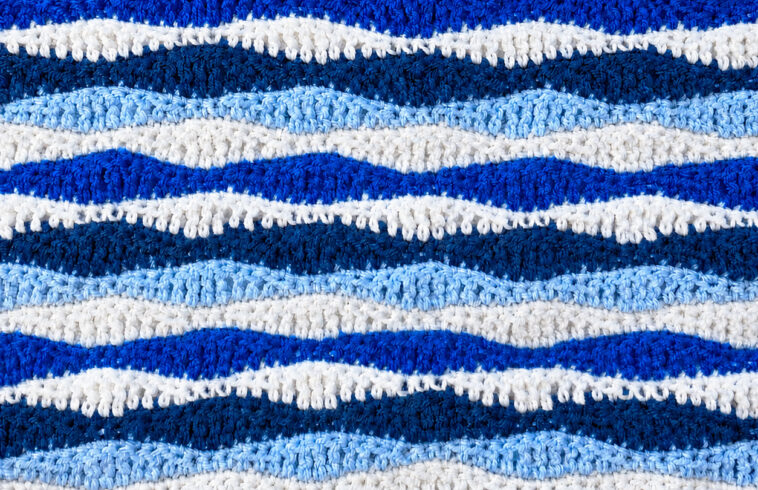
The Crochet Wave Stitch is a beautiful, relaxing pattern that creates gentle horizontal waves across your project. It is sometimes called the Ripple Stitch or Wave Ripple Stitch, and it is especially pretty when worked in several shades of blue, white, and navy.
The sample shown here has a lovely ocean-inspired palette, with rows of royal blue, light blue, white, and deep navy. The changing colors emphasize the movement of the waves while the textured stitches give the blanket a cozy handmade appearance.
This pattern is suitable for blankets, baby blankets, scarves, throws, cushions, and many other crochet projects.
Pattern note: “Wave stitch” is used for several different crochet constructions. The instructions below are an original, easy-to-follow wave/ripple version designed to produce the long, gently undulating striped appearance shown in the sample. It is not a transcription of the Reddit user’s pattern or any other designer’s copyrighted pattern.
Wave Stitch Crochet Blanket
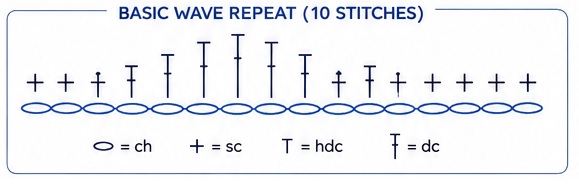
The wave effect is created by working groups of shorter and taller stitches. The stitch height gradually increases toward the top of a wave and then decreases again toward the valley.
This type of construction is widely used for ripple blankets because it produces a repeating fabric that can easily be resized.
The pattern also works beautifully with color changes. You can use just two colors for a simple modern look or several shades to create a striped ocean-wave effect.
Skill Level
Easy to Intermediate
You should be comfortable with:
- Chain stitch (ch)
- Single crochet (sc)
- Half double crochet (hdc)
- Double crochet (dc)
- Slip stitch (sl st)
- Working stitches together
- Changing colors
Materials
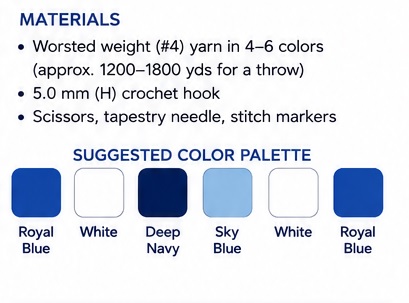
For a medium-sized throw, you will need approximately:
- Worsted-weight or medium #4 yarn
- Royal blue yarn
- Light blue yarn
- White or cream yarn
- Dark navy yarn
- 5.0 mm crochet hook
- Scissors
- Tapestry needle
- Stitch markers
The exact amount of yarn depends on the finished size and the yarn brand you choose.
The photograph uses several shades of blue and white, but you can substitute any colors you like.
Suggested Color Palette
For an ocean-inspired blanket, try:
Color A: Royal Blue
Color B: White
Color C: Deep Navy
Color D: Sky Blue
Color E: White
Color F: Royal Blue
You can repeat these colors throughout the blanket to create horizontal stripes.
Gauge
Gauge is not extremely important for a blanket, but making a small swatch is recommended.
Work approximately 15–20 stitches and several rows of the wave pattern.
If your fabric is too tight, use a larger hook.
If your fabric is too loose, use a smaller hook.
Finished Size
The pattern is easily adjustable.
You can make:
- Baby blanket
- Lap blanket
- Throw
- Twin-size blanket
- Queen-size blanket
- King-size blanket
Simply adjust the foundation chain while maintaining the required stitch multiple.
For your first project, a small swatch of approximately 31 stitches is a good way to practice the wave repeat.
Crochet Abbreviations
US crochet terminology:
| Abbreviation | Meaning |
|---|---|
| ch | chain |
| sc | single crochet |
| hdc | half double crochet |
| dc | double crochet |
| sl st | slip stitch |
| st | stitch |
| sts | stitches |
| rep | repeat |
| BLO | back loop only |
| dc2tog | double crochet two together |
Understanding the Wave
Before beginning the full blanket, it helps to understand what makes the waves.
The basic idea is:
short stitches → taller stitches → tallest stitches → taller stitches → short stitches
As the stitch heights change, the fabric naturally rises and falls.
A simple wave section can be visualized like this:
sc → hdc → dc → dc → hdc → sc → hdc → dc → dc → hdc → sc
The exact arrangement can be modified to make the waves wider, narrower, softer, or more dramatic.
Foundation Chain
Chain a multiple of 10 + 1.
For example:
Chain 51 for a small sample.
For a wider blanket:
Chain 101
For an even larger blanket:
Chain 151
Always make sure your starting chain follows:
10 × any number + 1
This keeps the wave pattern aligned across the entire project.
Row 1 – Foundation Wave Row
Using Color A:
- Chain the required number.
- Single crochet in the second chain from the hook.
- Work a single crochet in the next stitch.
- Work a half double crochet in the next stitch.
- Work a double crochet in each of the next 2 stitches.
- Work a half double crochet in the next stitch.
- Work a single crochet in the next 2 stitches.
- Work a half double crochet in the next stitch.
- Work a double crochet in each of the next 2 stitches.
Repeat the wave sequence across the row.
Finish with a single crochet as needed to maintain the edge.
Turn.

Row 2 – Returning Wave
Chain 1.
Beginning in the first stitch, work the same basic sequence while following the shape of the previous row.
Work:
sc, sc, hdc, dc, dc, hdc, sc, sc, hdc, dc
Repeat across the row.
The important point is to work into the corresponding stitches rather than accidentally adding or removing stitches.
Turn.

Row 3 – Creating the Texture
Chain 1.
For a more textured appearance, work the stitches through the back loop only (BLO).
Repeat the wave sequence:
sc BLO, sc BLO, hdc BLO, dc BLO, dc BLO, hdc BLO, sc BLO, sc BLO, hdc BLO, dc BLO
Repeat across.
Turn.
Working through the back loop can create visible horizontal ridges and emphasize the movement of the waves. BLO is also used in some published wave-stitch variations for additional texture.

Row 4 – Repeat
Chain 1.
Continue following the same wave sequence.
Keep your tension relaxed, especially when working the taller stitches.
Turn.

Main Pattern Repeat
Once your first four rows are complete, continue repeating the established wave pattern.
For a simple blanket, you can repeat the same wave rows until the blanket reaches your desired length.
The beauty of this stitch is that after the first few rows, the pattern becomes very rhythmic and easy to memorize.
Color Changes
The blue-and-white appearance in the sample comes primarily from the horizontal color changes.
You can change colors every:
- 1 row
- 2 rows
- 3 rows
- 4 rows
- 5 rows
For a look similar to the photographed blanket, try alternating narrow and medium stripes.
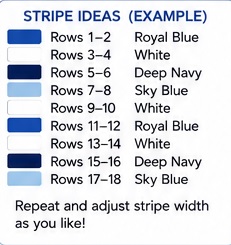
Suggested Stripe Sequence
Rows 1–2: Royal Blue
Rows 3–4: White
Rows 5–6: Deep Navy
Rows 7–8: Light Blue
Rows 9–10: White
Rows 11–12: Royal Blue
Rows 13–14: White
Rows 15–16: Deep Navy
Rows 17–18: Light Blue
Repeat this sequence.
You can also make some stripes wider to create a more organic, ocean-wave appearance.
How to Change Colors
When you reach the final stitch of a row, begin the last stitch normally.
When you have the final two loops on your hook, drop the old color and pull the new color through the remaining loops.
Chain 1 with the new color and turn.
Continue crocheting with the new color.
For clean edges, avoid pulling the new yarn too tightly.
Keeping Your Wave Edges Straight
One of the biggest challenges with ripple and wave blankets is maintaining the correct stitch count.
Here are some useful tips:
1. Count the first few rows
Don’t rely entirely on the visual appearance of the waves.
Count your stitches until you are comfortable with the repeat.
2. Use stitch markers
Place a marker in the first and last stitch of each row.
This makes it much easier to identify the edges.
3. Don’t tighten your turning chain
A tight turning chain can pull the edge inward.
Keep your tension relaxed.
4. Check your peaks and valleys
The high points and low points should remain aligned from row to row.
If one wave suddenly becomes crooked, check the stitch count before continuing.
5. Make a swatch first
A small test piece will help you understand how your particular yarn and hook behave.
Making the Blanket Wider
To make the blanket wider, simply increase the number of repeats.
For example:
51 chains = 5 wave repeats
101 chains = 10 wave repeats
151 chains = 15 wave repeats
Always maintain the required multiple:
multiple of 10 + 1
The same principle of using a stitch multiple to resize wave projects is common in crochet wave patterns.
Making the Blanket Longer
There is no special calculation for the length.
Simply continue repeating the rows until the blanket reaches the desired length.
For a baby blanket, you might stop after approximately 70–90 rows.
For a larger throw, continue for 100–150 rows or more.
Always measure the actual fabric because different yarn weights and crochet tensions produce different dimensions.
Border
A simple border works beautifully with this stitch.
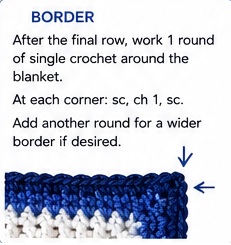
After completing the final wave row, do not cut the yarn.
Work one round of single crochet around the blanket.
At each corner, work:
sc, ch 1, sc
This helps create a clean corner.
For a wider border, add another round of single crochet or double crochet.
A solid navy border would look particularly beautiful with the blue-and-white color palette.
Finishing
When your blanket reaches the desired size:
- Fasten off.
- Leave a yarn tail of approximately 10–15 cm.
- Thread the tail onto a tapestry needle.
- Weave the end securely through several stitches.
- Change direction and weave through the fabric again.
- Trim the excess yarn.
- Repeat for all remaining ends.
Blocking is optional but can help straighten the edges and even out the stitches.
Why You’ll Love the Wave Stitch
The Crochet Wave Stitch is an excellent choice when you want a blanket that looks more interesting than a basic straight-row design without requiring complicated techniques.
It is:
- Easy to repeat
- Great for beginners building confidence
- Beautiful in stripes
- Suitable for blankets and scarves
- Easy to resize
- Excellent for scrap yarn
- Relaxing once the repeat is memorized
- Beautiful in both bright and neutral colors
Wave and ripple patterns are particularly popular for blankets because the same basic technique can be adapted to many widths and color combinations.
Crochet Wave Stitch Video Tutorial
If you prefer learning by watching someone work each row, a video tutorial can make the stitch much easier to understand.
This tutorial demonstrates the fundamentals of creating a crochet wave blanket and explains how the technique can be used for blankets, scarves, and different project sizes.
Another useful visual tutorial is the Wave Stitch Mini Skein Blanket tutorial from Emma C Makes, which walks through the beginning, individual rows, and how to calculate the chain for a larger blanket.
Wave Stitch Project Ideas
Once you understand the repeat, you don’t have to stop at blankets.
Try using this stitch for:
Baby Blanket
Use soft white, pale blue, cream, or pastel shades for a gentle nursery blanket.
Sofa Throw
Use navy, royal blue, light blue, and white for a coastal-inspired living-room throw.
Scarf
Make a narrow foundation chain and repeat the waves until the scarf reaches your desired length.
Cushion Cover
Create two matching wave panels and join them around a cushion insert.
Lap Blanket
A smaller version makes a wonderful lightweight blanket for a chair or sofa.
Pet Blanket
Use inexpensive washable yarn to make a practical blanket for a cat or dog.
Final Thoughts
The Crochet Wave Stitch is one of those patterns that looks impressive while relying on familiar crochet stitches. The combination of changing stitch heights creates the gentle rise-and-fall effect, while color changes make each wave stand out.
For a look similar to the inspiration photo, combine royal blue, light blue, deep navy, and white, using different stripe widths to keep the blanket visually interesting.
Once you establish the repeat, the project becomes wonderfully repetitive and relaxing. Whether you’re making a baby blanket, a cozy sofa throw, or a colorful scarf, this wave stitch is a versatile pattern worth adding to your crochet collection.
Happy crocheting! 🧶💙
Important Pattern Note
The stitch family is commonly referred to as wave, ripple, or chevron crochet, but individual designers use different stitch sequences and repeats. The sample shown above should therefore be treated as inspiration for a wave-style striped blanket rather than evidence of one exact published pattern. The Reddit discussion you referenced also illustrates how the terms “wave,” “ripple,” and “chevron” can overlap in crochet terminology.

