

 soofha
Hi, crochet friend! Welcome back to Soofha. Grab your favorite yarn, settle in with a cup of coffee, and let’s make something wonderfully textured together.
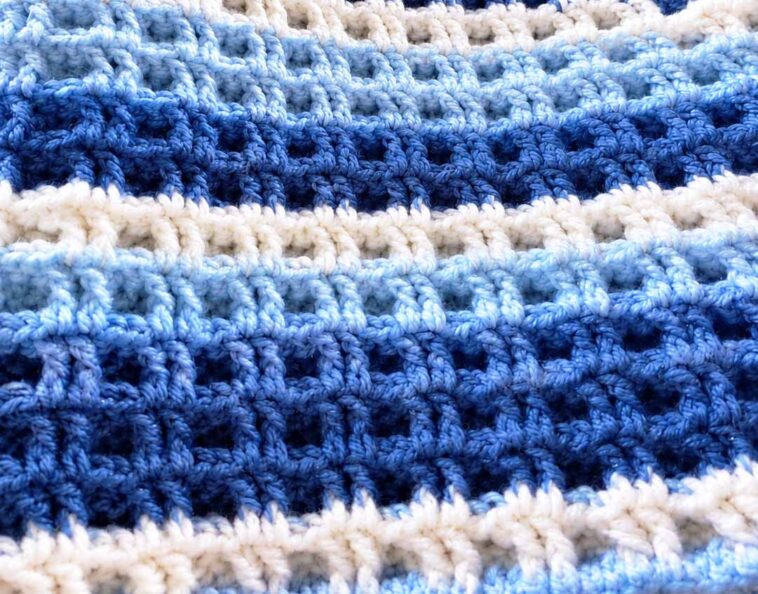
Today we’re exploring the Double Waffle Crochet Stitch, a thick and cozy stitch that creates a beautifully raised, dimensional fabric. At first glance, it may look like one of those complicated crochet stitches that requires endless concentration, but once you understand the repeat, it becomes surprisingly rhythmic and enjoyable.
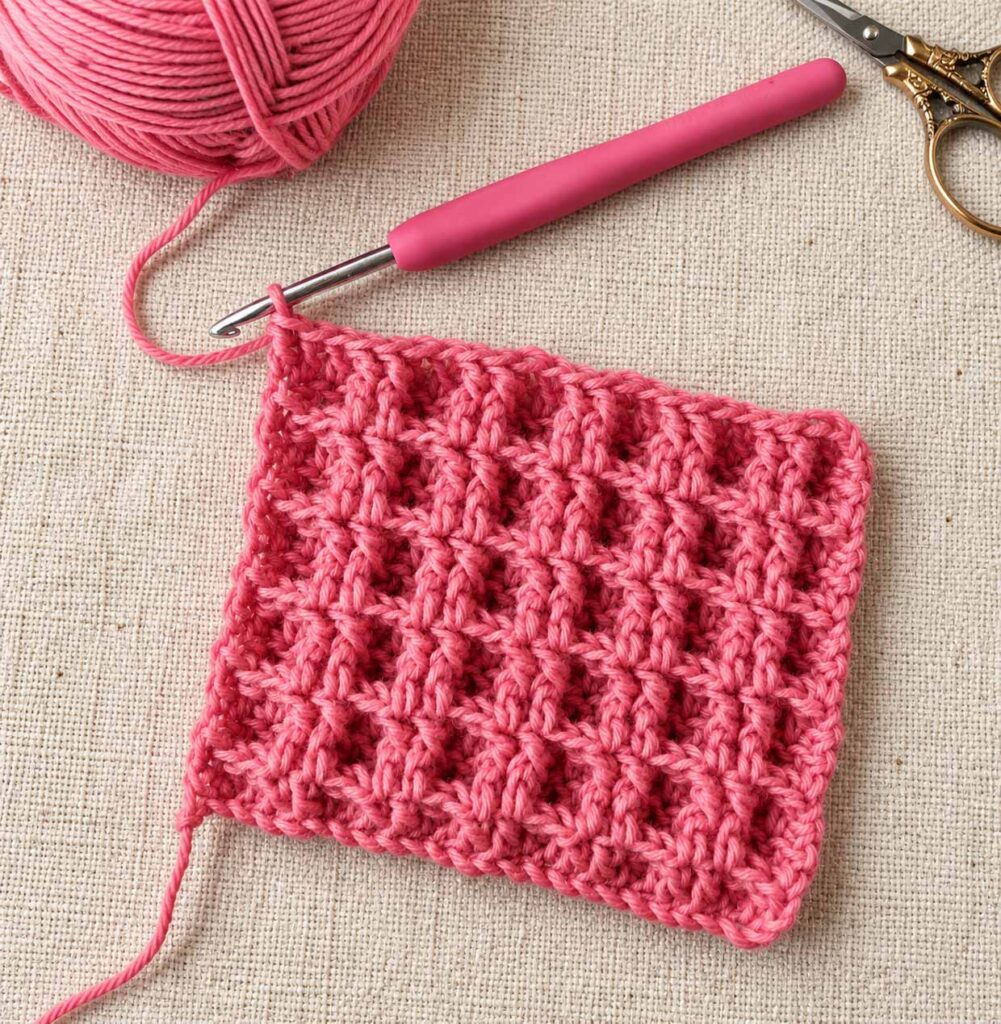
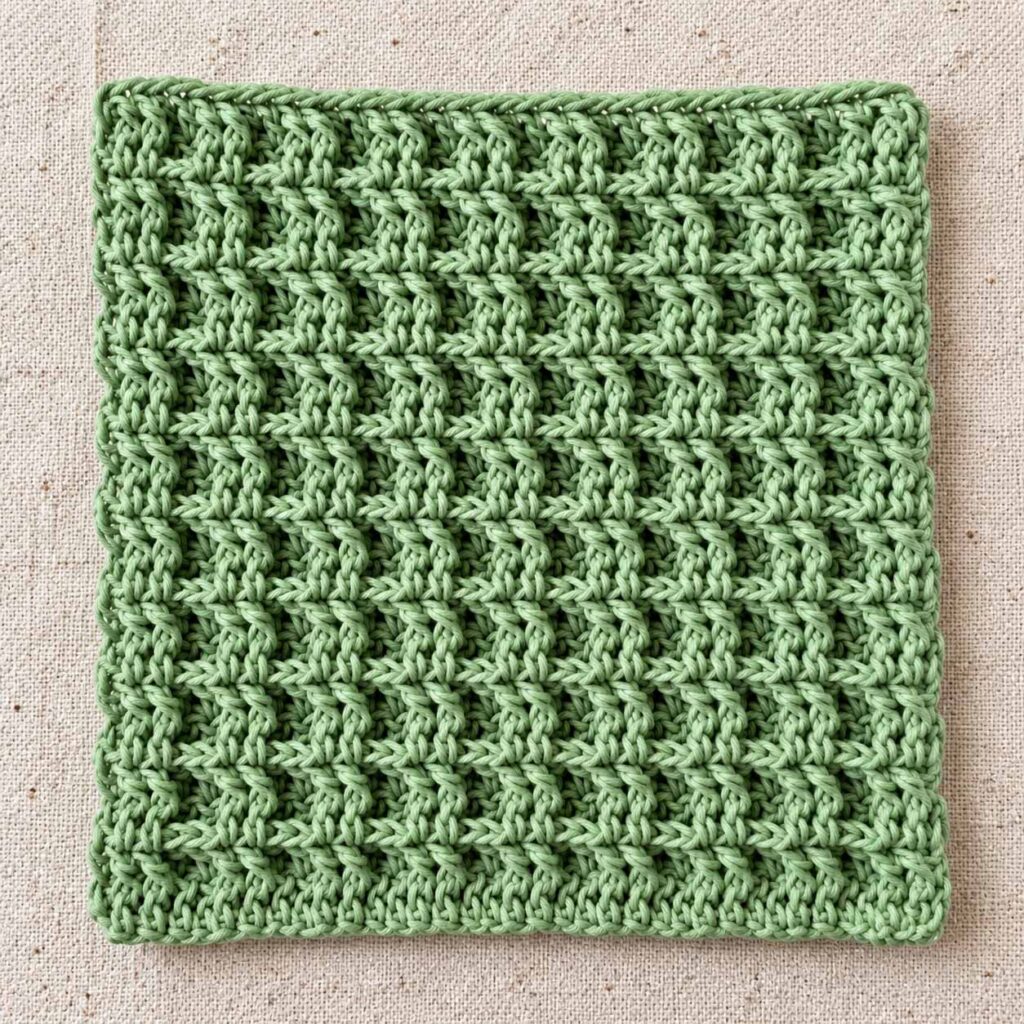
What makes this stitch so special is the combination of regular double crochet stitches and front post double crochet stitches. The post stitches sit proudly above the surface of the fabric, creating the little recessed squares and raised ridges that give the stitch its unmistakable waffle appearance.
And honestly, this is one of those crochet textures you’ll probably find yourself touching constantly. The finished fabric is wonderfully squishy and substantial, making it particularly appealing for projects designed to be warm and cozy.
Why You’ll Love the Double Waffle Stitch
There are plenty of reasons to add this stitch to your crochet collection.
The texture is the obvious star. Even when worked entirely in one color, the combination of raised and recessed sections gives the fabric plenty of visual interest. You don’t need complicated colorwork or decorative stitches to make the finished piece stand out.
It is also incredibly versatile.
You can use the Double Waffle Stitch for:
- Cozy blankets
- Baby blankets
- Afghans
- Throw pillows
- Cushion covers
- Scarves
- Cowls
- Washcloths
- Dishcloths
- Winter accessories
- Crochet sampler projects
A large blanket made with this stitch would be especially lovely. Imagine a thick handmade throw draped over the sofa on a chilly evening. The kind of blanket everyone in the family wants to use!
Before You Begin
There is one important thing to remember about this stitch: it is a yarn-hungry texture.
Because you are working several raised post stitches, the finished fabric uses more yarn than a simple double crochet fabric. It also becomes considerably thicker.
If you are making a large blanket, I recommend purchasing enough yarn at the beginning rather than assuming the same amount you would need for a basic stitch.
And as always, make a small gauge swatch before committing to a large project.
Materials
For a practice swatch, you will need:
- Worsted or medium-weight #4 yarn
- 5 mm crochet hook
- Scissors
- Yarn needle
- Stitch markers, optional
You can certainly experiment with different yarn weights. Just remember that this stitch naturally produces a dense fabric, so choose a hook size that allows your finished fabric to remain flexible.
A slightly larger hook can be helpful if your stitches tend to be tight.
Crochet Abbreviations
Here are the abbreviations used in this pattern:
- ch – chain
- dc – double crochet
- FPdc – front post double crochet
- st – stitch
- sts – stitches
- rep – repeat
- RS – right side
- WS – wrong side
- FO – fasten off
Double Waffle Stitch Pattern Notes
The stitch is worked over a:
Multiple of 5 + 2 chains
For our sample, we will chain 27.
That gives us:
25 working stitches + 2 turning chains
The beginning ch-2 does not count as a stitch throughout this pattern.
Keeping this detail in mind will make it much easier to maintain the correct stitch count.
Double Waffle Crochet Stitch
Special Stitch: Front Post Double Crochet
The main ingredient in this textured pattern is the front post double crochet.
Instead of inserting your hook through the normal top loops of the stitch, you work around the vertical post of the stitch.
How to Work an FPdc
- Yarn over.
- Insert your hook from front to back around the post of the stitch.
- Bring the hook back toward the front on the other side of the post.
- Yarn over and pull up a loop.
- You should now have 3 loops on your hook.
- Yarn over and pull through 2 loops.
- Yarn over again and pull through the remaining 2 loops.
Your front post double crochet is complete.
Helpful Tip
Try not to make your FPdc stitches too tight.
Because your hook travels around the post rather than through the top of the stitch, you need enough height in the stitch for the fabric to remain even.
If you pull the loops too tightly, your project can begin to draw inward.
Foundation Chain
For our sample swatch:
Chain 27.
The 27 chains consist of:
- 2 turning chains
- 25 working stitches
Once you understand the pattern, you can make the starting chain any size that follows the stitch multiple.
Row 1 – Double Crochet Foundation
Begin by working 1 dc into the third chain from your hook.
The two skipped chains do not count as a stitch.
Continue working:
1 dc in each chain across.
At the end of the row, you should have:
25 dc
Turn your work.
This simple foundation row gives you the vertical stitch posts that will be used for the first textured row.
Row 2 – First Textured Row
Chain 2.
Remember that the ch-2 does not count as a stitch.
Work:
1 dc in the first stitch.
Then work:
FPdc around each of the next 3 stitches.
Next, repeat the following sequence across the row:
1 dc in each of the next 2 stitches, FPdc around each of the next 3 stitches.
Continue following this sequence until you reach the final stitch.
Work:
1 dc in the last stitch.
Turn.
You should still have:
25 stitches
Row 2 Sequence
Think of the row as:
dc | FPdc FPdc FPdc | dc dc | FPdc FPdc FPdc | dc dc | … | dc
The groups of three FPdc stitches form the first set of raised ridges.
Row 3 – Second Textured Row
Chain 2.
Work:
1 dc in each of the first 4 stitches.
You will now have four regular double crochet stitches at the beginning of the row.
Next, repeat:
FPdc around the next 2 stitches, 1 dc in each of the next 3 stitches.
Continue repeating this sequence across the row.
When you reach the final stitch, work:
1 dc in the last stitch.
Turn.
You should again have:
25 stitches
Row 3 Sequence
The visual sequence is:
dc dc dc dc | FPdc FPdc | dc dc dc | FPdc FPdc | dc dc dc | … | dc
Notice how the raised stitches have shifted.
This offset is what gives the fabric its distinctive waffle-like appearance.
The Double Waffle Repeat
Once Rows 2 and 3 are complete, the rest is very simple.
Continue repeating:
Row 2 + Row 3
over and over until your project reaches the desired length.
That is the complete stitch pattern.
The two-row repeat is easy to memorize once you have worked a few repeats.
A helpful way to remember it is:
Row 2 = groups of 3 FPdc
Row 3 = groups of 2 FPdc
The raised sections move from one row to the next, creating the deep waffle texture.
What Should the Finished Texture Look Like?
After several rows, the texture will become much more obvious.
You should begin to see:
- Raised vertical ridges
- Recessed horizontal sections
- Small rectangular waffle pockets
- A thick, dimensional surface
- Texture visible from both sides
Don’t worry if the first few rows don’t immediately look like a waffle. The pattern becomes much easier to recognize as more repeats are added.
Give it at least several rows before deciding that something has gone wrong.
Easy Practice Swatch
If you are learning the stitch for the first time, start small.
Chain 27
Then work:
- Row 1: 25 dc
- Row 2: First textured row
- Row 3: Second textured row
- Rows 4–15: Continue repeating Rows 2 and 3
After approximately 8–10 textured rows, you should be able to clearly see the waffle pattern developing.
This is a great way to practice before starting a blanket or another larger project.
Keeping Your Stitch Count Correct
Your stitch count should remain the same throughout the project.
For our sample:
25 stitches every row
There are no increases or decreases.
The FPdc stitches do not create additional stitches. They simply replace the normal double crochet position.
This means that if you begin with 25 working stitches, you should continue having 25 stitches on every row.
I recommend counting your stitches during the first few rows. Once your hands learn the rhythm, you probably won’t need to count quite so often.
How to Make the Stitch Wider
The foundation chain needs to follow the stitch multiple:
Multiple of 5 + 2
Here are a few examples:
| Foundation Chain | Working Stitches |
|---|---|
| Ch 27 | 25 |
| Ch 32 | 30 |
| Ch 37 | 35 |
| Ch 52 | 50 |
| Ch 77 | 75 |
| Ch 102 | 100 |
For example, chaining 37 gives you 35 working stitches after the foundation row.
This makes the stitch easy to adapt to blankets, scarves, pillows, and other projects.
Planning a Double Waffle Blanket
If you are making a blanket, avoid choosing the foundation chain based solely on someone else’s measurements.
The Double Waffle Stitch can pull inward because of its dense texture, and your individual crochet tension will also affect the finished dimensions.
Instead, make a swatch first.
Work around 10–15 rows, lay the swatch flat without stretching it, and measure its width.
You can then use your personal gauge to determine how many stitches you need for your blanket.
This small step can save a lot of frustration later.
How to Keep Your Edges Straight
One of the most common problems with textured crochet is accidentally losing or adding stitches at the edges.
Since the turning chain does not count as a stitch, remember:
Chain 2, then work into the first actual stitch.
At the end of the row, make sure you work into the final real stitch.
Do not accidentally crochet into the top of the turning chain.
If you have trouble identifying the first and last stitches, place a stitch marker in each one.
Once you become familiar with the pattern, your edges should become much easier to recognize.
Why Is My Stitch Count Decreasing?
If your project is becoming narrower, check for these common mistakes:
- You skipped the first stitch.
- You forgot the final stitch.
- You accidentally skipped a stitch after an FPdc group.
- Your edge stitches are becoming too tight.
Count your stitches after each row while you’re learning.
A quick count of 25 is much easier than discovering several rows later that your project has quietly turned into a triangle. We’ve all been there!
Why Is My Stitch Count Increasing?
If your project is getting wider, you may be accidentally adding stitches.
Pay particular attention to the turning chain.
Since the ch-2 does not count as a stitch, you should not work into its top.
Also remember that an FPdc counts as one stitch.
Once you have completed the FPdc around a post, do not also work into the top loops of that same stitch.
Why Don’t I See the Waffle Pattern?
If your fabric isn’t developing the expected waffle boxes, first check your row sequence.
The pattern alternates between:
3 FPdc groups
and
2 FPdc groups
The raised stitches must shift between rows.
If you accidentally repeat the same textured row twice, the waffle pattern will no longer line up correctly.
What If My Fabric Is Too Stiff?
This stitch naturally creates a thick and firm fabric, so some stiffness is completely normal.
However, if your fabric feels almost rigid, try:
- Going up 0.5–1 mm in hook size
- Relaxing your crochet tension
- Choosing a softer yarn
- Trying DK-weight yarn instead of heavy worsted
Your finished fabric should feel dense and cozy while still being flexible enough to bend comfortably.
Getting the Best FPdc Height
If your FPdc stitches look shorter than your regular double crochet stitches, try pulling the loop up slightly higher when making the stitch.
The yarn travels around the post, so the stitch needs enough height to match the surrounding fabric.
Avoid pulling tightly on the working loop.
A relaxed FPdc will help maintain the beautiful three-dimensional texture.
Right Side vs. Wrong Side
The Double Waffle Stitch has attractive texture on both sides.
The two sides aren’t completely identical, but neither side looks plain or unfinished.
The raised areas on one side correspond with recessed areas on the opposite side.
This makes the stitch particularly useful for:
- Blankets
- Scarves
- Cowls
- Throws
You don’t have to worry quite as much about which side will be visible when the finished project is being used.
Changing Colors
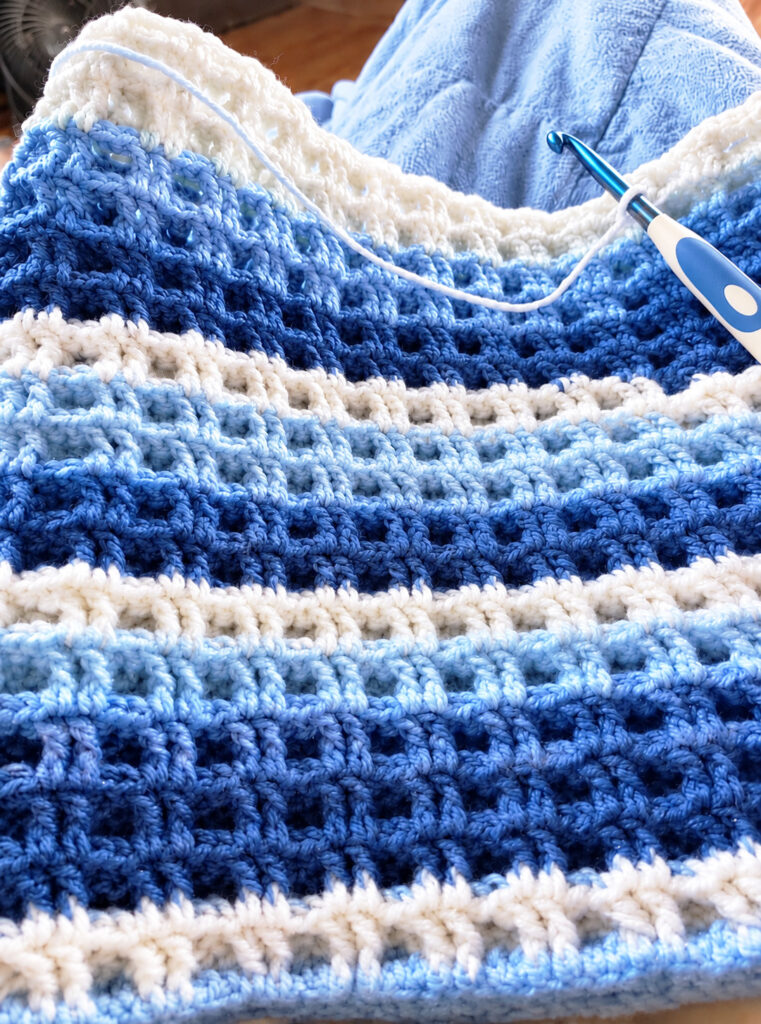
Although this stitch looks gorgeous in a single color, it also works beautifully with stripes.
For the cleanest color changes, change yarn at the end of a completed row.
I especially like changing colors after a complete two-row repeat because each color then contains a full texture sequence.
You could change color every:
- 2 rows
- 4 rows
- 6 rows
- 8 rows
Or simply let your own creativity decide.
Sometimes the best color combinations come from experimenting rather than following a strict plan.
Beautiful Color Combination Ideas
The Double Waffle Stitch works well with both neutrals and brighter colors.
Some combinations to try include:
- Cream + dusty rose
- Mauve + ivory
- Sage green + warm beige
- Soft blue + cream
- Caramel + ivory
- Navy + light gray
- Forest green + oatmeal
- Burgundy + cream
For a classic heirloom-inspired look, choose one soft neutral and let the texture become the main feature.
Yarn Requirements
Keep in mind that post stitches generally consume more yarn than straightforward double crochet.
The finished fabric is also heavier and denser.
If you’re making a large blanket, calculate your yarn requirements from a gauge swatch rather than relying on the yardage used for a simpler stitch.
And if you’re working with a discontinued or seasonal yarn color, buying a little extra at the beginning is always a good idea.
Running out of yarn when you’re almost finished is never fun!
Double Waffle Crochet Project Ideas
Once you’ve mastered the repeat, there are so many ways to use this stitch.
Baby Blanket
The thick texture makes this an excellent option for a soft baby blanket.
Choose a gentle color such as cream, pale blue, dusty pink, sage, or warm beige.
Cozy Throw
A large sofa throw would showcase the texture beautifully.
Work it in a single deep color for a sophisticated look or use wide stripes for a more playful design.
Cushion Cover
The raised waffle texture would make a gorgeous decorative pillow.
A neutral shade would work particularly well with modern home décor.
Scarf or Cowl
Because the fabric is naturally warm and substantial, the stitch is perfect for cold-weather accessories.
Washcloth or Dishcloth
A small square is a wonderful beginner project and lets you practice the stitch without committing to a large amount of yarn.
Sampler Blanket
Use individual waffle squares alongside other textured crochet stitches to create a unique sampler blanket.
Adding a Simple Border
Because the Double Waffle Stitch already contains so much texture, I prefer a simple border.
A basic single crochet border is an excellent choice.
Other possibilities include:
- Half double crochet
- Simple shell edging
- Picot edging
- A few rounds of single crochet
For a blanket, don’t feel that you need an elaborate border. Sometimes allowing the waffle texture to remain the star creates the prettiest finished piece.
Simple Single Crochet Border
When your project reaches the desired size, don’t fasten off.
Chain 1.
Work single crochet evenly around the entire piece.
At each corner, work:
sc, ch 2, sc
into the same corner space.
Continue around the project.
Join with a slip stitch.
Fasten off and weave in the ends.
When working along the sides, distribute your stitches evenly instead of trying to force a specific number of stitches into each row end.
Blocking the Double Waffle Stitch
Because this stitch is already quite thick and dimensional, heavy blocking usually isn’t necessary.
If your yarn allows wet blocking, gently dampen your finished piece and lay it flat.
Use your hands to straighten the edges and lightly shape the project.
Avoid pressing the fabric flat with a hot iron.
The beautiful raised ridges are part of what makes this stitch special, so you want to preserve the texture rather than flatten it.
Double Waffle Crochet Stitch Memory Trick
Here’s an easy way to remember the pattern once you’ve practiced it:
Row 2
THREE raised stitches
Row 3
TWO raised stitches
So remember:
3 FPdc → 2 FPdc → 3 FPdc → 2 FPdc
The raised groups move across the fabric from one row to the next, creating those characteristic waffle pockets.
Once your hands get used to this rhythm, the pattern becomes much easier to work without constantly checking the written instructions.
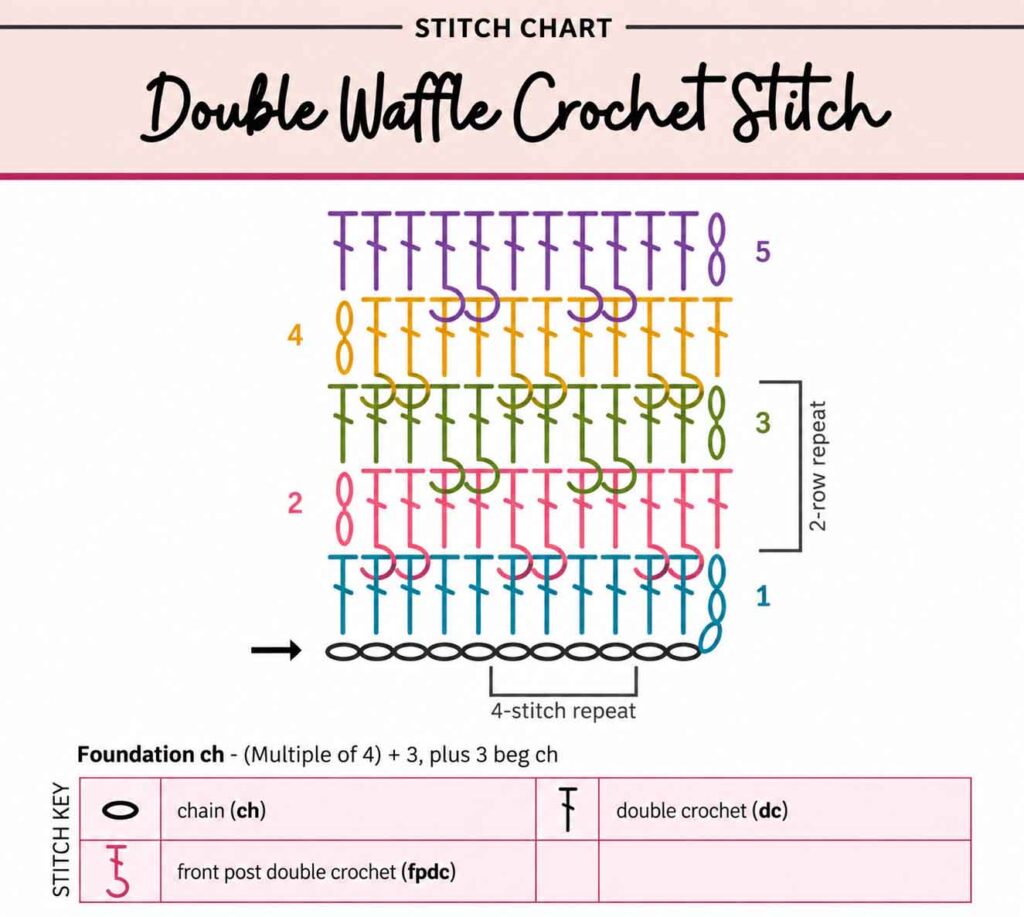
Double Waffle Crochet Stitch Chart
GRAPH
For a written chart, remember the basic structure:
Row 1: dc across
Row 2: dc + groups of 3 FPdc separated by 2 dc
Row 3: 4 dc + groups of 2 FPdc separated by 3 dc
Then repeat:
Row 2 → Row 3
Keep the stitch count consistent throughout.
VIDEO TUTORIAL
If you prefer learning visually, follow along with the video tutorial while working your first few rows.
Watching how the hook travels around the stitch post can make the FPdc technique much easier to understand, especially if this is your first time working post stitches.
Pause the video whenever necessary and work one section at a time.
After a few repeats, the movement becomes much more natural.
Final Thoughts
Once the Double Waffle Crochet Stitch finally clicks, it becomes such a relaxing pattern to work.
There is enough variation to keep your hands interested, but the repeat isn’t so complicated that you have to stop every few seconds to study the instructions. It’s the perfect kind of stitch for cozy crochet evenings when you want to work with your hands while watching a favorite show or chatting with family.
I especially love the fact that both sides of the fabric have attractive texture. They aren’t exactly the same, but either side can be used beautifully in blankets, scarves, and other projects where the back may be visible.
If you’re new to front post stitches, start with a small swatch and give yourself a few rows to get comfortable. Don’t worry if the waffle design doesn’t appear immediately. Once several repeats are completed, those raised sections and recessed pockets will really begin to stand out.
Choose a yarn you love, pick a comfortable hook, make a cup of coffee, and give this beautiful stitch a try.
Whether you turn it into a cozy blanket, a warm scarf, a decorative cushion, or simply add it to your collection of favorite crochet stitches, the Double Waffle Crochet Stitch is definitely one worth remembering.
Thank you for spending some crafty time with me here at Soofha. Keep your hook close, enjoy the process, and don’t forget to explore the rest of the blog for more crochet stitches, patterns, and creative projects.
Happy crocheting! 🧶☕

