

 soofha
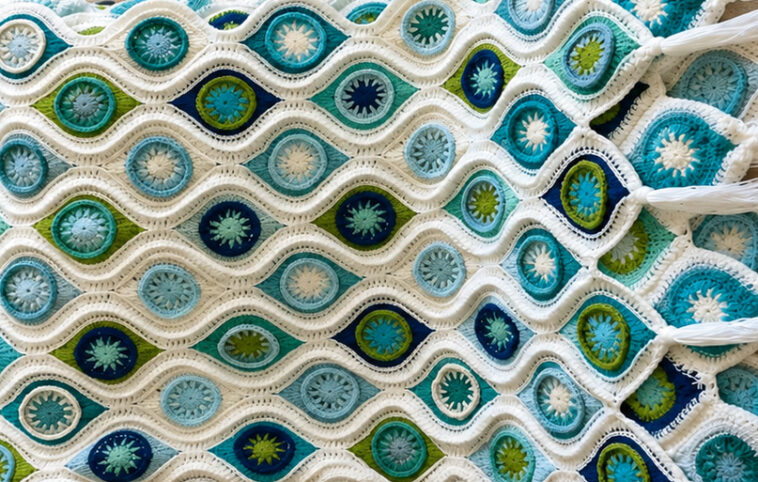
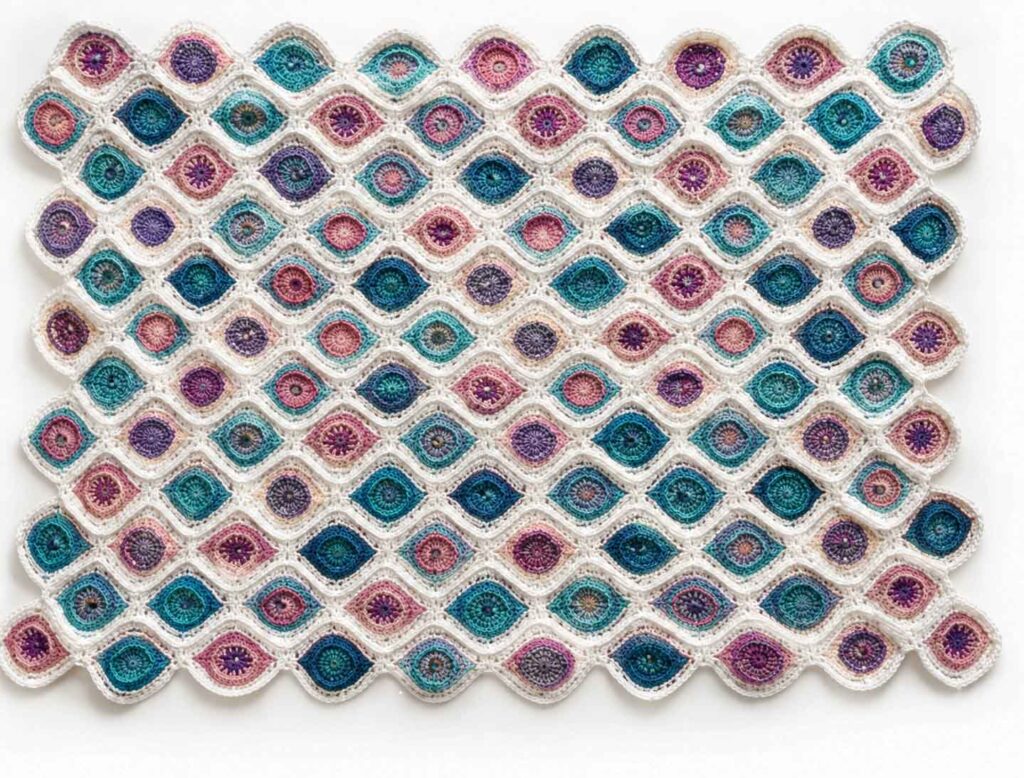
When the weather starts to cool and autumn colors begin appearing outdoors, it’s the perfect season to settle in with your crochet hook and create something warm and beautiful. The Graphic Fall Throw Crochet Pattern combines elegant geometric motifs, rich colors, and delicate texture to create a cozy handmade blanket that works beautifully as both a practical throw and a decorative accent.
With its repeating marquise-shaped motifs and colorful circular centers, this blanket has a modern graphic appearance while still maintaining the warmth and charm of traditional crochet. It’s an especially lovely project for adding personality to a sofa, reading chair, bedroom, or cozy autumn corner.
The pattern is best suited to intermediate crocheters because it includes several specialty stitches, color changes, motif joining, and a join-as-you-go construction technique. Once you become familiar with the motif, however, the repetitive nature of the design makes the project enjoyable and relaxing to work on.
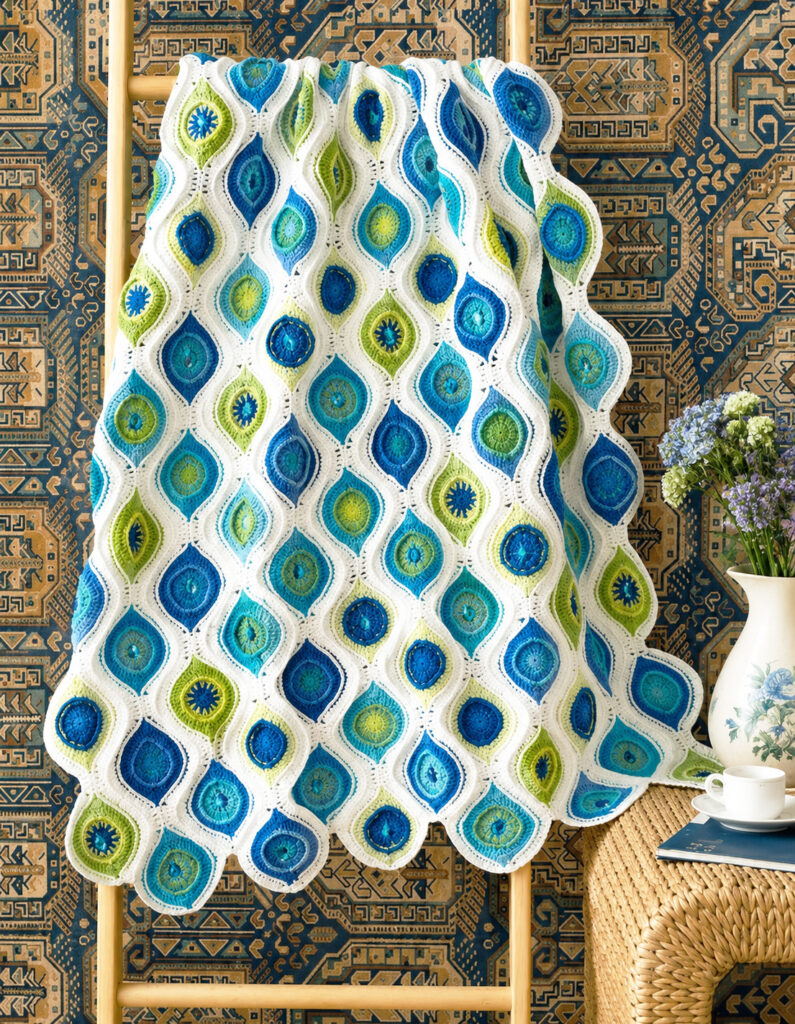
About the Graphic Fall Throw
The finished throw measures approximately 45 inches wide by 55 inches long (114.5 x 139.5 cm).
Rather than crocheting one large piece from beginning to end, the blanket is built from individual marquise motifs. A total of 84 motifs are crocheted in joined rounds. The completed motifs are arranged into strips and then joined together to create the finished blanket.
One of the most attractive details is the fringe. Long yarn tails are gathered at the ends of the strips to form decorative tassels, giving the finished throw a soft, bohemian appearance.
The join-as-you-go construction also minimizes the amount of sewing and assembly required after the motifs are completed.
Pattern Notes
Keep the following points in mind while working on your throw:
- The blanket uses 84 marquise motifs.
- Motifs are worked in joined rounds with the right side facing.
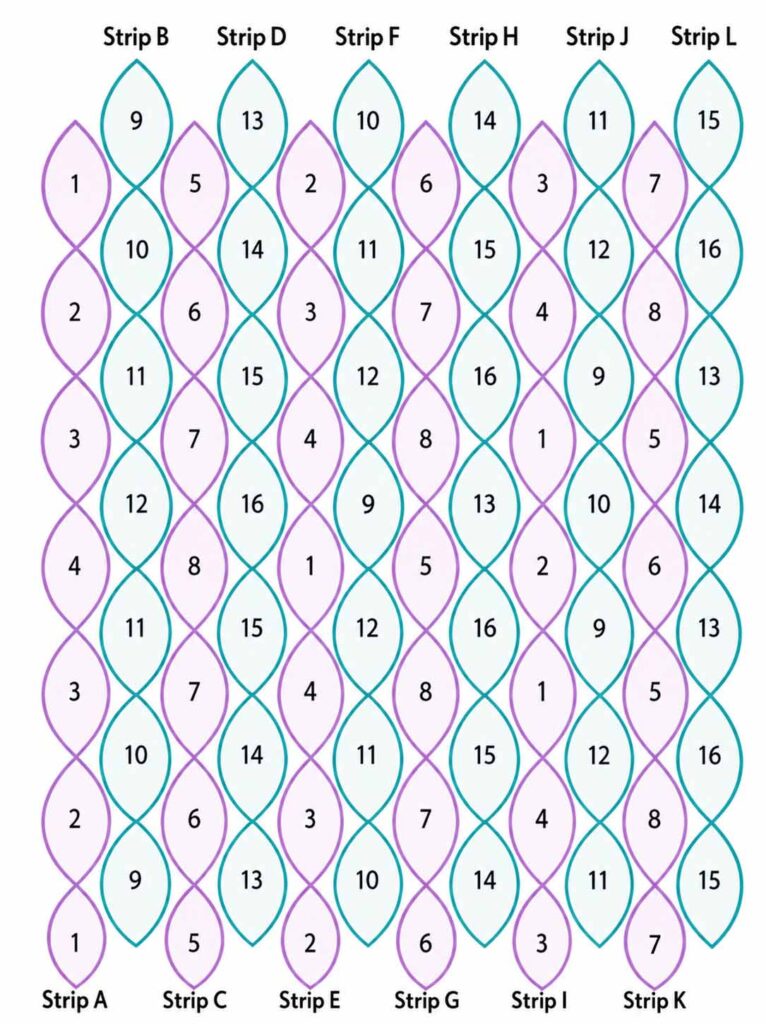
- The motifs are arranged into strips according to the intended color sequence.
- The strips are subsequently joined to form the complete throw.
- Long yarn tails are intentionally left at the beginning and end of the strips to create tassels.
- When changing colors, work the final stitch of the old color until the final yarn-over. Use the new color for the last yarn-over and pull it through the remaining loops.
- Continue crocheting with the new color and fasten off the previous color.
- When the instructions say to work into a stitch or space “2 rounds below,” count back two rounds from the round you are currently working.
For example, if you are working Round 3 and are instructed to crochet into a stitch two rounds below, the target stitch will be located in Round 1.
Special Stitches
Back Post Half Double Crochet (BPhdc)
Yarn over and insert the hook from the back of the work toward the front and then back toward the rear around the post of the indicated stitch.
Yarn over and pull up a loop. You should have three loops on the hook.
Yarn over and pull through all three loops.
Skip the stitch positioned directly in front of the back post half double crochet.
Double Crochet Two Together (dc2tog)
Yarn over and insert the hook into the next stitch. Yarn over and pull up a loop.
Yarn over and pull through two loops.
Repeat the same process in the next stitch.
Yarn over and pull through all three remaining loops on the hook.
This creates a decrease.
Special Joining Techniques
Join With BPhdc
Place a slip knot on the hook.
Yarn over and insert the hook from the back of the work toward the front and back again around the post of the specified stitch.
Yarn over and pull up a loop.
Yarn over and draw through all three loops on the hook.
Skip the stitch directly in front of the BPhdc.
Join With Double Crochet
Place a slip knot on the hook.
Yarn over and insert the hook into the specified space.
Yarn over and pull up a loop.
You should have three loops on the hook.
Yarn over and pull through two loops twice.
Join With Single Crochet
Place a slip knot on the hook.
Insert the hook into the indicated stitch.
Yarn over and pull up a loop.
Yarn over and pull through both loops on the hook.
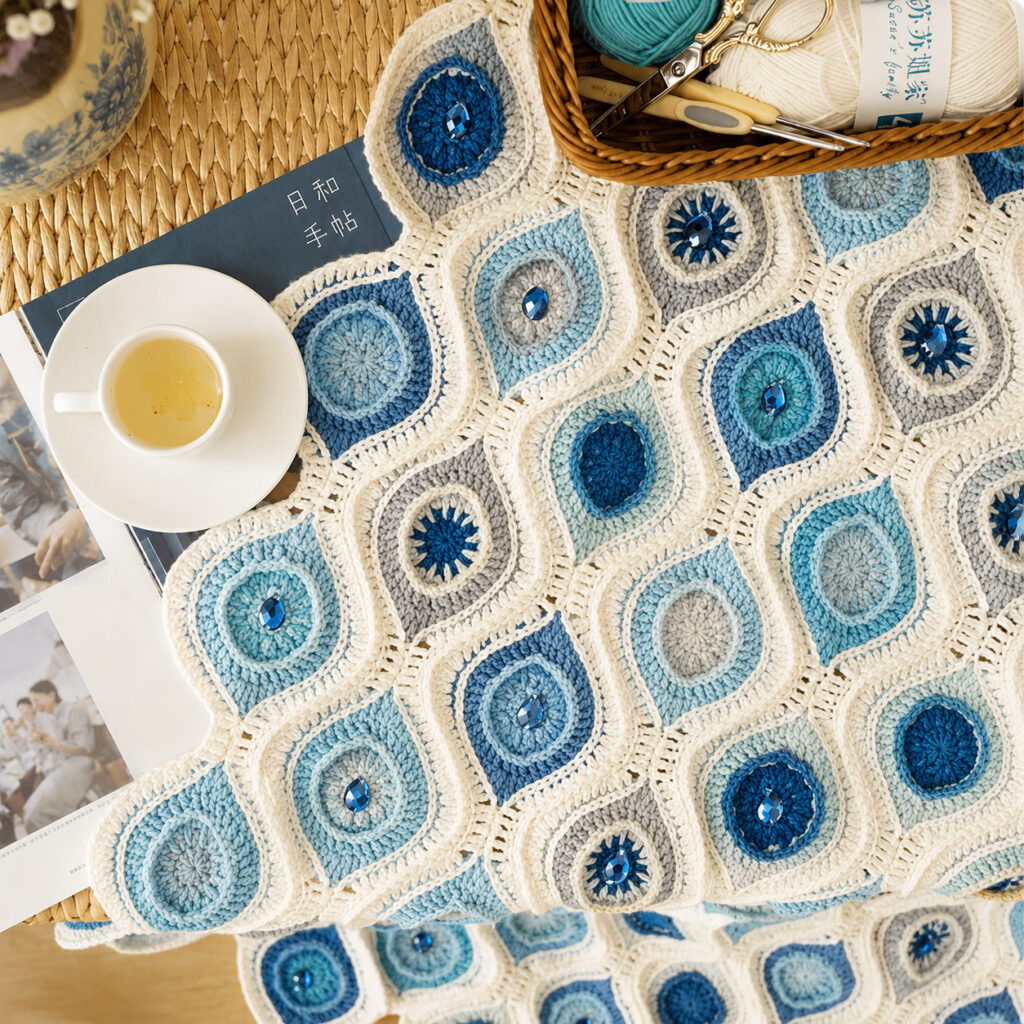
Fall Throw Crochet Pattern
Step-by-Step Crochet Pattern
Marquise Motif
Make 84 motifs according to the desired color sequence.
Begin with your first color.
Chain 4 and join with a slip stitch to the first chain to create a ring.
Round 1
Chain 3, which counts as the first double crochet.
Work 11 double crochets into the center of the ring.
Join with a slip stitch to the top of the beginning chain.
Total: 12 double crochets.
Round 2
Chain 3. This counts as the first half double crochet and chain-1 space.
Work a half double crochet in the next stitch.
Repeat:
[Chain 1, half double crochet in the next stitch]
10 times.
Chain 1.
Change to the second color and join with a slip stitch in the second chain of the beginning chain.
Total: 12 half double crochets and 12 chain-1 spaces.
Round 3
Chain 3, counting as the first double crochet.
Work a double crochet into the same stitch where you joined.
Working in front of the first chain-1 space, work a double crochet into the next stitch from two rounds below.
Repeat the following sequence 11 times:
- 2 double crochets in the next stitch.
- Working in front of the next chain-1 space, make a double crochet in the stitch two rounds below.
Join with a slip stitch to the top of the beginning chain.
Total: 36 double crochets.
Fasten off and weave in the ends.
Round 4
Join the third color with a back post half double crochet around any stitch.
Continue working a back post half double crochet around each stitch around the motif.
Join with a slip stitch to the top of the beginning BPhdc.
Total: 36 half double crochets.
Round 5
Chain 2, counting as the first half double crochet.
Work another half double crochet in the same stitch as the join.
Work a half double crochet in each of the next 2 stitches.
Repeat:
[2 half double crochets in the next stitch, half double crochet in the next 2 stitches]
3 times.
Then work:
- A half double crochet and double crochet in the next stitch.
- A double crochet in the following stitch.
- 2 treble crochets in each of the next 2 stitches.
- A double crochet in each of the next 2 stitches.
Repeat:
[2 half double crochets in the next stitch, half double crochet in the next 2 stitches]
4 times.
Continue with:
- A half double crochet and double crochet in the next stitch.
- A double crochet in the following stitch.
- 2 treble crochets in each of the next 2 stitches.
- A double crochet in each of the next 2 stitches.
Join with a slip stitch to the top of the beginning chain.
The completed round contains approximately 34 half double crochets, 8 double crochets, and two groups of 4 treble crochets.
Fasten off.
Repeat until you have completed all 84 marquise motifs.
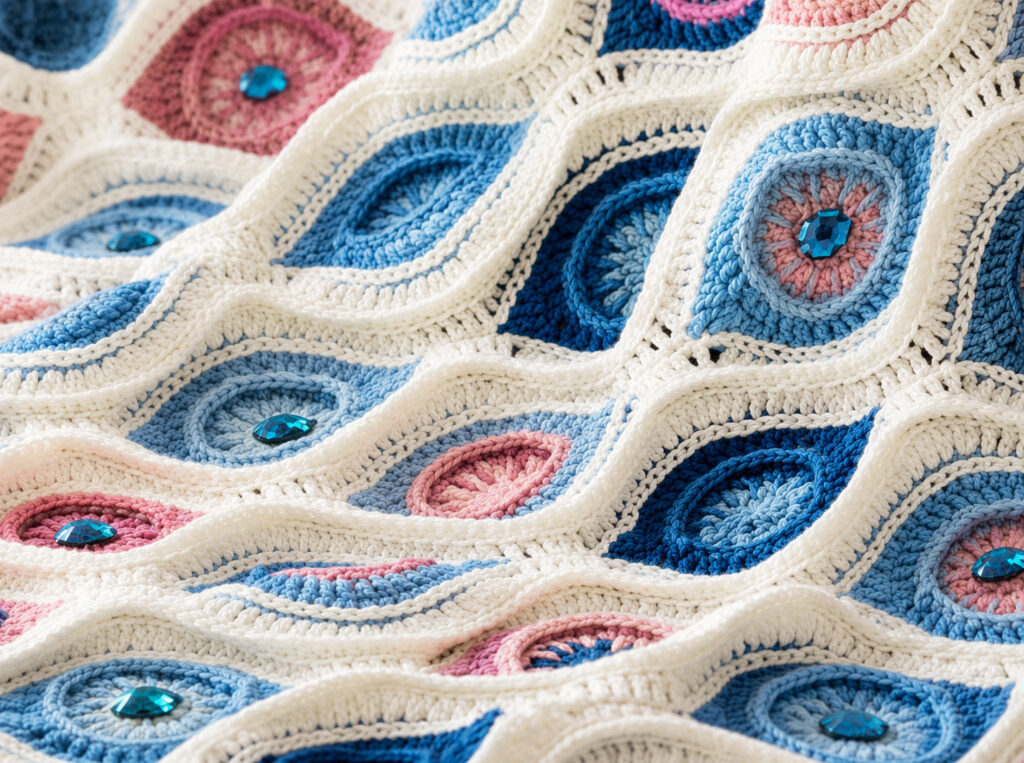
Making the Strips
Make 12 strips.
Use the assembly arrangement to determine the placement and color order of your marquise motifs.
Keep each motif with the right side facing upward. When working the strips, leave a long yarn tail at both the beginning and end of the round. These tails will later be gathered into tassels.
Strip Round 1
Using Color A, chain 1.
Working across the first edge, slip stitch into the third treble crochet of any four-treble group on the first marquise motif.
Slip stitch across the next 24 stitches.
Then repeat the following sequence four times:
- Chain 5.
- Slip stitch into the third treble crochet of a four-treble group on the next marquise motif.
- Slip stitch across the following 24 stitches.
Chain 5.
Slip stitch into the third treble crochet of the four-treble group on the first motif and continue across its next 24 stitches.
Chain 2.
Work across the opposite edge by slip stitching across the stitches of the same motif.
Slip stitch into the bottom loops of the next 5 chains.
Repeat the motif-and-chain joining sequence until all motifs in the strip have been incorporated.
Join with a slip stitch to the first chain.
Approximate stitch count: 380 slip stitches, 30 chains, 1 chain-1 space, and 1 chain-2 space.
Fasten off.
Strip Round 2
With the right side facing, join Color A with a double crochet in the chain-1 space.
Work 2 double crochets in the same space.
Continue around the strip using the following repeated sections:
- Double crochet two together twice.
- Double crochet across the next 5 stitches.
- Work 2 double crochets in the next stitch.
- Repeat the 5-stitch increase section as instructed.
- Double crochet across the next 5 stitches.
- Work two dc2tog decreases.
- Double crochet across the next 5 chains.
Repeat the established sequence around the strip.
Finish by working 3 double crochets into the chain-1 space, followed by chain 1.
Join with a slip stitch to the first double crochet.
Total: 392 double crochets, 1 chain-1 space, and 1 chain-2 space.
Fasten off.
Repeat to create all 12 strips.
Joining the Strips
Once all of your strips have been completed, lay them out according to the desired arrangement.
Take your time at this stage and check the color placement before joining. This is especially important when working with several colors because the positioning of each motif contributes to the overall graphic appearance of the blanket.
Leave long yarn tails at the beginning and end of each joining row so they can be incorporated into the decorative tassels.
Joining Strips A and B
Place the strips with the right side facing.
Using the back loops, join Color A with a single crochet in the first double crochet following the chain-1 space of Strip A.
Work single crochet into the next 13 double crochets.
Place Strips A and B together with their wrong sides facing each other.
Working through both layers and through the inner loops—the back loop of Strip A and the front loop of Strip B—single crochet through the corresponding stitches.
Continue across the joining section until reaching the chain-2 space.
Skip the chain-2 space.
Work single crochet through the back loops of the final 14 double crochets of Strip B.
Leave the chain-1 space unworked.
Total: approximately 210 single crochets.
Fasten off.
Joining Strips B and C
Turn the work so the wrong side is facing and work through the front loops where indicated.
Join Color A with a single crochet in the first double crochet following the chain-1 space of Strip C.
Work single crochet across the next 13 double crochets.
Hold Strips B and C together and work through both layers and the inner loops.
Continue joining the corresponding double crochets across the strip.
When you reach the chain-2 space of Strip C, skip it.
Finish by working single crochet through the back loops of the final 14 double crochets of Strip B.
Leave the chain-1 space unworked.
Total: approximately 210 single crochets.
Fasten off.
Continue joining the remaining strips in the same manner until the blanket is completely assembled.
Finishing the Graphic Fall Throw
Once all the strips have been joined, inspect the blanket carefully and weave in any remaining loose ends.
The long tails left at the ends of the strips can be gathered together to form the decorative fringe. Trim the tassels evenly if desired, or leave them slightly varied for a relaxed handmade look.
You can also add a simple crochet border in a coordinating color. A clean border helps frame the geometric motifs while giving the edges a more finished appearance.
For a softer autumn-inspired palette, consider using shades such as cream, rust, mustard, dusty rose, sage, teal, brown, or deep plum. Alternatively, bright turquoise, navy, green, and white can give the design a fresh modern appearance.
Tips for a Beautiful Finished Blanket
Plan Your Colors Before Crocheting
Because the blanket contains 84 individual motifs, planning the color sequence ahead of time can make assembly much easier. Arrange your completed motifs on a large surface before joining them into strips.
Keep Your Tension Consistent
Consistent tension is particularly important with this design because the motifs need to fit together evenly. If your tension changes significantly, the finished strips may not align properly.
Use Stitch Markers
If you are unfamiliar with working into stitches from previous rounds, stitch markers can help identify important joining points and reduce counting mistakes.
Weave in Ends as You Go
Although the project contains many color changes, weaving in loose ends periodically can make the final finishing stage much less overwhelming.
Check the Layout Frequently
Before permanently joining your strips, double-check the motif arrangement. A few minutes spent checking the layout can save considerable time later.
Why You’ll Love This Crochet Throw
The Graphic Fall Throw is more than just a warm blanket. Its repeating geometric motifs create a striking decorative pattern that can instantly brighten a living space.
The join-as-you-go construction makes the project particularly appealing for crocheters who enjoy creating smaller motifs rather than carrying a large blanket throughout the entire project. You can crochet the motifs individually, organize them by color, and gradually transform them into a beautiful finished throw.
The long tassels add another layer of texture and movement, giving the blanket a cozy handmade character.
Final Thoughts
The Graphic Fall Throw Crochet Pattern is a wonderful project for welcoming the cooler months with color, texture, and creativity. Its combination of marquise motifs, circular centers, geometric joining, and flowing tassels creates a distinctive handmade blanket that looks equally beautiful draped over a sofa or favorite armchair.
Whether you follow a traditional autumn palette or experiment with fresh colors like turquoise, aqua, navy, green, and cream, this pattern offers plenty of opportunities to make the finished throw your own.
Set aside some relaxing crochet time, choose your favorite yarn colors, and enjoy watching the individual motifs come together into one spectacular blanket.
Happy crocheting, and enjoy creating your beautiful Graphic Fall Throw!

