

 soofha
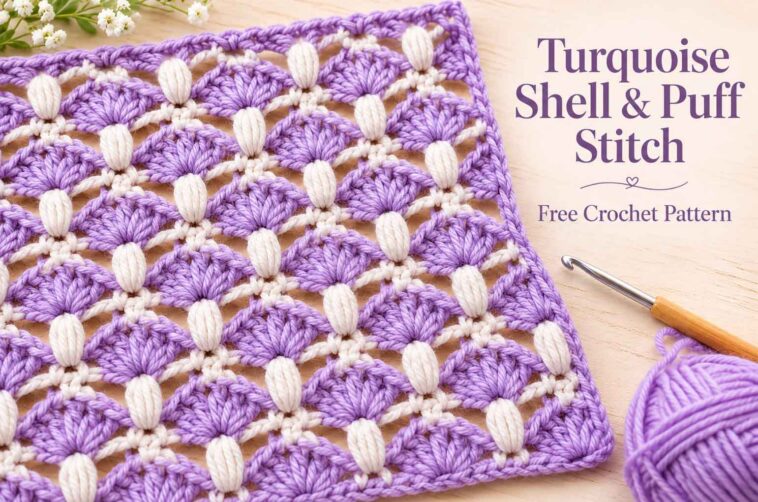
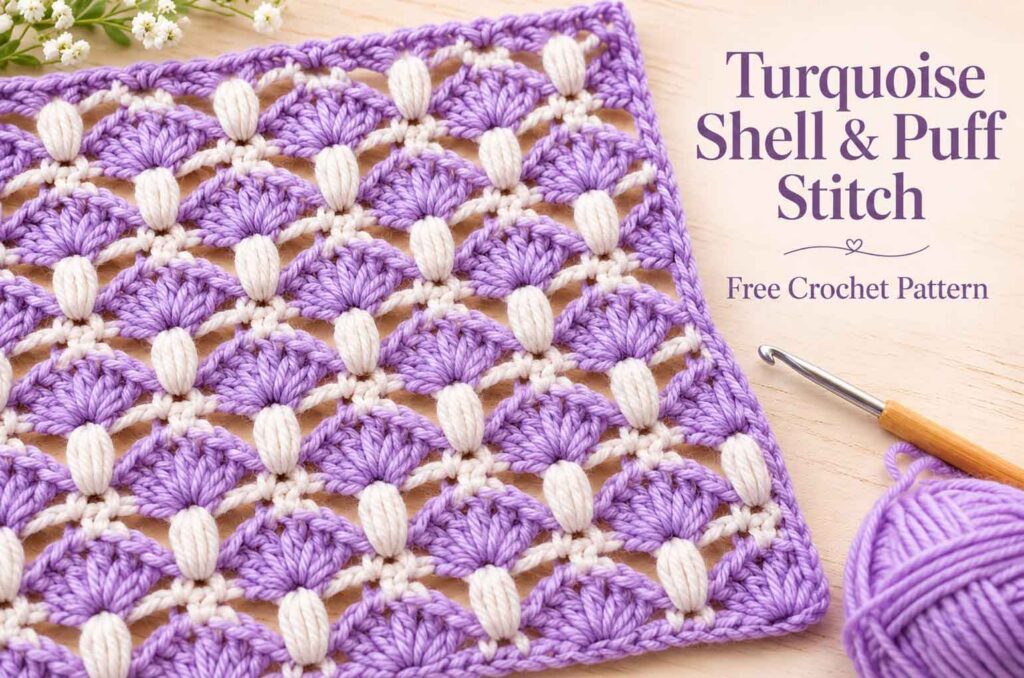
If you love crochet stitches with beautiful texture, the Turquoise Shell & Puff Crochet Stitch is one to add to your collection. It brings together delicate shell stitches, little raised puffs, and open chain spaces to create a fabric that looks detailed without being overly complicated.
The turquoise color makes the different stitches stand out beautifully. The shells create soft, fan-like shapes, while the puff stitches add a lovely raised texture. Between them, the small open arches keep the fabric from looking too heavy.
This stitch could be a lovely choice for a scarf, wrap, decorative blanket, or throw. Once you get comfortable with the placement of the shells and puffs, the repeating rows become easier to follow.
In this tutorial, you’ll find the materials list, special stitch instructions, a complete written pattern, sizing tips, and suggestions for finishing your project.
A quick note before you begin: This pattern is a written interpretation of the supplied stitch chart, not a verified original design. The seven-loop puff, turning chains, sample instructions, and optional border have been defined for this version. The original image does not specify the yarn, hook size, gauge, finished measurements, or yardage. Although the stitch placement and counts have been checked on paper, the pattern has not been independently test crocheted.
Choosing Yarn and Colors
Turquoise is a lovely choice for this stitch because it brings out the contrast between the raised puff stitches and the open spaces. However, you don’t have to stick with turquoise. Cream, dusty rose, sage green, or a soft blue would all give the finished fabric a different look.
For your first sample, try a smooth medium-weight yarn in a solid color. Smooth yarn makes it easier to see where each stitch belongs, which is especially helpful when working into shell centers and puff stitches.
Before starting a large project, crochet a small swatch and look at it in natural light. Check whether the shells are easy to distinguish and whether you like the overall texture.
It’s also worth checking how the fabric drapes. Fold your swatch, let it hang naturally, and see how it feels. A softer fabric may be ideal for a scarf or wrap, while a firmer fabric could work well for a decorative throw.
Keep a note of the yarn you use, your hook size, and the measurements of your swatch. These details will help you estimate the width and yarn requirements for your finished project.
Materials
You’ll need the following supplies to get started:
- Smooth medium-weight (#4) yarn in turquoise or another color of your choice. This is a suggested starting point, not a yarn identification from the photograph.
- 5.0 mm crochet hook, adjusted if necessary to suit your yarn and tension.
- Scissors.
- Tapestry needle for weaving in the ends.
- Tape measure.
- Two removable stitch markers.
- Optional: a small kitchen scale for estimating yarn requirements.
Skill Level, Size, and Gauge
Suggested skill level: Intermediate, or confident beginner.
You should be comfortable with chain stitches, single crochet, double crochet, and working into specific stitches or spaces.
The pattern is worked flat in turned rows. A 28-chain foundation is provided for the teaching sample, along with instructions for making the fabric wider or longer.
No original finished measurements or gauge are available from the supplied image. Your final dimensions will depend on your yarn, hook, tension, and the number of horizontal repeats you work.
Abbreviations
The pattern uses US crochet terminology.
- ch: Chain
- sc: Single crochet
- dc: Double crochet
- st / sts: Stitch / stitches
- sp: Space
- sk: Skip
- sl st: Slip stitch
- YO: Yarn over
- [ ]: Repeat the instructions inside the brackets as directed
Special Stitches
Before beginning the main pattern, take a moment to familiarize yourself with the two stitches that give this design its distinctive texture.
Shell Stitch
Work the following stitches into the same indicated stitch:
(3 dc, ch 1, 3 dc)
The chain-1 space between the two groups of three double crochets forms the center of the shell.
A half shell contains three double crochets. At the beginning of a row, a chain-3 followed by two double crochets counts as the three double crochets needed for a half shell.
Seven-Loop Puff Stitch
The puff stitch creates the raised texture that contrasts with the flatter shell stitches.
- Yarn over and insert your hook into the indicated stitch.
- Yarn over again and draw up a loop.
- Repeat the same movement two more times in the same stitch.
You should now have seven loops on your hook.
Yarn over and pull through all seven loops at once.
Do not add a separate closing chain. The first chain of the following chain-3 instruction locks the puff stitch and is included in those three chains.
Try to draw up your loops evenly so that the puff reaches approximately the height of a double crochet.
Pattern Notes
Read these notes before starting, as they will help you keep the stitch placement consistent throughout the project.
- The foundation chain is a multiple of 8 plus 4.
- Work Row 1 once, then repeat Rows 2–5.
- A beginning chain-1 does not count as a stitch.
- A beginning chain-3 counts as one double crochet.
- Row 4 begins with six chains. The first three count as a double crochet, and the next three form an arch.
- Work all six double crochets of a shell into the same indicated stitch.
- Work single crochet stitches into the shell’s center chain-1 space, not into one of the surrounding double crochets.
- On the mesh rows, skip the unmentioned double crochets and chain spaces. Work only into the specified stitches or spaces.
- The puff stitch does not need an additional closing chain beyond the following chain-3 arch.
Foundation Chain
The foundation chain follows this formula:
8 × N + 4, where N is the number of horizontal repeats.
For the teaching sample, chain 28. This gives you three horizontal repeats.
The three skipped chains at the beginning of Row 1 count as the first double crochet. Before you begin, place a stitch marker in the chain closest to your hook. This marks the top of that first counted double crochet.
Row 1 – Half Shells at Both Edges
Work 2 dc into the fourth chain from your hook. The three skipped chains count as the first dc, giving you a half shell at the beginning of the row.
Ch 1, skip the next 3 foundation chains, and work 1 sc into the next chain.
Repeat the following sequence until only 4 foundation chains remain:
[Ch 1, skip the next 3 foundation chains, work a shell into the next chain; ch 1, skip the next 3 foundation chains, work 1 sc into the next chain.]
Ch 1, skip the next 3 chains, and work 3 dc into the last chain.
Turn your work.
Row 2 – Puff Stitches Between Shell Centers
Ch 1. This chain does not count as a stitch.
Work 1 sc into the first dc.
Repeat the following sequence, working across the row:
[Ch 3, work a puff stitch into the next sc; ch 3, work 1 sc into the center ch-1 space of the next full shell.]
Continue until all the full shells have been used.
Ch 3, work a puff stitch into the last sc, ch 3, and work 1 sc into the marked top of the beginning counted dc.
On the first pass, this is the marked foundation chain. On later passes, it is the top of Row 5’s beginning chain-3.
Turn your work.
Row 3 – Full Shells Between Single Crochets
Ch 1. This does not count as a stitch.
Work 1 sc into the first sc.
Repeat the following sequence across the row:
[Ch 1, work a shell into the top of the next puff stitch; ch 1, work 1 sc into the next sc.]
Continue across, making sure that each shell is worked into the top of a puff stitch rather than into a neighboring chain space.
Work the final sc into the last sc of Row 2.
Turn your work.
Row 4 – Offset Puffs With Double-Crochet Edges
Ch 3. This counts as the first dc. Mark the third chain you just made.
Ch 3 more to create the first arch.
Work 1 sc into the center ch-1 space of the first shell.
Repeat the following sequence across the row:
[Ch 3, work a puff stitch into the next sc; ch 3, work 1 sc into the center ch-1 space of the next shell.]
Continue until all the shells have been used.
Ch 3, then work 1 dc into the final edge sc.
Turn your work.
Important: Do not work puff stitches into the two edge sc stitches of Row 3. These stitches support the double-crochet edges instead.
Row 5 – Return to the Half Shells
Ch 3. This counts as the first dc. Mark the top of this chain.
Work 2 dc into the first dc.
Ch 1, then work 1 sc into the next sc.
Repeat the following sequence across the row:
[Ch 1, work a shell into the top of the next puff stitch; ch 1, work 1 sc into the next sc.]
Continue until all the puff stitches have been used.
Ch 1, then work 3 dc into the marked third chain of Row 4’s beginning six-chain edge.
The marked chain is the top of the edge double crochet, not the top of the chain-3 arch.
Turn your work.
Continue the Four-Row Repeat
Your first row established the shell pattern, and Row 5 brings you back to a similar arrangement. From here, the stitch pattern follows a repeating sequence.
Repeat Rows 2–5 until your project reaches the length you want.
For an unbordered finish, you can stop after Row 2 or Row 4 to leave a mesh edge. If you prefer a more decorative open edge, finish after a shell row and leave the edge unbordered.
Because the original fabric has not been independently test crocheted, check your stitch placement and edge counts as you work rather than relying on appearance alone.
Complete Teaching Sample
For a small teaching swatch, follow these instructions:
- Chain 28.
- Work Rows 1–5 once.
- Repeat Rows 2–5 twice more.
- Work Row 2 one final time.
You will have 14 pattern rows, ending with a mesh row.
Fasten off if you want to keep the sample unbordered, or continue with the optional border below.
Stitch Count Reference
The following table records the expected placement counts for the written interpretation.
| Row | Full shells | Half shells | Puffs | Single crochets | Other edge dc | Ch-3 arches |
|---|---|---|---|---|---|---|
| 1 / 5 | 2 | 2 | 0 | 3 | 0 | 0 |
| 2 | 0 | 0 | 3 | 4 | 0 | 6 |
| 3 | 3 | 0 | 0 | 4 | 0 | 0 |
| 4 | 0 | 0 | 2 | 3 | 2 | 6 |
The double crochets inside full and half shells are included in the shell counts, not in the separate edge double-crochet column.
On the shell rows, there are also six connecting chain-1 spaces, plus one center chain-1 space for each full shell.
These counts describe the intended teaching sample and have been checked on paper; they are not the result of an independently crocheted test swatch.
How to Adjust the Width and Length
One of the useful things about a repeating stitch pattern is that you can adapt it to different projects without changing the basic design.
Before calculating the size of a scarf, wrap, or throw, wash or block your swatch according to the yarn label. Measure it once it has settled into its finished shape.
To estimate the width of one horizontal repeat, measure between two equivalent points that are one complete repeat apart. Alternatively, measure several repeats across the middle of your swatch and divide the measurement by the number of repeats.
Divide your desired width by the width of one repeat, then round to a whole number, N. Use at least one repeat.
Finally, calculate your foundation chain using:
Foundation chains = 8N + 4
Here are a few examples:
| Horizontal repeats (N) | Foundation chains |
|---|---|
| 3 | 28 |
| 4 | 36 |
| 5 | 44 |
| 10 | 84 |
| 20 | 164 |
For example, if one repeat measures approximately 2 inches, five repeats would give you a width of about 10 inches before adding a border. You would begin with 44 chains.
This is simply a calculation example, not a measured gauge for the photographed stitch.
Check the width again after working several rows, as the edge treatment and your personal tension can affect the finished measurement.
Suggested Throw Size
If you would like to turn this stitch into a small decorative throw, you could aim for approximately 30 × 36 inches (76.2 × 91.4 cm) before adding a border.
Use your swatch to calculate the number of horizontal repeats, work Row 1, and continue repeating Rows 2–5 until the fabric approaches your desired length. Finish after Row 2 or Row 4 if you prefer a mesh edge.
These are suggested project dimensions, not measurements taken from the original photograph.
Estimating How Much Yarn You’ll Need
Since the original image does not provide yarn information or yardage, the most reliable approach is to estimate your requirements from your own swatch.
Make a reasonably large sample using the yarn and hook you intend to use for the project. Measure its area and weigh it.
Then use this formula:
Estimated project weight = swatch weight × planned project area ÷ swatch area
If you intend to add a border, include its area in your estimate or make a separate border sample.
It is also sensible to allow an extra 15–20% for weaving in ends, differences in tension, and small variations during construction.
Once you have an estimated total weight, compare it with the weight of a full skein shown on the yarn label to work out how many skeins to purchase.
Remember that this is an estimate rather than a tested yardage requirement. Buying enough yarn from the same dye lot can also help keep the color consistent throughout your project.
Optional Simple Single-Crochet Border
A simple single-crochet border can give your finished piece a tidier edge without competing with the shell and puff texture.
For this version, finish the stitch pattern after Row 2 or Row 4, leaving a mesh edge.
Keep the working loop on your hook and do not turn your work.
Border Round 1
- Ch 1. This does not count as a stitch.
- Work 3 sc into the current corner stitch.
- Continue down the first side, placing single crochets evenly around the row ends. As a starting point, try about 2 sc around a tall row end and 1 sc around a short row end. Adjust the spacing if the edge begins to wave or pull inward.
- At the bottom corner, work 3 sc into the corner foundation chain.
- Work 1 sc into each remaining structural foundation chain across the bottom. The three chains that represented the first double crochet are part of the side edge.
- Work 3 sc into the far bottom corner chain, counting that corner only once.
- Continue evenly up the second side.
- At the top corner, work 3 sc into the corner stitch.
- Across the top, work 3 sc into each chain-3 arch and 1 sc into each intervening sc or puff. If your final pattern row was Row 4, also work into its edge double crochet as needed.
- The starting corner has already been worked. Join to the first sc with a slip stitch without adding extra stitches to that corner.
Border Round 2
Ch 1, then work 1 sc into each sc around the edge.
At each corner, work 3 sc into the middle stitch of the existing three-sc corner group.
Join with a slip stitch into the first sc, fasten off, and weave in the ends.
This is a proposed finishing option for the written interpretation, rather than a border verified on a finished sample. Pay attention to the side spacing and adjust it if the fabric begins to curl or flare.
Troubleshooting Common Problems
Even a repeating stitch can take a little practice. If your sample doesn’t look quite right, check these common trouble spots before starting again.
My Shell Count Keeps Changing
Make sure that each shell is worked into its designated stitch and that you are following the correct row sequence.
Row 3 has one more full shell than Rows 1 and 5 in the teaching sample. This difference is intentional, so don’t try to make the counts identical across every row.
My Edges Are Getting Wider or Narrower
Pay close attention to the turning chains and the stitch markers.
At the end of Row 5, the final half shell belongs in the third chain of the lower double-crochet section of Row 4’s beginning six-chain edge. It does not belong in the upper chain-3 arch.
Working into the wrong chain can change the shape of the edge and make later rows more difficult to follow.
My Foundation Chain Is Too Tight
A tight foundation can cause the bottom of your work to draw inward.
Try keeping your chain stitches relaxed and consistent. If necessary, use a slightly larger hook for the foundation chain, then return to your main hook for the remaining rows.
My Puff Stitches Look Uneven
Puff stitches can look different when the loops are drawn up to different heights.
Try to pull each loop to approximately double-crochet height and avoid tightening the yarn too much when drawing through all seven loops. Consistent loop height will help the puffs stand out more evenly.
My Fabric Looks Stiff or Too Open
Your yarn, hook size, and tension all affect the finished texture.
If the fabric feels too stiff, try a larger hook for your next swatch. If the spaces look too open or the stitches lack definition, experiment with a smaller hook.
Always make a new sample before committing to a larger project.
Download the Free Turquoise Shell & Puff Crochet Stitch PDF
If you prefer to crochet from a printed copy, a printable version of this pattern can be useful to keep beside you while you work.
A complete PDF for this written interpretation should include the row-by-row instructions, a stitch-placement map, the sample counts, sizing guidance, and the optional border instructions.
PDF availability note: A downloadable PDF file has not been attached to this article. Add the actual PDF download link here once the file has been created and uploaded.
Shell and Puff Crochet Stitch PDF
Finishing Your Crochet Project
Once you reach the desired size, fasten off and weave in your yarn ends with a tapestry needle. Take care not to pull the ends too tightly, as this can affect the fabric’s natural drape.
Wash or block the finished piece according to the yarn label, then let it rest before taking your final measurements.
If you’re making the project as a gift, consider including the yarn care instructions so the recipient knows how to look after it.
Final Thoughts
The Turquoise Shell & Puff Crochet Stitch is a lovely example of how a few different stitch techniques can work together to create an interesting fabric. The shells bring a fan-like pattern, the puff stitches add dimension, and the open arches give the design a lighter feel.
Start with the 28-chain teaching sample and take your time learning where each stitch belongs. Once the pattern becomes familiar, you can experiment with different colors, widths, and lengths to suit your next crochet project.
Whether you choose turquoise for a bold look or a softer shade for a more delicate finish, this textured stitch offers plenty of possibilities for a handmade piece that feels personal and thoughtfully made.

