

 soofha
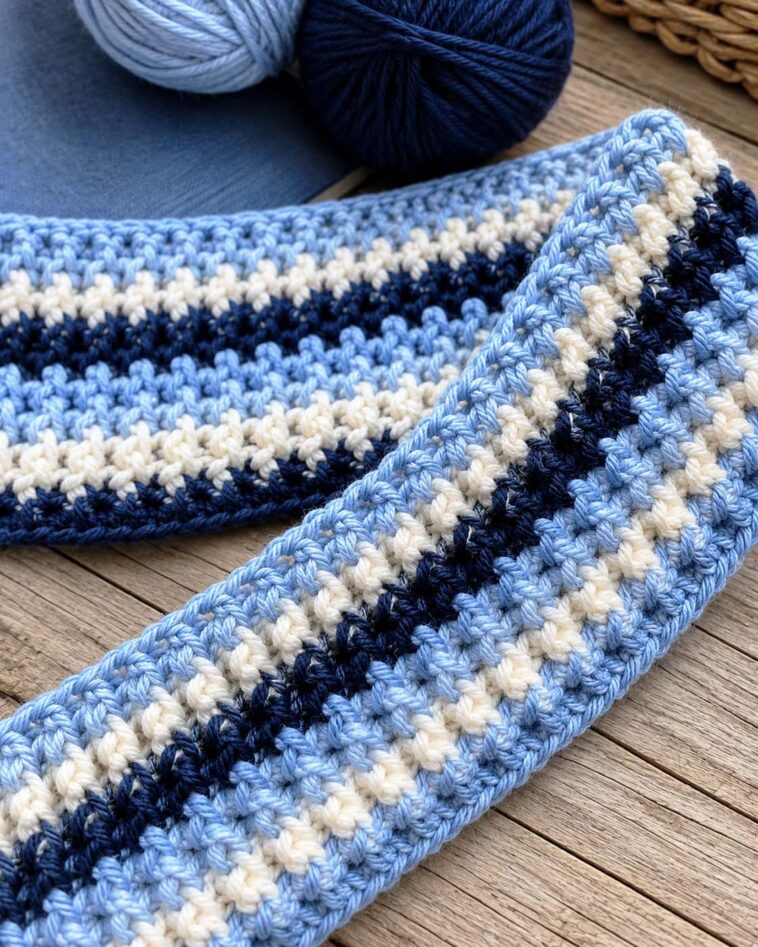
If you love crochet blankets with beautiful texture, raised stitches, and simple color changes, this Front Post Double Crochet Blanket is a wonderful project to add to your collection. The combination of light blue, navy blue, and creamy white creates a classic look that works beautifully for a baby blanket, throw, nursery blanket, or cozy sofa afghan.
The texture comes from the Front Post Double Crochet (FPdc) technique. Instead of inserting your hook through the top of the stitch, you work around the vertical post of the stitch from the front. This pushes the stitch forward and creates a raised, dimensional ridge. FPdc is commonly used for ribbing, basketweave designs, cables, and textured blankets.
The pattern below is an original blanket pattern designed to recreate the overall look and texture shown in the supplied photo, rather than claiming to be the original designer’s pattern.
Front Post Double Crochet Blanket
This blanket combines regular double crochet rows with rows of front post double crochet stitches. The result is a soft fabric with subtle raised stripes that look especially beautiful when worked in contrasting colors.
Skill Level
Advanced Beginner
You should be comfortable with:
- Chain stitch
- Double crochet
- Changing yarn colors
- Working around the post of a stitch
- Turning rows
The FPdc itself is simply a variation of the regular double crochet, so it becomes much easier after a few practice stitches.
Crochet Terms
This pattern uses US crochet terminology.
Finished Size
Approximately:
40 × 50 inches (102 × 127 cm)
The blanket can easily be made smaller or larger by changing the starting chain.
Materials
- Worsted-weight yarn (#4 medium)
- Crochet hook suitable for your yarn, approximately 5 mm (H/8)
- Yarn needle
- Scissors
- Measuring tape
For the color scheme shown in the inspiration image, use:
- Color A: Light Blue
- Color B: Cream/Off-White
- Color C: Navy Blue
You can substitute any worsted-weight yarn with a similar color palette.
A 5 mm hook and medium worsted yarn are also commonly used when learning FPdc.
Abbreviations
| Abbreviation | Meaning |
|---|---|
| ch | Chain |
| dc | Double Crochet |
| FPdc | Front Post Double Crochet |
| st | Stitch |
| sts | Stitches |
| yo | Yarn Over |
| rep | Repeat |
| sk | Skip |
How to Crochet a Front Post Double Crochet
The most important part of this blanket is learning the FPdc.
A normal double crochet is worked through the top of the stitch. With a Front Post Double Crochet, the hook goes around the vertical post of the stitch instead. This creates the raised effect on the front of the blanket.
Step 1: Yarn Over
Wrap the yarn around your hook.
Step 2: Find the Post
Look at the double crochet from the previous row.
Instead of inserting your hook through the two top loops, locate the vertical post underneath them.
Step 3: Insert the Hook
Insert your hook from front to back, then back toward the front, passing around the post.
Step 4: Yarn Over and Pull Up a Loop
Yarn over and pull the yarn around the post.
You should now have three loops on your hook.
Step 5: Complete the Double Crochet
Yarn over and pull through the first two loops.
You now have two loops remaining.
Yarn over again and pull through the final two loops.
Your FPdc is complete.
This is essentially the same finishing sequence as a regular double crochet; the major difference is where the hook is inserted.
For another slower demonstration showing both front- and back-post stitches, this tutorial includes a slow-motion section.
Practice Swatch
Before starting the blanket, I recommend practicing the stitch.
Chain 22.
Row 1
Dc in the 4th ch from the hook and dc across.
You should have 19 dc.
Ch 2 and turn.
Row 2
Dc across.
Ch 2 and turn.
Row 3
Dc in the first stitch.
Work 1 FPdc around the post of the next stitch.
Continue alternating:
1 dc, 1 FPdc
across the row.
Finish with a dc.
Row 4
Dc across.
Repeat Rows 3–4 until you feel comfortable identifying the posts.
Blanket Pattern
Foundation Chain
With Color A – Light Blue, chain 122.
To adjust the width, add or remove chains as desired. Make sure you maintain an even stitch count.
Row 1
Dc in the 4th chain from the hook.
Dc in each chain across.
You should have approximately 120 dc.
Ch 2 and turn.
Row 2
Dc in each stitch across.
Ch 2 and turn.
Row 3 – First Textured Row
This is where the raised texture begins.
Dc in the first stitch.
FPdc around the post of the next stitch.
Dc in the next stitch, FPdc around the post of the following stitch.
Repeat from * across the row.
End with a dc.
Ch 2 and turn.
Row 4
Dc in every stitch across.
Ch 2 and turn.
Row 5
Repeat Row 3:
Dc in the first stitch.
FPdc around the post of the next stitch, dc in the following stitch.
Repeat across.
Finish with a dc.
Ch 2 and turn.
Row 6
Dc across.
Ch 2 and turn.
Creating the Striped Effect
The beautiful appearance in the photograph comes largely from combining the raised stitch texture with contrasting horizontal color bands.
You can use the following color sequence.
Suggested Color Sequence
| Rows | Color |
|---|---|
| 1–6 | Light Blue |
| 7–8 | Cream |
| 9–14 | Navy |
| 15–20 | Light Blue |
| 21–22 | Cream |
| 23–28 | Navy |
| 29–34 | Light Blue |
| 35–36 | Cream |
| 37–42 | Navy |
Continue repeating this sequence until your blanket reaches your desired length.
For a softer, more traditional look, make the light blue sections wider than the cream and navy sections.
How to Change Colors
Change colors at the end of the row.
When you have two loops remaining on your final stitch, drop the old color and complete the final yarn over using the new color.
Then:
Ch 2 and turn.
Continue with the new color.
This keeps the color transition relatively clean and prevents unnecessary loose ends from appearing along the edge.
Important Tip for FPdc Rows
One of the easiest mistakes when learning post stitches is accidentally working into the top of the same stitch after you’ve already worked around its post.
Remember:
The FPdc is worked around the post.
The top of that stitch is not used again for another stitch in the same row.
Post stitches are specifically worked around the vertical post rather than through the normal top “V” of the stitch.
Continue the Blanket
Repeat the following two-row texture sequence throughout the project:
Texture Row
Dc, FPdc, dc, FPdc across.
Plain Row
Dc across.
Repeating these rows gives the blanket its raised, ribbed appearance while keeping the construction relatively simple.
Continue until the blanket measures approximately 50 inches long, or until it reaches your preferred size.
Optional Border
A simple border works especially well with this textured blanket.
After completing your final row, do not fasten off.
Border Round 1
Ch 1.
Work sc evenly around the entire blanket.
Place 3 sc in each corner.
Join with a slip stitch.
Border Round 2
Ch 1.
Sc in every stitch around.
Place 3 sc in each corner.
Join with a slip stitch.
Fasten off.
Weave in all ends.
For an especially polished finish, use navy blue for the final border so it frames the light blue and cream stripes.
Finishing Your Blanket
Once the final border is complete:
- Cut the yarn.
- Pull the tail through the final loop.
- Thread the yarn needle.
- Weave the end securely through several stitches.
- Trim the excess yarn.
- Repeat for all remaining ends.
- Block the blanket if desired.
Blocking can help straighten the edges and even out the stitches.
Tips for Getting Beautiful FPdc Texture
Keep your tension relaxed
Don’t pull the yarn too tightly when working around the post. A tight FPdc can make the fabric stiff and difficult to work.
Identify the post before inserting your hook
The post is the vertical section underneath the top loops. Once you recognize it, FPdc becomes much easier.
Don’t skip stitches
Because you’re working around the post instead of through the top loops, it can initially look like you’re skipping a stitch. You’re not—the post stitch counts as your stitch.
Use contrasting colors
FPdc texture becomes particularly noticeable when combined with colors such as:
- Navy + white
- Light blue + cream
- Gray + white
- Sage + ivory
- Burgundy + cream
- Black + gray
Practice before starting the blanket
A small swatch can save a lot of frustration. Work several rows before beginning the full-size blanket.
Why You’ll Love This Crochet Blanket
This design has several qualities that make it a great handmade project.
Texture: The FPdc stitches create raised details without requiring complicated cable techniques.
Easy color changes: The stripes add visual interest while allowing you to use leftover yarn.
Customizable: You can make the blanket narrower for a baby blanket or wider for a sofa throw.
Beginner-friendly texture: Once you know regular double crochet, FPdc is a manageable next step.
Great for gifts: The classic blue, cream, and navy combination works for nurseries, bedrooms, living rooms, and cozy winter throws.
Frequently Asked Questions
What does FPdc mean in crochet?
FPdc means Front Post Double Crochet. It is a double crochet worked around the post of the stitch rather than through its top loops.
Is Front Post Double Crochet difficult?
It can feel unusual the first time you try it, but the actual stitch is very similar to a normal double crochet once the hook is positioned around the post.
What is FPdc used for?
FPdc is frequently used to create ribbing, raised texture, basketweave designs, cables, and dimensional crochet patterns.
Can I use this pattern for a baby blanket?
Absolutely. Simply reduce the foundation chain and work fewer rows. A soft washable worsted-weight yarn is a practical choice.
Can I make the blanket larger?
Yes. Increase the foundation chain for additional width and continue repeating the pattern rows until you reach the desired length.
Can I use different colors?
Definitely. The stitch texture works beautifully with almost any color combination. You can even make every textured section a different shade for a more colorful blanket.
What is the difference between FPdc and BPdc?
An FPdc brings the stitch forward toward the front of the fabric, while a BPdc is worked around the post from the back and pushes the stitch toward the opposite side. Alternating the two can create pronounced ribbing and basketweave textures.
Video Tutorial
If you’re new to Front Post Double Crochet, watching the stitch being made can make the technique much easier to understand.
You can also watch a slower FPdc/BPdc demonstration that shows how the hook travels around the post and how the two post stitches create different textures.
Final Thoughts
The Front Post Double Crochet Blanket is a great example of how one relatively simple technique can transform an ordinary crochet fabric into something with much more depth and character.
The combination of light blue, creamy white, and navy gives this blanket a timeless appearance, while the raised FPdc stitches provide the cozy texture that makes handmade blankets so special.
If you’re comfortable with double crochet and ready to learn a texture stitch, this is an excellent project to try. Start with a small swatch, practice identifying the stitch posts, and then move on to the full blanket. Once the technique becomes familiar, you’ll be able to use FPdc in blankets, scarves, hats, sweaters, borders, and many other crochet projects.

