
 soofha
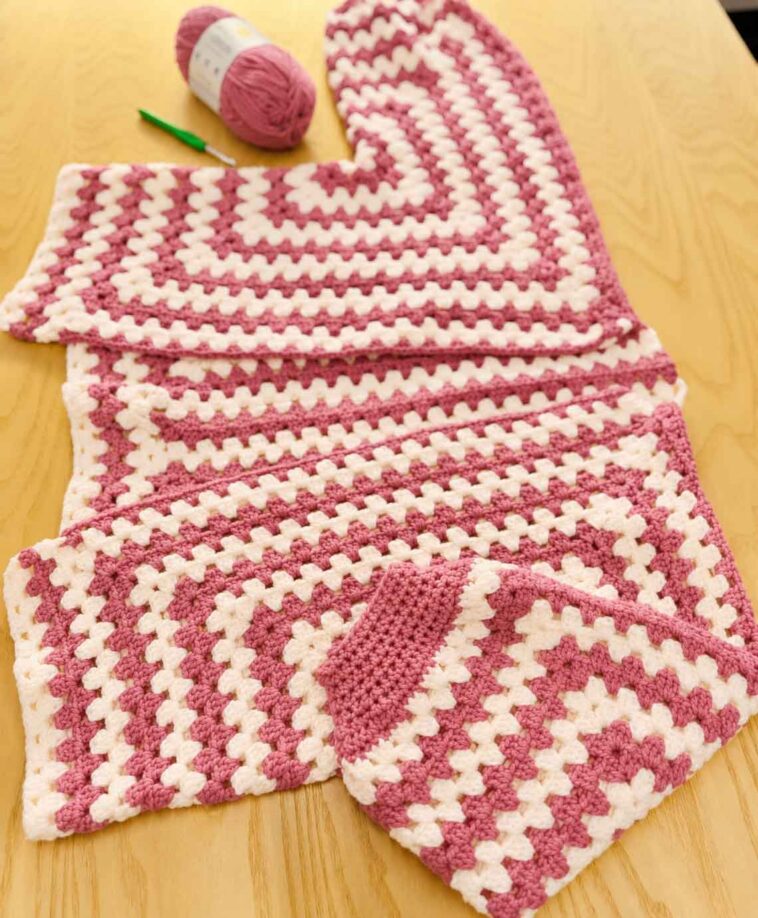
There is something special about turning a few simple crochet stitches into a garment you can wear and enjoy. If you have been wanting to make your own cardigan but feel a little intimidated by shaping sleeves, shoulders, and the body, this crochet hexagon cardigan pattern is a lovely place to start.
Welcome to Soofha! Today, we are looking at a clever way to crochet a comfortable cardigan using two large granny-style hexagons. Instead of making separate front panels, a back panel, and individual sleeves, you begin with two main pieces. With a little folding, joining, and finishing, those pieces become a relaxed cardigan.
The construction might seem unusual at first, especially if you are used to crocheting blankets or traditional granny squares. You work in rounds, adding clusters of double crochet stitches around each hexagon. Once the pieces are large enough, you extend selected sides to create more room through the body without unnecessarily widening the sleeves.
Crochet Hexagon Cardigan Pattern
One of the nicest things about this design is how easily you can make it your own. Choose a single shade for a simple, timeless look, combine two or three colors for a striped effect, or use leftover yarn from other projects to create a colorful cardigan. You can also adjust the length, change the sleeve shape, and add buttons if you prefer a more finished front.
If you enjoy crochet projects that look complicated but use familiar stitches, this is a pattern worth exploring.
What Is a Crochet Hexagon Cardigan?
A crochet hexagon cardigan is made from two large crocheted hexagons that are folded and joined to create the main shape of the garment.
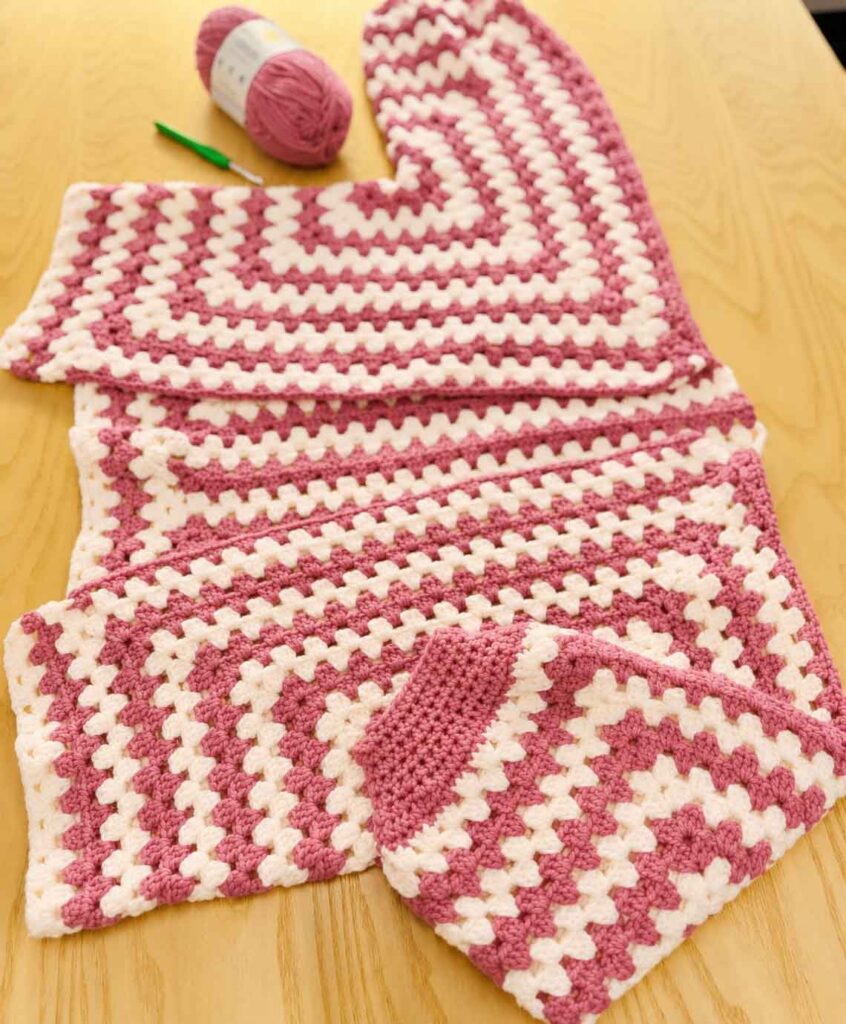
Each hexagon starts small and grows outward with granny-style clusters. The six-sided shape allows the fabric to fold naturally into an L-like section, forming part of the body and one sleeve. When the two pieces are brought together, the back, shoulders, and sleeves begin to take shape.
The beauty of this construction is that you do not have to crochet every part separately. Much of the shaping happens through the arrangement of the hexagons rather than complicated increases and decreases.
For this version, the hexagons are worked evenly until the sleeve depth is sufficient. After that, three consecutive sides are extended to provide additional width and length through the body. The remaining sides form the sleeve sections.
You can then adjust the sleeves, add cuffs, extend the bottom if needed, and finish the front opening with a neat border.
A little tip before you begin: Do not worry if your hexagons look wavy or refuse to lie completely flat. That is normal for many granny hexagon cardigan constructions. The extra fabric helps the pieces fold into the shape needed for the garment.
Why You’ll Love This Crochet Cardigan
- Familiar stitches: The pattern uses double crochet clusters and chain spaces, making it manageable if you already know the basics.
- Clever construction: Two main pieces create most of the cardigan, so there are fewer separate sections to assemble.
- Flexible sizing: You can work from your own measurements instead of relying entirely on a fixed size.
- Easy to customize: Change the sleeve length, add extra body rows, or choose a different edging.
- Beautiful in many colors: Granny-style clusters work well with solid shades, color changes, and leftover yarn.
- Comfortable everyday style: The relaxed shape is ideal for layering over a T-shirt, blouse, or simple dress.
Crochet Hexagon Cardigan Pattern Details
Skill level: Intermediate
Construction: Two granny-style hexagons, folded and joined
Stitch pattern: Double crochet clusters with chain-2 corners
Fit: Relaxed, with customizable body and sleeve measurements
Finishing options: Ribbed cuffs, front edging, and optional buttons
This pattern uses a made-to-measure approach. Your finished cardigan will depend on your yarn, hook, tension, and the measurements you choose.
Materials You’ll Need
Gather the following supplies before starting:
- Light-weight or light-worsted yarn
- 5.0 mm crochet hook, or the hook needed to achieve your preferred fabric
- Stitch markers
- Yarn needle for sewing seams and weaving in ends
- Scissors
- Measuring tape
- Buttons, if desired
For reference, the original Horizon version uses a 5.0 mm hook with a light acrylic yarn measuring approximately 550 meters per 200 grams.
Yarn quantities will vary according to the size of your cardigan, the length of the sleeves, and whether you add extra rows to the body. It is best to check your measurements and have enough yarn available before beginning.
Choosing the Right Yarn
For a cardigan that drapes comfortably over your clothes, choose a yarn that feels soft and has some movement. Acrylic yarn is a practical option because it is generally easy to care for and comes in a wide range of colors.
A lighter yarn will usually create a softer, more flowing garment, while a thicker yarn can produce a warmer cardigan with more structure. Whatever you choose, try to keep the yarn weight consistent throughout the project.
If you plan to use several colors, think about how often you want the colors to change. Alternating shades every few rounds can create a lovely striped effect without making the pattern more complicated.
Abbreviations Used in This Pattern
The following abbreviations use US crochet terminology.
- ch: chain
- dc: double crochet
- sl st: slip stitch
- sp: space
- st(s): stitch(es)
- cl: cluster
- fpdc: front post double crochet
- bpdc: back post double crochet
- RS: right side
- WS: wrong side
- sk: skip
- dc2tog: double crochet two together
How to Make a Cluster
For this pattern, a cluster consists of three double crochet stitches worked into the same space.
Work 3 dc into the indicated space.
How to Make a Hexagon Corner
At each corner space, work the following sequence:
(3 dc, ch 2, 3 dc)
This creates the corner increase that allows the hexagon to grow evenly around its six sides.
Take Your Measurements Before Starting
Because this cardigan is adjustable, measuring before you begin will make it easier to get a comfortable fit.
1. Arm Depth
Measure around the part of your arm where you want the sleeve to fit. Use this measurement as a guide for the sleeve opening and upper-arm comfort.
2. Finished Chest Circumference
Measure around your chest or bust at the fullest point. Add a little extra room if you prefer a loose, relaxed cardigan.
3. Quarter Chest Measurement
Divide your desired finished chest circumference by four. This gives you a useful reference for the body-extension stage.
4. Finished Cardigan Length
Measure from your shoulder to the point where you want the cardigan to end. You can make it waist-length, hip-length, or longer.
5. Center Back to Wrist
Measure from the center of your upper back, across your shoulder, and down to your wrist. This helps you estimate the overall sleeve length.
Keep your measurements nearby as you work. It is much easier to make small adjustments along the way than to discover at the end that the cardigan is shorter or wider than you wanted.
Step-by-Step Crochet Hexagon Cardigan Pattern
You will make two identical hexagons. Turn your work after every round.
Part 1: Crochet the First Hexagon
Round 1
Make a magic ring.
Ch 3. This beginning chain counts as the first dc.
Work 2 dc into the ring.
Ch 2, then work 3 dc into the ring.
Repeat the sequence of ch 2 and 3 dc around until you have six clusters in total.
Join with a sl st to the top of the beginning ch-3.
You should now have six clusters and six ch-2 corner spaces.
Turn your work.
Round 2
Sl st into the first ch-2 corner space.
Ch 3, then work 2 dc into the same space.
Ch 2, then work 3 dc into that same corner space.
Move to the next corner and work the following sequence:
(3 dc, ch 2, 3 dc)
Repeat in every remaining corner space.
Join with a sl st to the top of the beginning ch-3, then turn.
You should now have two clusters along each side of the hexagon.
Round 3
Sl st into the first corner space.
Work (3 dc, ch 2, 3 dc) into the corner.
Work 3 dc into each space between the clusters along the side.
At the next corner, work (3 dc, ch 2, 3 dc).
Continue around the hexagon, placing one cluster in each space between clusters and a corner increase in every corner.
Join with a sl st and turn.
Part 2: Continue Growing the Hexagon
Repeat Round 3 until the hexagon reaches your desired arm-depth measurement.
For every new round:
- Work 3 dc into each space between clusters.
- Work (3 dc, ch 2, 3 dc) into every corner space.
- Join the round and turn your work.
Each new round adds another cluster along each side.
Check your measurements occasionally rather than relying only on the number of rounds. Different yarns and crochet tensions can produce noticeably different sizes.
Once the first hexagon reaches the required measurement, make the second one in exactly the same way.
Important: Both hexagons should have the same number of rounds and approximately the same dimensions. This will help the cardigan fit evenly when the pieces are joined.
Part 3: Extend the Body of the Hexagons
Now comes the part that gives this cardigan its shape.
Instead of continuing around all six sides, you will work back and forth across three consecutive sides of each hexagon. These extensions provide extra fabric for the front, bottom, and back of the cardigan while leaving the other three sides unchanged for the sleeve section.
Place stitch markers at the beginning and end of the three sides you intend to extend.
Extension Row 1
Begin at the outer corner of the first marked side.
Ch 3 and work 2 dc into the same corner space.
Work 3 dc into each space between clusters along the first side.
At the first internal corner, work (3 dc, ch 2, 3 dc).
Continue across the middle side, working one cluster in each space.
At the next internal corner, work (3 dc, ch 2, 3 dc).
Continue across the third side and finish at the opposite outer edge with the appropriate corner cluster.
Turn your work.
Extension Row 2
Ch 3.
Work 3 dc into each cluster space across the first side.
At both internal corners, maintain the corner sequence of (3 dc, ch 2, 3 dc).
Continue across the final side.
Work a dc into the top of the turning chain, then turn.
Extension Row 3
Ch 3.
Work 2 dc into the first available cluster space.
Continue working 3 dc into each space across the row.
Maintain the corner sequence of (3 dc, ch 2, 3 dc) at both internal corners.
When one space remains at the opposite edge, work 2 dc into that space.
Work a dc into the top of the turning chain and turn.
Continue the Body Extensions
Repeat Extension Rows 2 and 3 until the body has the width you want.
Every few rows, fold the hexagon into its approximate cardigan shape and check how it looks. This is a useful way to judge the fit before adding too much fabric.
Continue until the folded body section reaches your Quarter Chest measurement.
Repeat the same number of extension rows on the second hexagon.
The important point here is to extend only the selected three sides. Increasing all six sides at this stage would also enlarge the sleeve area, which is not the intention of this construction.
Part 4: Fold the Hexagons Into Shape
Once both pieces are complete, lay them on a flat surface.
Fold each hexagon so that the sleeve section and body section form an L-like shape. Arrange the two folded pieces as mirror images of one another.
You should now be able to identify:
- Two sleeve sections
- Two front sections
- The lower body edges
- The two back edges that will meet at the center back
Take a moment to check that the pieces are facing the correct way before joining them.
Using stitch markers or pins to hold the edges together can make this step much easier, especially if the fabric is soft or stretchy.
Part 5: Join the Center Back
Place the two center-back edges together, matching the clusters as neatly as possible.
Using matching yarn, join the edges with your preferred method:
- Slip stitches
- Whip stitch
- Mattress stitch
Work from the bottom of the back toward the neckline, keeping the seam even.
Fasten off securely and weave in the end.
A neat, flat seam is a practical choice for this cardigan. It keeps the back together without adding unnecessary bulk.
Part 6: Join the Shoulders and Sleeve Seams
Lay the cardigan flat again and align the upper edges of the folded pieces.
Leave an opening at the center back for the neckline. As a starting point, you can leave approximately three granny spaces unseamed on either side of the center-back seam, then adjust the opening to suit your preferred neckline.
Pin the shoulder and sleeve edges together before sewing.
If possible, try the cardigan on or hold it against your body to check the shoulder placement and neckline opening.
Join each side from the outer sleeve edge toward the neckline, making sure the seams are secure but not too tight.
Fasten off and weave in the ends.
At this stage, you should be able to see the cardigan taking shape clearly. The sleeves and body are connected, and the remaining work is mostly about getting the length and finishing details right.
Part 7: Crochet the Sleeves
Work the sleeves one at a time.
Join your yarn at the underarm seam.
Sleeve Round
Ch 3 and work 2 dc into the same space.
Work 3 dc into each granny space around the sleeve opening.
Join with a sl st to the top of the beginning ch-3.
Turn your work.
Repeat this round until the sleeve is approximately 3–4 inches shorter than your desired finished length. The remaining length will be used for the cuff and any shaping you want to add.
Use your Center Back to Wrist measurement as a guide, but try the cardigan on whenever possible. Arm length and preferred sleeve fit can vary, so your own measurements are the best reference.
Optional Sleeve Taper
If you like roomy sleeves, you can skip the taper and move directly to the cuff.
For a narrower wrist, you can reduce the sleeve opening gradually.
Decrease Round 1: Ch 3 and work 2 dc into each granny space around. Join the round.
Decrease Round 2: Ch 3 and work dc around, placing dc2tog decreases at regular intervals until the opening fits comfortably around your wrist. Join the round.
Decrease Round 3: Ch 3 and work 1 dc in each stitch around. Join.
Check the stitch count before beginning the ribbing. The stitches should be arranged so the post-stitch pattern can be repeated evenly.
These decrease instructions are intended as a shaping guide. The exact number of decreases will depend on your sleeve circumference and the stitch count you have.
Part 8: Add the Ribbed Cuffs
Ribbed cuffs give the sleeves a tidy finish and help them sit comfortably around the wrists.
Cuff Round 1
Ch 2.
Work a front post double crochet (fpdc) around the next dc, followed by a back post double crochet (bpdc) around the next dc.
Repeat this sequence around the sleeve.
Join with a sl st.
Cuff Rounds 2–7
Repeat the same pattern, working fpdc around each fpdc and bpdc around each bpdc.
Continue for seven rounds in total, or add or remove rounds to achieve your preferred cuff length.
Fasten off and weave in the yarn end.
Repeat the process for the second sleeve.
If you prefer a loose, relaxed sleeve, keep the cuffs relatively short. For a snugger finish, work a few extra ribbing rounds.
Part 9: Add Extra Length to the Body
You may find that the cardigan is already the right length after joining the hexagons. If so, you can skip this section.
If you would like a longer cardigan, extra rows can be added along the lower edge.
With the right side facing, join your yarn at one lower front corner.
Body Row 1
Ch 3 and work 2 dc into the first space.
Work 3 dc into each granny space across the bottom edge, including the center-back join.
Work 3 dc into the final corner.
Turn.
Body Row 2
Ch 3.
Work 3 dc into each space between clusters across the row.
Work a dc into the top of the turning chain.
Turn.
Body Row 3
Ch 3.
Work 2 dc into the first space.
Work 3 dc into each space across the row.
Work 2 dc into the final space, then work a dc into the top of the turning chain.
Turn.
Repeat Body Rows 2 and 3 until the cardigan reaches your preferred length.
Measure from the shoulder rather than judging the length while the garment is lying flat. This will give you a better idea of how it will sit when worn.
Part 10: Finish the Front Opening and Neckline
A simple border around the front opening and neckline gives the cardigan a clean, finished appearance.
Join your yarn at one lower front corner.
Edging Round 1
Ch 1.
Work single crochet stitches evenly up the first front edge.
Continue around the neckline and down the opposite front edge.
Work across the bottom edge to return to the starting point.
At each lower corner, work 3 sc into the corner area to help the edging turn neatly.
Join with a sl st.
Edging Round 2
Ch 1.
Work 1 sc into each stitch around the front opening, neckline, and bottom edge.
Work 3 sc into each lower corner.
Join with a sl st and fasten off.
You can repeat this round if you want a wider border. Keep the tension relaxed enough that the front edges do not pull inward.
Optional: Add Buttons
Buttons are a lovely finishing touch if you want the cardigan to close at the front.
Choose buttons that suit the weight and style of your yarn. Sew them evenly along one front edge, checking their placement against the opposite edge before securing them.
Depending on the size of the buttons and the spacing of the crochet fabric, you may be able to use the existing spaces as buttonholes.
Alternatively, create buttonholes in the final edging round by working:
Ch 2, skip 2 stitches.
Repeat at the positions where you want the buttonholes, making sure each one lines up with a button on the opposite side.
For a longer cardigan, six to eight buttons can be a useful starting point, although the number will depend on the length of the front opening and your personal preference.
If you prefer an open-front cardigan, simply leave the buttons out. The design works beautifully without them.
Finishing Your Crochet Hexagon Cardigan
Before calling your cardigan finished, take a little time to check the details.
- Weave in all loose yarn ends.
- Check that both sleeves are the same length.
- Make sure the shoulder and back seams are secure.
- Check the neckline and front edging for pulling or uneven tension.
- Try the cardigan on and make any final adjustments.
- Gently block the finished garment if your yarn allows it.
Blocking can help even out the granny clusters and smooth the seams. Always follow the care instructions for your chosen yarn, especially if it contains acrylic or other synthetic fibers.
Let the cardigan dry completely before wearing or storing it.
Tips for Getting the Best Results
Check the Fit as You Go
The main advantage of this construction is that you can make adjustments while crocheting. Try the cardigan on after joining the body and again before finishing the sleeves.
A few extra rows can make a noticeable difference in sleeve length or overall coverage.
Keep Both Hexagons Consistent
Count your rounds and extension rows on the first hexagon. Use those numbers as a reference for the second piece so the cardigan remains balanced.
Choose Colors That Work Together
A single color creates a classic look, while two coordinating shades can highlight the construction. If you are using several colors, consider keeping the cuffs and front edging in one shade to bring the design together.
Do Not Rush the Joining Stage
The folding and joining can seem confusing before the pieces are arranged correctly. Lay the hexagons flat, use stitch markers, and check the orientation before sewing.
Remember That Yarn Changes the Result
Even when two people follow the same instructions, their cardigans may turn out differently because of yarn weight, hook size, and tension. Measuring the garment is more reliable than copying a round count from another project.
Frequently Asked Questions
Is a crochet hexagon cardigan suitable for beginners?
It can be a good project for a confident beginner who already knows how to make chains, double crochet stitches, slip stitches, and granny clusters. The folding and joining stages may take a little patience, but the main stitch pattern is repetitive.
How many hexagons are needed?
You need two matching hexagons. Once they are folded and joined, they form the main body and sleeves of the cardigan.
Why does my crochet hexagon look wavy?
The extra fabric created by the corner increases allows the hexagon to fold into the cardigan shape. A wavy appearance is common in this type of construction and does not automatically mean you have made a mistake.
Can I make the cardigan longer?
Yes. Add more rows along the lower body edge before completing the front edging. You can also make the initial hexagons larger, depending on the fit you want.
Can I make the sleeves longer or shorter?
Absolutely. Continue crocheting the sleeve rounds until you reach the desired length, remembering to leave room for the cuff if you plan to add one.
Can I use leftover yarn?
Yes, provided the yarns have reasonably similar weights and care requirements. Combining leftover shades is a lovely way to create a colorful cardigan. Make sure you have enough yarn for both sleeves and the finishing details.
Does this cardigan have to include buttons?
No. Buttons are optional. You can leave the front open for a relaxed look or add buttons if you prefer a cardigan that can be closed.
What should I do if the sleeves are too wide?
You can add gradual decreases before beginning the ribbed cuffs. Check the sleeve circumference as you work and space the decreases evenly rather than reducing too much in a single round.
Video Tutorial
If you prefer to watch the construction before starting, follow the video tutorial provided with this pattern. Seeing how the hexagons are folded and arranged can make the joining stage much easier to understand.
Video tutorial: Add your crochet hexagon cardigan video here.
Crochet Hexagon Cardigan Pattern
Final Thoughts
A crochet hexagon cardigan is a wonderful reminder that a garment does not always need complicated shaping to come together beautifully. With two matching hexagons, a familiar granny-style stitch, and a little patience during assembly, you can create a cardigan that suits your own style.
The best part is how much freedom you have with the finished design. You can keep it simple in a favorite neutral shade, experiment with colorful stripes, make the sleeves extra cozy, or add length for a more relaxed fit.
Take your time with the measurements, check the shape as you go, and do not be discouraged if the hexagons look a little unusual before they are folded. Once the pieces come together, the construction begins to make sense.
Thank you for spending some crochet time with me here at Soofha. I hope this pattern inspires you to pick up your hook, choose a yarn color you love, and make a cardigan you will be happy to wear.
Happy crocheting!

