 soofha
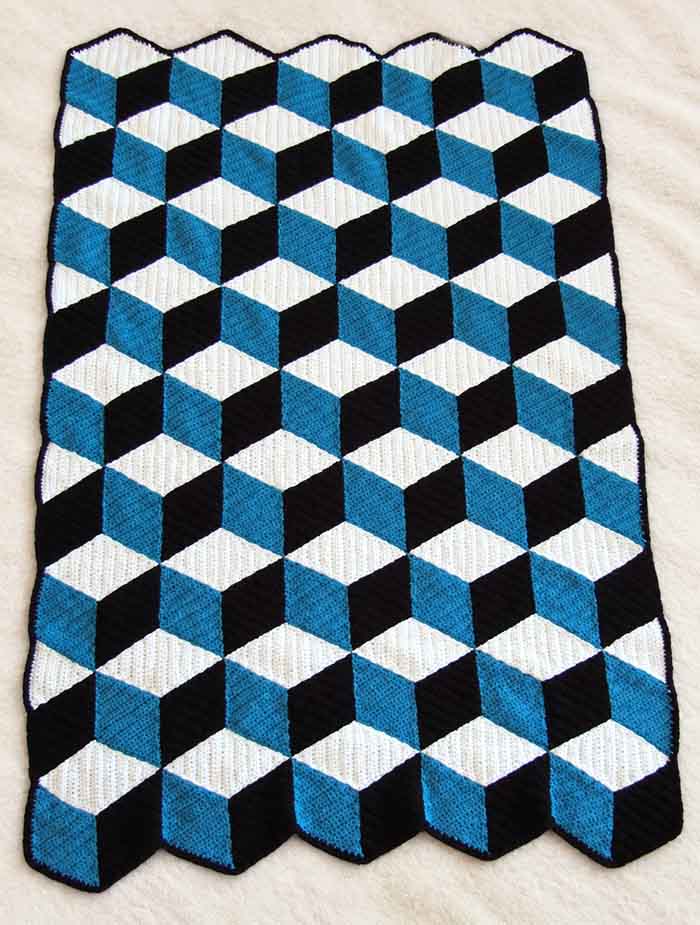
Some crochet projects are beautiful because of their colors, while others stand out because of the stitches. This 3D Illusion Blanket has both! At first glance, you might think you’re looking at a collection of little cubes stacked together, but take a closer look and you’ll see how the clever arrangement of colors creates an amazing three-dimensional effect.
What I love most about this design is how something made with simple crochet stitches can look so impressive. The finished blanket has a geometric pattern that almost seems to jump off the surface. It’s the kind of project that makes people stop and ask, “How did you make that?”
If you’re looking for a blanket that’s a little different from the usual designs, this one is definitely worth trying. It would look lovely draped over a sofa, spread across a bed, or given as a handmade gift to someone special.
And don’t let the finished look intimidate you! The pattern is rated easy, and the motifs are worked individually before being sewn together. You can take your time with each piece and watch the overall design come together as you go.
In this guide, we’ll walk through the materials, stitch abbreviations, and step-by-step instructions for making your own 3D Illusion Blanket. You’ll also find a few color combinations to inspire you if you’d like to give the design your own personal touch.
What Makes the 3D Illusion Blanket So Special?
The secret behind this blanket is the way its geometric shapes and contrasting colors work together. When the individual motifs are arranged correctly, they create the appearance of three-dimensional cubes, even though the blanket itself is completely flat.
The effect comes from the placement of light, dark, and contrasting shades. Certain sections appear to sit in front of others, giving the design its distinctive depth.
The stitches themselves are familiar crochet stitches, mainly double crochet. It’s the way the pieces are shaped, colored, and joined that creates the illusion.
This makes the blanket a great project for crocheters who want to try something visually striking without having to learn lots of complicated stitches.
Choosing Colors for Your Blanket
Color selection plays a big part in how the 3D effect turns out. You can follow the original color scheme or experiment with shades that suit your home.
Here are three combinations you might like to try:
1. Deep Ocean
Combine dark blue, emerald green, and turquoise for a rich color palette inspired by the ocean. The different shades help define the geometric shapes and give the blanket a cool, relaxing look.
2. Sunset Glow
Try orange, pink, and violet for a warmer, more colorful version. These shades create a lively combination that would look beautiful in a cozy living room or bedroom.
3. Enchanted Garden
Mix several shades of green with pink and lavender. The result is a softer, floral-inspired palette that brings a little color and charm to any space.
Of course, you don’t have to stick to these suggestions. Neutral shades, earthy colors, or different shades of the same color can also work beautifully. Just remember that contrast is important if you want the three-dimensional effect to stand out.
3D Illusion Blanket Pattern
Pattern Details
- Skill level: Easy
- Finished size: Approximately 50 × 60 inches (127 × 152.5 cm)
- Crochet terms: US terminology
- Main stitch: Double crochet
- Recommended hook: US K/10½ (6.5 mm), or the size needed to obtain the correct gauge
Materials
This pattern follows the original Yarnspirations yarn recommendations, but you can substitute other shades or suitable yarns if you prefer.
Yarn
Caron x Pantone Collaboration
- Weight: 3.5 oz (100 g) per braid
- Yardage: 127 yd (116 m) per braid
Required colors:
- Contrast A: Mushroom Greige (01002) — 6 braids
- Contrast B: Dane Gray (01003) — 7 braids
- Contrasts C, D, E, F, and G: Blueberry (01009) — 6 braids in total, as specified in the original pattern
Crochet hook: US K/10½ (6.5 mm), or the size required to obtain the correct gauge.
Gauge
11 double crochet stitches and 6 rows = 4 inches (10 cm).
It’s worth making a small gauge swatch before starting. Matching the gauge will help you achieve the intended blanket size and make the most of the available yarn.
Before You Begin
A little preparation will make this project easier to manage.
Prepare the yarn: Before using the Caron x Pantone multishade yarn braids, separate each color link and wind it into five individual balls.
Check the colors: Each color link has a Pantone number printed on its ball band, making it easier to identify the shades.
Check your gauge: The recommended gauge is important, especially because the amount of yarn available in each shade is limited.
Keep your motifs organized: Since the blanket is made from several different shapes and colors, it helps to keep the finished motifs grouped by type and shade. This will make assembly much easier later.
Abbreviations (US Crochet Terms)
The pattern uses the following abbreviations:
- Approx: Approximately
- Beg: Beginning
- Beg dec: Chain 3, skip the first double crochet, and make 1 double crochet in the next double crochet. Counts as 1 double crochet.
- Beg inc: Chain 3 and make 1 double crochet in the first double crochet. Counts as 2 double crochets.
- Ch: Chain
- Cont: Continue
- Dc: Double crochet
- Dc2tog: Double crochet 2 stitches together. Yarn over and draw up a loop in the next stitch. Yarn over and draw through 2 loops on the hook. Repeat in the next stitch, then yarn over and draw through all loops on the hook.
- Dec: Decrease
- Tog: Together
- Rem: Remaining
- Rep: Repeat
- RS: Right side
- Sl st: Slip stitch
- St(s): Stitch(es)
- WS: Wrong side
- Yoh: Yarn over hook
Step-by-Step Crochet Instructions
The blanket is made by crocheting individual motifs and joining them together to create the finished geometric design.
Follow the instructions for each motif carefully, keeping track of the colors and quantities as you work.
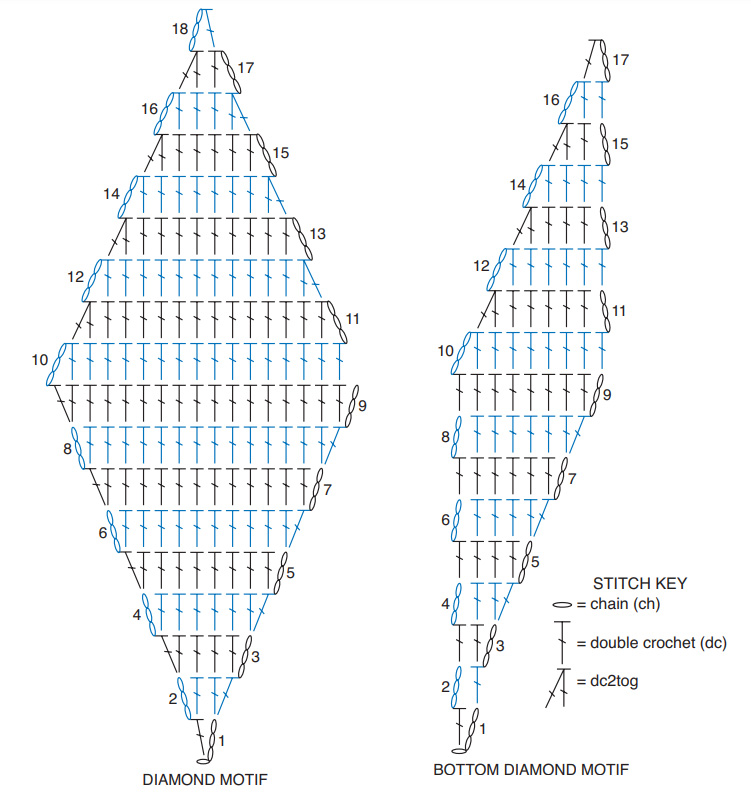
1. Diamond Motifs
Make the following motifs:
- 27 using Color A
- 27 using Color B
- 3 using Color C
- 6 using Color D
- 6 using Color E
- 6 using Color F
- 3 using Color G
Instructions
Foundation: Chain 4.
Row 1 (RS): Make 1 double crochet in the fourth chain from the hook. This counts as 2 double crochets. Make 2 more double crochets. Turn. (4 dc)
Row 2: Begin increasing. Make 2 double crochets in the next double crochet, then make 1 double crochet in each of the next 3 double crochets. Turn. (5 dc)
Row 3: Make 1 double crochet in each of the next 2 double crochets, then make 2 double crochets in the last double crochet. Turn. (6 dc)
Row 4: Make 1 double crochet in each double crochet until the last stitch. Make 2 double crochets in the last stitch. Turn. (8 dc)
Repeat Row 4 five more times, increasing by 2 stitches on each increase row as directed, until you have 18 double crochets.
Decrease Section
Next row (WS): Make 1 double crochet in each stitch until the last 2 stitches. Work the last 2 stitches together using dc2tog. Turn. (16 dc)
Repeat this decrease row six more times, leaving 4 double crochets.
Next row: Work dc2tog, then make 2 double crochets. Turn.
Next row: Make 1 double crochet. Fasten off.
Your diamond motif is complete.
2. Side Triangle Motifs
Make 3 motifs using Color C and 3 motifs using Color G, following the original color layout.
Work these motifs using the same instructions as the Diamond Motif, from the foundation chain through the increase and decrease sections.
Fasten off when each motif is complete.
3. Bottom Diamond Motifs
Make one motif in each of the following colors:
- Color C
- Color D
- Color E
- Color F
Follow the instructions below.
Increase Section
Foundation: Chain 4.
Row 1 (RS): Make 1 double crochet in the fourth chain from the hook. This counts as 2 double crochets. Turn.
Row 2: Chain 3, counting as a double crochet throughout. Make 1 double crochet in the next double crochet. Turn. (2 dc)
Row 3: Begin increasing. Make 1 double crochet in each double crochet. Turn. (3 dc)
Row 4: Chain 3. Skip the first double crochet. Make 1 double crochet in each double crochet until the last stitch, then make 2 double crochets in the last stitch. Turn. (4 dc)
Row 5: Make 1 double crochet in each double crochet across. Turn. (5 dc)
Repeat the last 2 rows twice more, increasing as directed, until you have 9 double crochets.
Decrease Section
Next row (WS): With the wrong side facing, decrease by making 1 double crochet in each stitch until the end of the row. Turn. (8 dc)
Next row: Chain 3. Make 1 double crochet in each double crochet until the last 2 stitches. Work the last 2 stitches together using dc2tog. Turn. (7 dc)
Repeat the last 2 rows twice more, following the decrease sequence.
Next row: Begin the final decrease. Make 1 double crochet in the next stitch, then make 2 double crochets as directed in the original pattern. Turn.
Next row: Work dc2tog. Fasten off.
4. Two-Color Top Triangle Motifs
Make 4 motifs.
Begin with Color B and follow the increase instructions for the Bottom Diamond Motif, working from the foundation through the final increase row.
Once the increase section is complete, switch to Color A.
Continue with the decrease instructions for the Bottom Diamond Motif, following the original shaping sequence.
Fasten off when complete.
Using two colors in the same motif helps create the contrast needed for the finished illusion.
5. Corner Motifs
Make one corner motif using Color A and one using Color G.
For each motif, follow the increase instructions for the Bottom Diamond Motif, from the foundation chain through the final increase row.
Fasten off when complete.
Important: The right side and wrong side will be reversed during assembly, so keep this in mind when arranging the corner pieces.
Assembling the Blanket
Once all your motifs are finished, it’s time to bring them together.
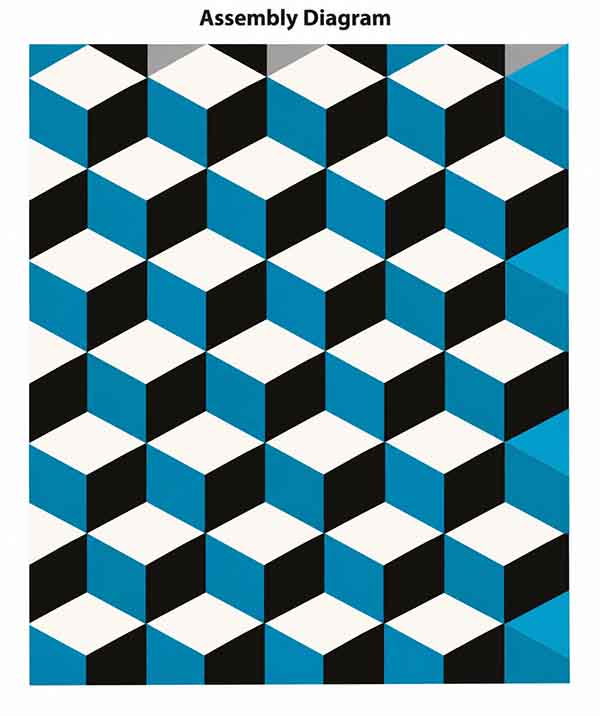
Lay the pieces out according to the original assembly diagram. Take a moment to check the placement of each color and shape before sewing anything together.
This step is especially important because the three-dimensional effect depends on how the motifs are arranged. Even a small change in placement can alter the overall appearance.
When you’re happy with the layout, sew the motifs together using a flat seam.
Try to keep the seams neat and even so the finished blanket lies flat and the geometric design remains clear.
If possible, take a photograph of your arrangement before sewing the pieces together. It can be a helpful reference if you need to move any motifs while assembling the blanket.
Adding the Border
The border gives the blanket a neat, finished edge and helps bring the entire design together.
Use Color B for the border.
Round 1
With the right side facing you, attach the yarn with a slip stitch in any corner.
Chain 1, then work single crochet stitches evenly around the entire blanket. Make 3 single crochet stitches in each corner to help the border lie flat.
Join with a slip stitch to the first single crochet.
Round 2
Chain 1.
This round is worked from left to right rather than in the usual direction.
Work 1 reverse single crochet in each single crochet around the blanket.
Join with a slip stitch to the first stitch.
Fasten off and weave in any remaining yarn ends.
Your 3D Illusion Blanket is now ready to use or give as a handmade gift!
ILLUSION BLANKET PDF
Printable Pattern and Diagram
If you’d like to keep the instructions beside you while crocheting, look for the original Yarnspirations PDF version of the pattern. A printed copy can make it easier to follow the different motifs and keep track of your progress.
The assembly diagram is particularly helpful for understanding how the individual shapes fit together. Be sure to refer to it when arranging your motifs.
Video Tutorial
Sometimes it’s easier to understand a crochet technique when you can watch someone demonstrate it.
For that reason, a video tutorial can be a useful companion to the written instructions, especially when you’re working on the increase and decrease sections or joining the motifs.
The original article recommends a video from Marifu6a’s YouTube channel. You can look for the relevant tutorial on the channel and follow along as you work through the pattern.
Combining a written pattern with a visual demonstration can help you understand the construction and see how the finished design comes together.
Final Thoughts
The 3D Illusion Blanket is one of those crochet projects that makes you appreciate just how much can be done with yarn and a little creativity. The individual pieces may look simple on their own, but once they’re arranged together, they create a design that seems to have depth and movement.
I especially love how much the color choices can change the finished look. You can follow the original palette for a classic geometric effect or experiment with your own favorite shades to make something that feels more personal.
If you’re planning to make this blanket, take your time with the motifs and pay attention to their placement during assembly. That’s where the magic of the design really comes together.
And remember, handmade projects don’t have to be rushed. Enjoy the process, one stitch at a time, and give yourself the chance to see your hard work turn into something special.
Have you tried a crochet blanket with a 3D effect before? I’d love to hear what colors you’d choose for this design!
If you know someone who enjoys crocheting, feel free to share this pattern with them. It might be just the inspiration they need for their next project.
Happy crocheting, and thanks for stopping by Soofha! 🧶💕

