

 soofha
There’s something special about making your own Christmas decorations. A little yarn, a bit of creativity, and suddenly you have something that feels much more personal than anything bought from a store.
Today at Soofha, we’re making a sweet Crochet Christmas Tree Decoration that’s surprisingly simple to put together. At first glance, it looks like a little three-dimensional crocheted tree, but the construction is actually much easier than you might expect.
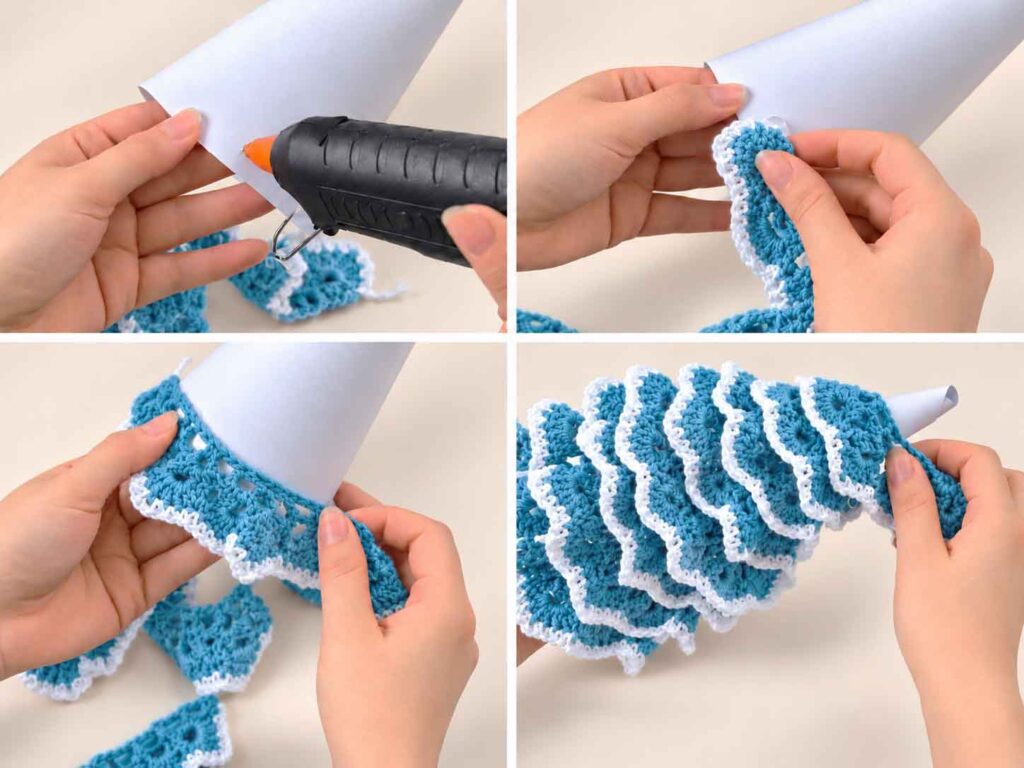
Instead of crocheting a stuffed Christmas tree or shaping a complicated cone, you’ll crochet one long strip with pretty scalloped shells. The strip is then wrapped around a simple paper cone, creating layers that look just like soft, full tree branches.
It’s a clever little technique, and once you get the first few rounds in place, the assembly comes together quite quickly.
Why You’ll Love This Crochet Christmas Tree
The crochet itself is beginner-friendly. The main strip uses a simple repeating shell pattern, so after you work through the first few repeats, you’ll find yourself settling into a comfortable rhythm.
The paper cone takes care of the shaping, which means you don’t have to worry about increasing and decreasing to create a three-dimensional tree.
And there’s plenty of room to make the design your own.
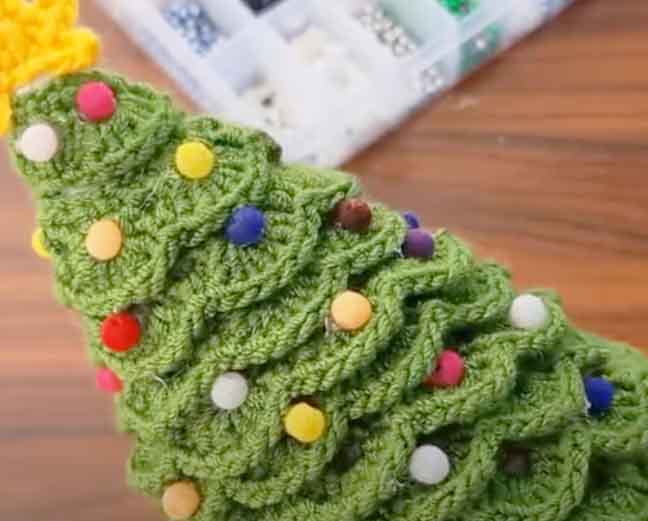
A traditional green tree with a golden star would look beautiful on a Christmas mantel, but you certainly don’t have to stop there. Try sage green, cream, white, blush pink, dusty blue, or even several shades of green. You could also add tiny beads, bows, bells, pom-poms, or sequins between the layers.
If you have small amounts of leftover yarn from other projects, this is a great project for using them up. The tree doesn’t require much yarn, and even the star can be made from a tiny leftover ball.
The finished tree is small enough for a shelf, desk, dining table, mantel, or Christmas centerpiece. Make one for a simple seasonal accent, or make several in different colors and sizes for a whole little collection.
Finished Size
The instructions below make a small tabletop tree approximately 8–9 cm tall, depending on your yarn, tension, and how tightly you form the paper cone.
The crochet strip should measure approximately 55–60 cm long when laid flat without stretching.
Because crochet tension varies from person to person, don’t worry if your measurements are slightly different. The important thing is that the strip wraps comfortably around your cone.
Materials
- Green worsted weight yarn
- Small amount of yellow, gold, cream, or white yarn for the star
- 3.5 mm crochet hook
- Scissors
- Yarn needle
- Stitch marker, optional
- Craft glue or hot glue
- Medium-weight cardstock or firm craft paper
- Pencil
- Ruler
- Compass or round object for tracing
- Optional beads, bows, pom-poms, sequins, bells, or miniature ornaments
Crochet Abbreviations
This pattern uses US crochet terminology.
- ch – chain
- sc – single crochet
- hdc – half double crochet
- dc – double crochet
- sl st – slip stitch
- MR – magic ring
- st/sts – stitch/stitches
- FO – fasten off
A Note Before You Begin
The crochet tree itself isn’t stuffed.
The shape comes from a handmade paper cone, with the crocheted strip wrapped around it in a spiral. The scalloped shell edge hangs over each layer, creating the look of overlapping branches.
For the best result, take your time when positioning the first layer. Once that first spiral is attached, the rest of the tree will naturally follow the same angle.
Crochet Christmas Tree Decoration
Part 1: Make the Paper Cone
Start by making the simple cone that will form the inside of the tree.
Using your ruler and pencil, draw a semicircle approximately 18 cm across the straight edge. The radius will be about 9 cm.
Cut out the semicircle.
Bring the two straight edges toward each other until they overlap slightly. Adjust the overlap until you have a cone that stands upright and has a shape you like.
Once you’re happy with it, secure the overlapping edges with craft glue.
Let the glue dry completely before moving on to the crochet.
Beginner Tip
Try not to make the cone too narrow. The bottom should be wide enough for the crochet shells to spread naturally. A slightly wider base will also give your finished tree a more traditional Christmas-tree shape.
Set the cone aside while you crochet the strip.
Part 2: Crochet the Tree Strip
Using your green yarn, begin with the foundation chain.
Foundation Chain
Ch 116.
Lay the chain flat without stretching it. It should measure approximately 55–60 cm.
If your chain is noticeably shorter, add chains in multiples of 6. If it’s considerably longer, remove chains in multiples of 6.
The stitch pattern follows this basic formula:
6 × number of shells + 2 chains
With 116 chains, you’ll have approximately 19 shell repeats.
Scalloped Branch Row
Starting in the second chain from the hook:
Sc 1.
Then repeat the following sequence across the chain:
Skip 2 chains, 7 dc in the next chain, skip 2 chains, sc in the next chain.
Continue this repeat until you reach the end of the foundation chain.
You should end up with approximately 19 large scalloped shells.
Fasten off and leave a small yarn tail.
Weave in the ends.
What Your Crochet Strip Should Look Like
Lay the strip flat and take a look at the two edges.
One edge should be fairly straight. This is the foundation-chain edge, and it will be the edge attached to the paper cone.
The other edge should have large, rounded shell shapes.
Those shells will become the tree’s soft, layered branches.
When the tree is assembled, the scalloped edge should hang downward rather than being pulled tight against the cone.
Part 3: Test the Strip Around the Cone
Before reaching for the glue, do a test assembly.
Place the paper cone upright and start wrapping the crochet strip around the bottom.
Keep the scalloped shell edge facing downward.
As you work your way around the cone, gradually move the strip upward so that each new layer overlaps the one below it.
Continue wrapping toward the tip.
Don’t glue anything yet.
This little test is worth doing because it lets you see whether the strip is long enough and whether you like the spacing of the layers.
If Your Strip Is Too Short
You can crochet another small section using the same shell repeat and discreetly join it to the main strip. Try to place the join toward the back of the tree where it will be less noticeable.
If Your Strip Is Too Long
Simply overlap the layers a little more. You can also leave the final shell unused and hide the extra section toward the back of the tree.
Part 4: Attach the Crochet to the Cone
Once you’re happy with the arrangement, carefully remove the strip.
Start again at the bottom of the cone.
Apply a small amount of glue along the straight foundation edge of the crochet strip.
Try not to put glue on the scalloped shells. Keeping the shells free will help them retain their soft, dimensional appearance.
Press the first section against the bottom of the cone.
Continue wrapping the strip around the cone, adding small amounts of glue every few centimeters.
Keep the spiral as even as possible.
As you move upward, each row of shells should overlap the attachment line of the previous layer. This is what hides the paper underneath and gives the tree its full, layered appearance.
Creating the Tree Shape
As you work toward the top:
- Keep the lower layers a little wider.
- Let the middle layers overlap naturally.
- Bring the final section closer together near the tip.
- Avoid pulling the crochet strip too tightly.
- Let the shells remain loose and slightly raised.
When you reach the top, secure the final section with a little glue.
If any paper is visible at the tip, trim away the excess carefully.
Part 5: Make the Crochet Star
Now for the finishing touch — a little five-point star for the top of the tree.
Use yellow, gold, cream, white, or any other color that works with your Christmas decorations.
Round 1
Make a magic ring.
Work 10 sc into the ring.
Pull the ring closed.
Join with a sl st to the first sc.
10 sts
Create the Five Star Points
Each point uses two stitches from the center circle.
Repeat the following sequence 5 times:
- Sl st in the next stitch.
- Ch 5.
- Starting in the second chain from the hook:
- Sl st in the next chain.
- Sc in the next chain.
- Hdc in the next chain.
- Dc in the final chain.
- Sl st in the next stitch of the center circle.
That’s one star point.
Continue around until you have five points.
After completing the fifth point, slip stitch back to the beginning.
Fasten off, leaving a longer tail if you’d like to sew the star onto the tree.
Shape the Star
Gently pull the five points outward with your fingers.
The combination of slip stitches, single crochet, half double crochet, and double crochet naturally creates the pointed shape.
If your star looks a little uneven, you can lightly block it before attaching it.
Attach the Star
Place the star over the top of the cone.
There are two easy ways to attach it.
Option 1: Glue
Put a tiny amount of craft glue behind the center of the star.
Press it gently against the top of the tree until it stays in place.
Option 2: Sew
If you have enough crochet fabric near the top of the tree, use the yarn tail to make a few small stitches through the upper shell layer.
Sewing usually gives the star a particularly neat handmade finish.
Optional: Add a Tree Trunk
A little trunk isn’t necessary, but it can be a cute finishing detail if you’d like your tree to have one.
Cut a piece of brown cardstock approximately:
2.5 cm × 5 cm
Roll it tightly into a small tube and glue the edge.
Insert approximately 1–1.5 cm of the tube into the opening at the bottom of the paper cone.
Secure it with glue.
For a more coordinated look, you can also wrap the paper tube with brown yarn before inserting it.
Decorating Your Crochet Christmas Tree
This is where you can really have fun with the project.
The tree looks lovely on its own, but a few tiny decorations can make it feel even more festive.
Try adding:
- Tiny beads
- Mini bows
- Small pom-poms
- Pearls
- Sequins
- Metallic thread
- Miniature bells
- Tiny crochet circles
- Small buttons
When attaching decorations, try placing them toward the outside edges of the shells so they’re easy to see.
And don’t worry about making everything perfectly symmetrical. In fact, slightly uneven ornament placement can make a handmade Christmas tree look more natural and charming.
Optional Snowy Christmas Tree
For a snowy version, keep the main tree green and add small touches of white along the shell edges.
Attach white yarn near the top of a shell and work a few loose slip stitches or single crochets along part of the curved edge.
Leave some sections untouched before moving to another shell.
The uneven white edging will look more like little patches of snow rather than a solid white border.
Optional Two-Tone Tree
Another pretty idea is to combine two shades of green.
You could crochet half of the strip in a dark forest green and the other half in a lighter shade.
Another option is to make two separate strips and alternate them as you wrap them around the cone.
Forest green with sage green would create a soft, understated look, while emerald and lighter green would give the tree a brighter Christmas feel.
Final Finishing
Once everything has been attached, place your tree on a flat surface and take a moment to adjust the layers.
Gently separate the crochet shells with your fingers.
Pull the bottom shells slightly outward while allowing the upper layers to sit closer to the cone.
Look around the tree and check that there aren’t any large sections of paper showing between the crochet layers.
Remove any dried strands of glue.
Straighten the star and make any final adjustments to the decorations.
And that’s it — your little Crochet Christmas Tree Decoration is ready for the holidays!
Beginner Tip for a Better Finish
The crochet itself is probably the easiest part of this project. The assembly is where taking your time really pays off.
Before gluing the strip permanently, always wrap it around the cone once and check the spacing.
Pay particular attention to the first layer. If that first spiral sits crooked, the layers above it will follow the same angle. Starting with a straight, even bottom edge makes a surprisingly big difference to the finished tree.
There’s no need to rush the gluing process. Work slowly, use only small amounts of glue, and adjust each layer as you go.
Video Tutorial
If you’d prefer to see the construction and assembly before starting, follow along with the video tutorial for this project.
Seeing how the crochet strip wraps around the cone can make the process much easier, especially if this is your first time making a crochet decoration using a paper base.
Final Thoughts
I love projects like this because they don’t require a huge amount of yarn or complicated shaping, yet the finished piece looks much more detailed than the work involved.
You can make the tree traditional with green yarn and a golden star, or use whatever colors you already have in your stash. Add a few beads, some tiny bows, or a little sparkle, and you’ve got a decoration that’s completely your own.
These little trees would also make lovely handmade gifts. Make several in coordinating colors and place them together as a small Christmas display, or create individual ones to decorate a desk, shelf, mantel, or holiday table.
Most importantly, have fun with it. Handmade decorations don’t have to be perfect. The little differences in color, shell placement, and decoration are what make them feel special.
We hope you enjoy making this Crochet Christmas Tree Decoration Pattern and adding your own creative touch to it.
Thanks so much for visiting Soofha. Be sure to have a look around the blog for more crochet patterns, seasonal projects, and handmade ideas to enjoy throughout the year.

